Posted: January 31st, 2016 | Author: sabre1041 | Filed under: Technology | 1 Comment »
In a previous post, Clustering Jenkins on OpenShift, we introduced how to run the Jenkins Continuous Integration server connected to a collection of slave instances that are used to run Jenkins jobs, all within OpenShift. The slave instances were configured as a pool of running Docker containers that are automatically discovered by the Jenkins master through the use of the Jenkins Swarm plugin. This pool could be scaled up or down as necessary and provides the ability to handle the most robust workload that is only capped by the resource limitations of the cloud infrastructure. While this approach gives administrators the flexibility to define the state of their infrastructure, it can result in wasted resources as slaves become idle waiting to take on incoming job requests. An alternative approach is for the Jenkins master to dynamically provision slave instances as necessary within the OpenShift environment. This process is facilitated by the Jenkins Kubernetes plugin and in a few short steps, Jenkins can be configured to run jobs using dynamically provisioned slaves or complement a set of existing statically defined slaves using the Swarm plugin as described earlier.
Prior to creating any resources within OpenShift, let’s discuss the components involved in being able to dynamically provision Jenkins slave instances.
Note: I will forego a discussion on the topics of Jenkins masters and slaves. I suggest reading the previous entry which provided an overview of these concepts.
When using the Jenkins swarm plugin as in the previous post, slave instances were provisioned by OpenShift in a predetermined manner similar to any other application deployment. The number of slave instances can be governed by project members or cluster administrators . These instances are configured with the parameters necessary to communicate with the Jenkins master, which in turned allowed them to register themselves to take on workload. The registration and discovery of the slaves does provide a substantial benefit to Jenkins administrators as they no longer needed to manually configure the slave instances within Jenkins. However, when working with the Kubernetes plugin, the responsibility to provision new slave instances belongs to the Jenkins master and is based on the current workload of the master. When the Jenkins master determines that there is a need for additional resources to perform jobs, it will utilize a preconfigured Docker image to perform the job. The plugin communicates with the Kubernetes (OpenShift) API to create a new container/pod. Using the parameters automatically specified by the plugin to start the container, the slave has all of the information that it needs to communicate back with the master to complete the registration and to perform the job. Once the job completes, the slave is then destroyed.
Posted: January 3rd, 2016 | Author: sabre1041 | Filed under: Technology | 4 Comments »
Note: OpenShift version 3.4 now provides support for executing dynamic slaves within the platform. More information can be found here
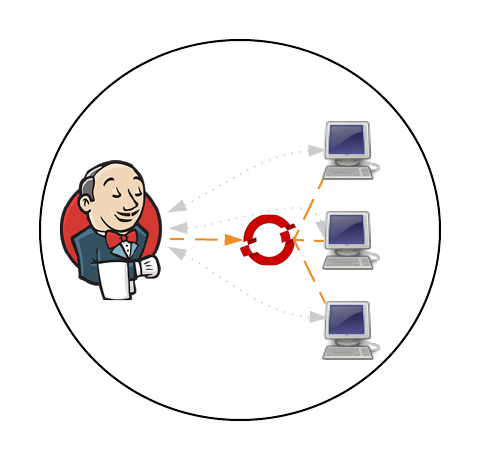
A Continuous Integration server can act as a focal point for managing the builds and deployments of applications. As organizations adopt many of the principles of Continuous Integration and Continuous Delivery, the stability of a continuous integration server, such as Jenkins, becomes magnified. The majority of the components within Jenkins that most users are familiar with, such as the user interface and job configuration and execution, occurs on the Jenkins master. However, the execution of these jobs can be delegated to external agents, called slaves, to offload processing from the master. The utilization of slave agents is a natural progression many organizations move towards as they expand their Jenkins usage. Slaves are nothing more than instances that run a small Java program that communicates with the master to perform job execution. There are several strategies for configuring and managing slaves. The default implementation is to configure a slave on the master and have the master manage the lifecycle of the slave. While this process works and is the most straightforward, the time that it takes to configure and provision slaves is time consuming as there are a number of manual steps that needs to occur on both the master and the slave instances. Another strategy is for slaves to advertise and register themselves to the master. This is accomplished using the Jenkins Swarm plugin and is even more beneficial when working in a cloud environment, such as OpenShift, as slave instances can be dynamically allocated and scaled as necessary. Let’s walkthrough how jobs in Jenkins can be executed using a cluster of slave instances all running in OpenShift.
First, let’s review the architecture of this implementation. Since OpenShift runs Docker containers, both the master and slave instances will each be running as Docker containers within OpenShift. There is no requirement that both the slave and master components needs to be running in OpenShift. But for simplicity, this is the architecture that will be described. Many organizations leveraging OpenShift as their Platform as a Service still utilize an existing Jenkins instance outside of OpenShift and I will cover how you can extend this demonstration to handle that use case. The project can be found on GitHub and contains the resources for adding the Jenkins master and slave components to an OpenShift environment.
https://github.com/sabre1041/ose-jenkins-cluster
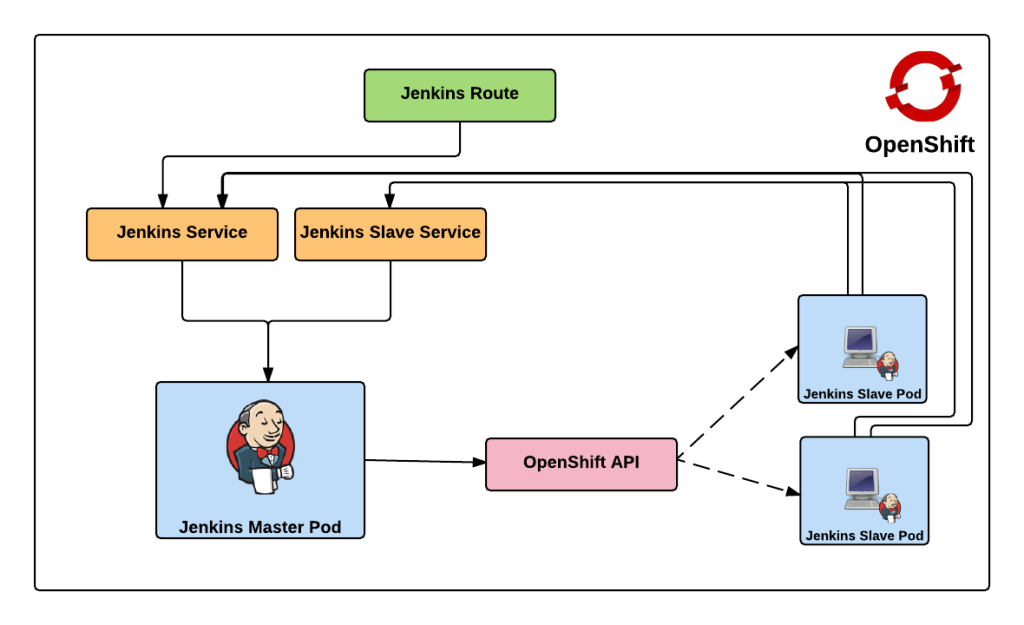
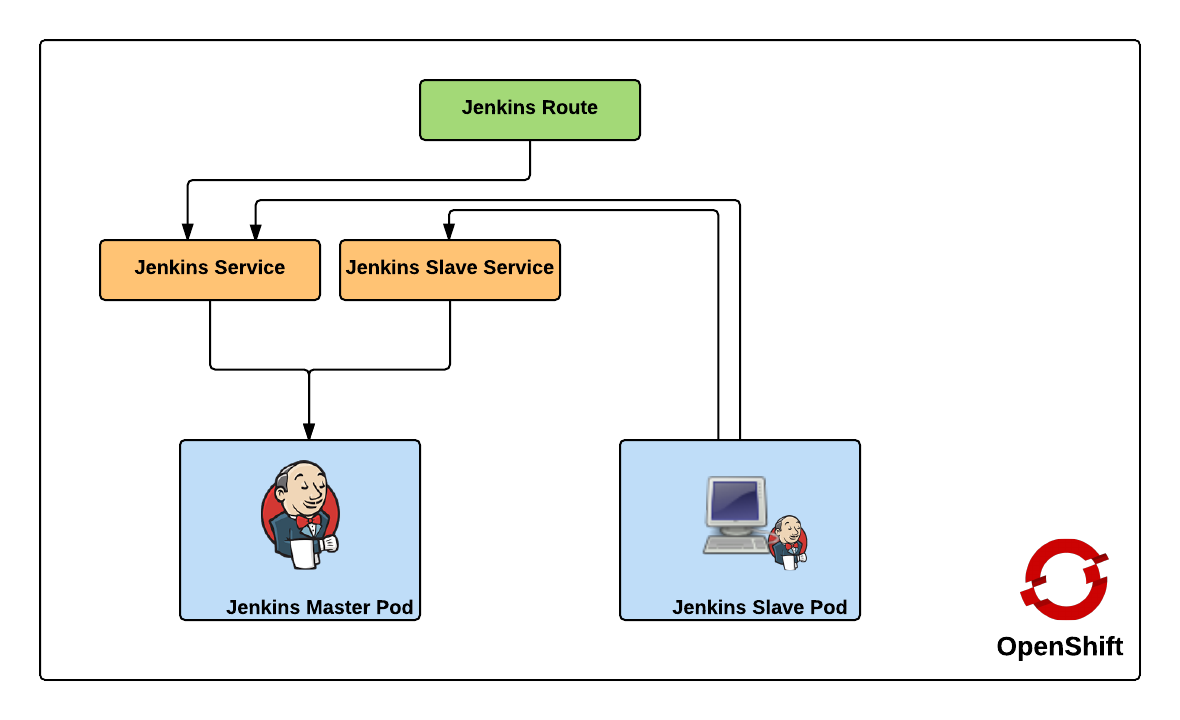
Red Hat provides a supported Jenkins Docker image that can be used within OpenShift, and that is what we will use as the base for the image representing the Jenkins master. The only modifications that will need to be added to the master is the inclusion of the Swarm plugin. The docker image containing the slave is a Red Hat Enterprise Linux image with the addition of Swarm client. Additional build tools, such as Maven, can be added to extend the functionality of the slave, but was omitted from this demonstration. Feel free to fork and extend and/or modify to suit your specific use case. The benefit of the swarm plugin is that slaves can come and go without any manual configuration on the master. By default, the master discovers slaves with Jenkins Swarm plugin using UDP broadcast. However, in our case, slaves connect directly to the master. The Jenkins master listens for incoming slave connections on port 50000. Within OpenShift, containers can communicate with each other using Kubernetes Services. A Kubernetes service is an network abstraction over a group or pods, or containers deployed on the same host. Two services have been defined in this implementation:
- jenkins – Load balances requests to the Jenkins master for the Jenkins UI on port 8080
- jenkins-slave – Load balances requests to the Jenkins master for agent communication on port 50000
Both of these services enable the slaves to communicate with the master. Kubernetes services expose environment variables that can be consumed by pods.The slave docker image uses a wrapper script to start up the java process containing the slave agent where these environment variables are referenced along with additional parameters such as the user name and password that will be used to connect to the master as well as the number of build executors. We will see how we can configure and manage these properties later on. Also included in the repository are two OpenShift templates that allow for the cluster to be instantiated with ease. The difference between the two templates is that one provides support for persistent storage. More information on persistent storage can be found in the OpenShift documentation. The following diagram depicts architecture created by the template.
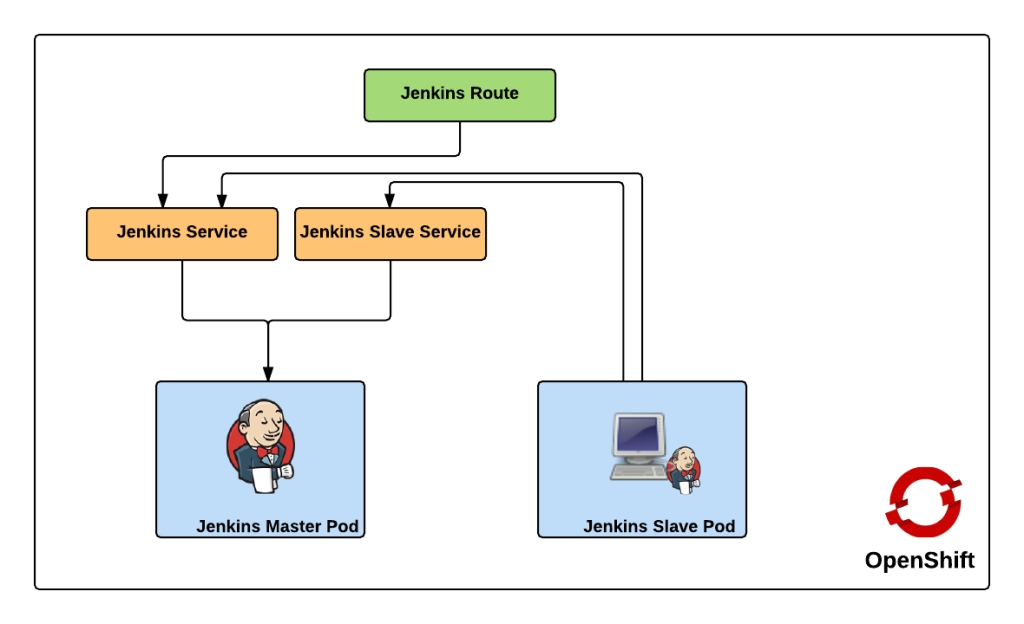
The Jenkins route is used to handle requests from outside the OpenShift environment, such as a typical user accessing the Jenkins user interface which is then passed down to the service and then ultimately into the master pod. Now that we have an understanding of the architecture created by the template, lets discuss how to create and run the Jenkins cluster within OpenShift. To get started, first clone the repository to your local machine
git clone https://github.com/sabre1041/ose-jenkins-cluster
If an OpenShift project is not already created, create a new project for Jenkins
oc new-project jenkins
Enter the directory containing the Git repository cloned previously and add the templates to the project
oc create -f jenkins-cluster-persistent-template.json,jenkins-cluster-ephemeral-template.json
Both templates should now be available in the project. Let’s instantiate the jenkins-cluster-ephemeral template (Note: This template does not use persistent storage for the master. All settings and configurations will be lost once the pod dies)
oc new-app --template=jenkins-cluster-ephemeral
New builds of both the Jenkins master and slave images will be started. You can track the progress by executing the following command:
oc get builds
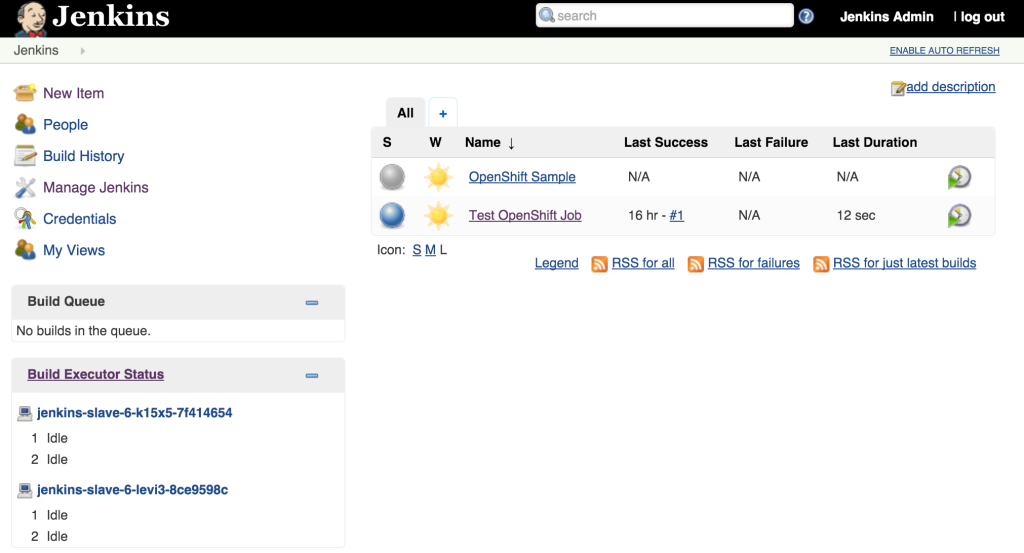
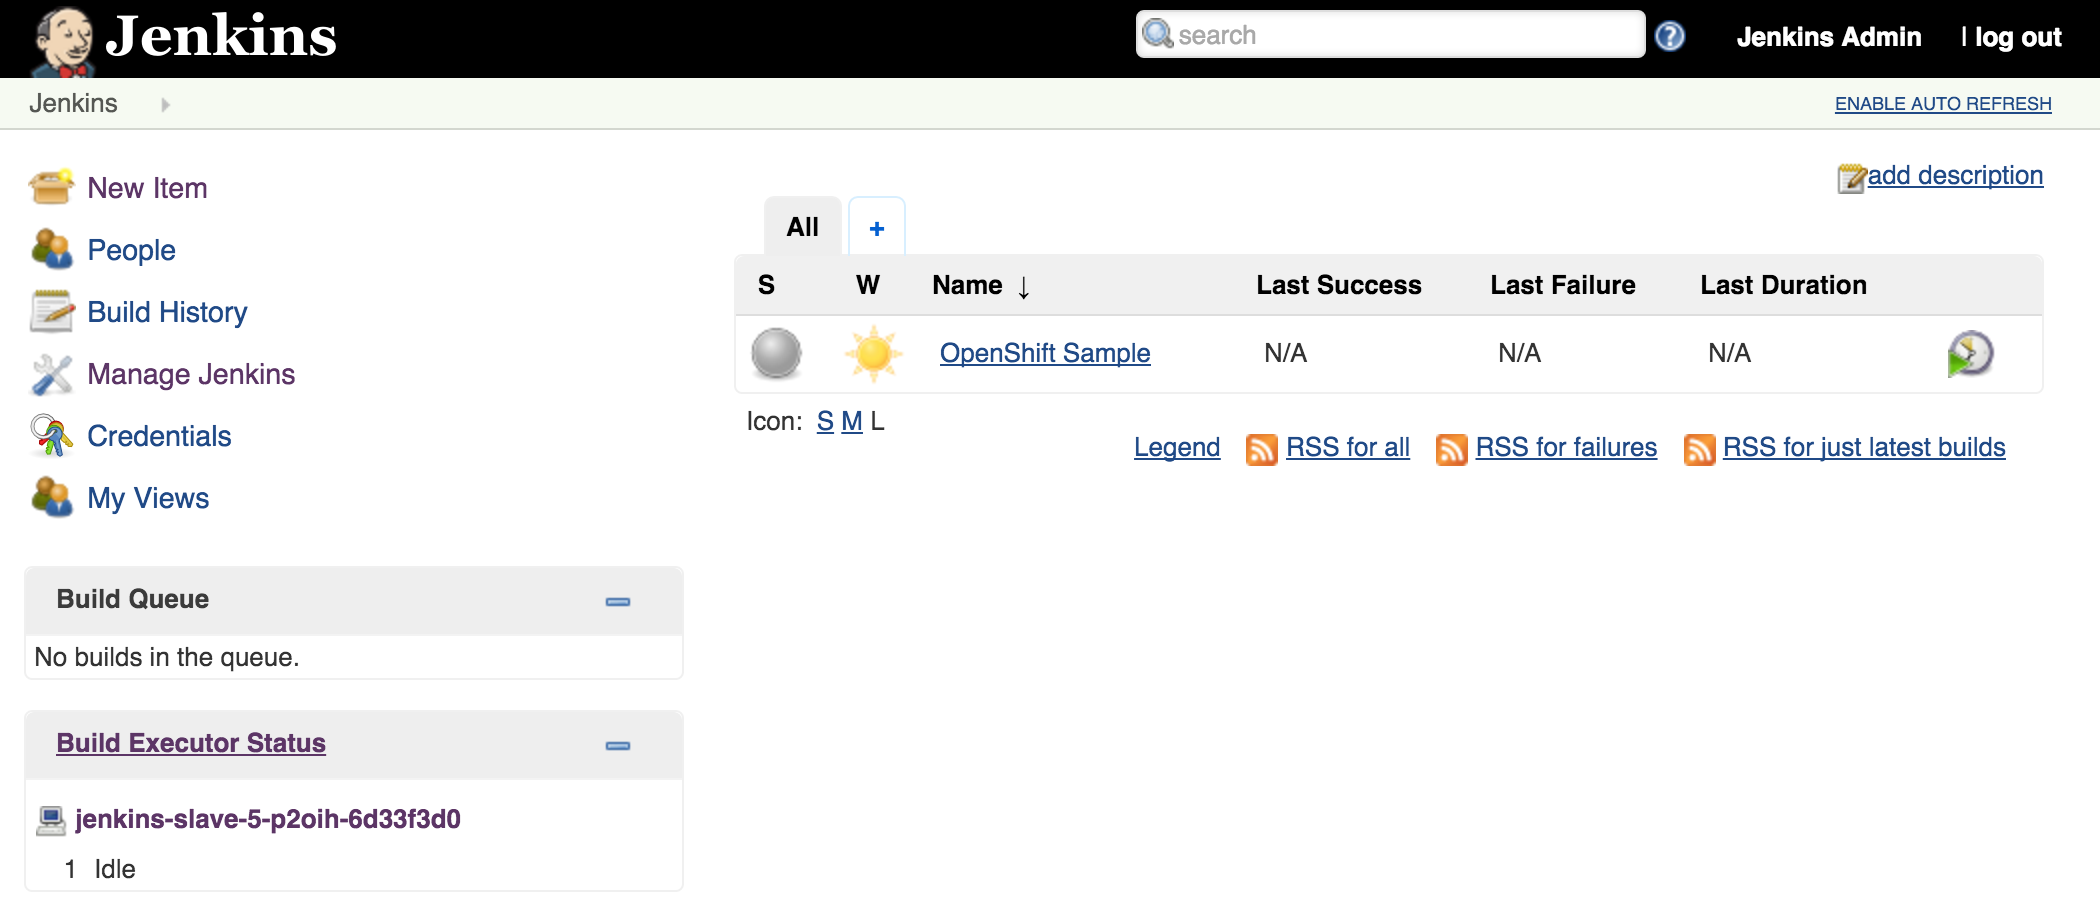
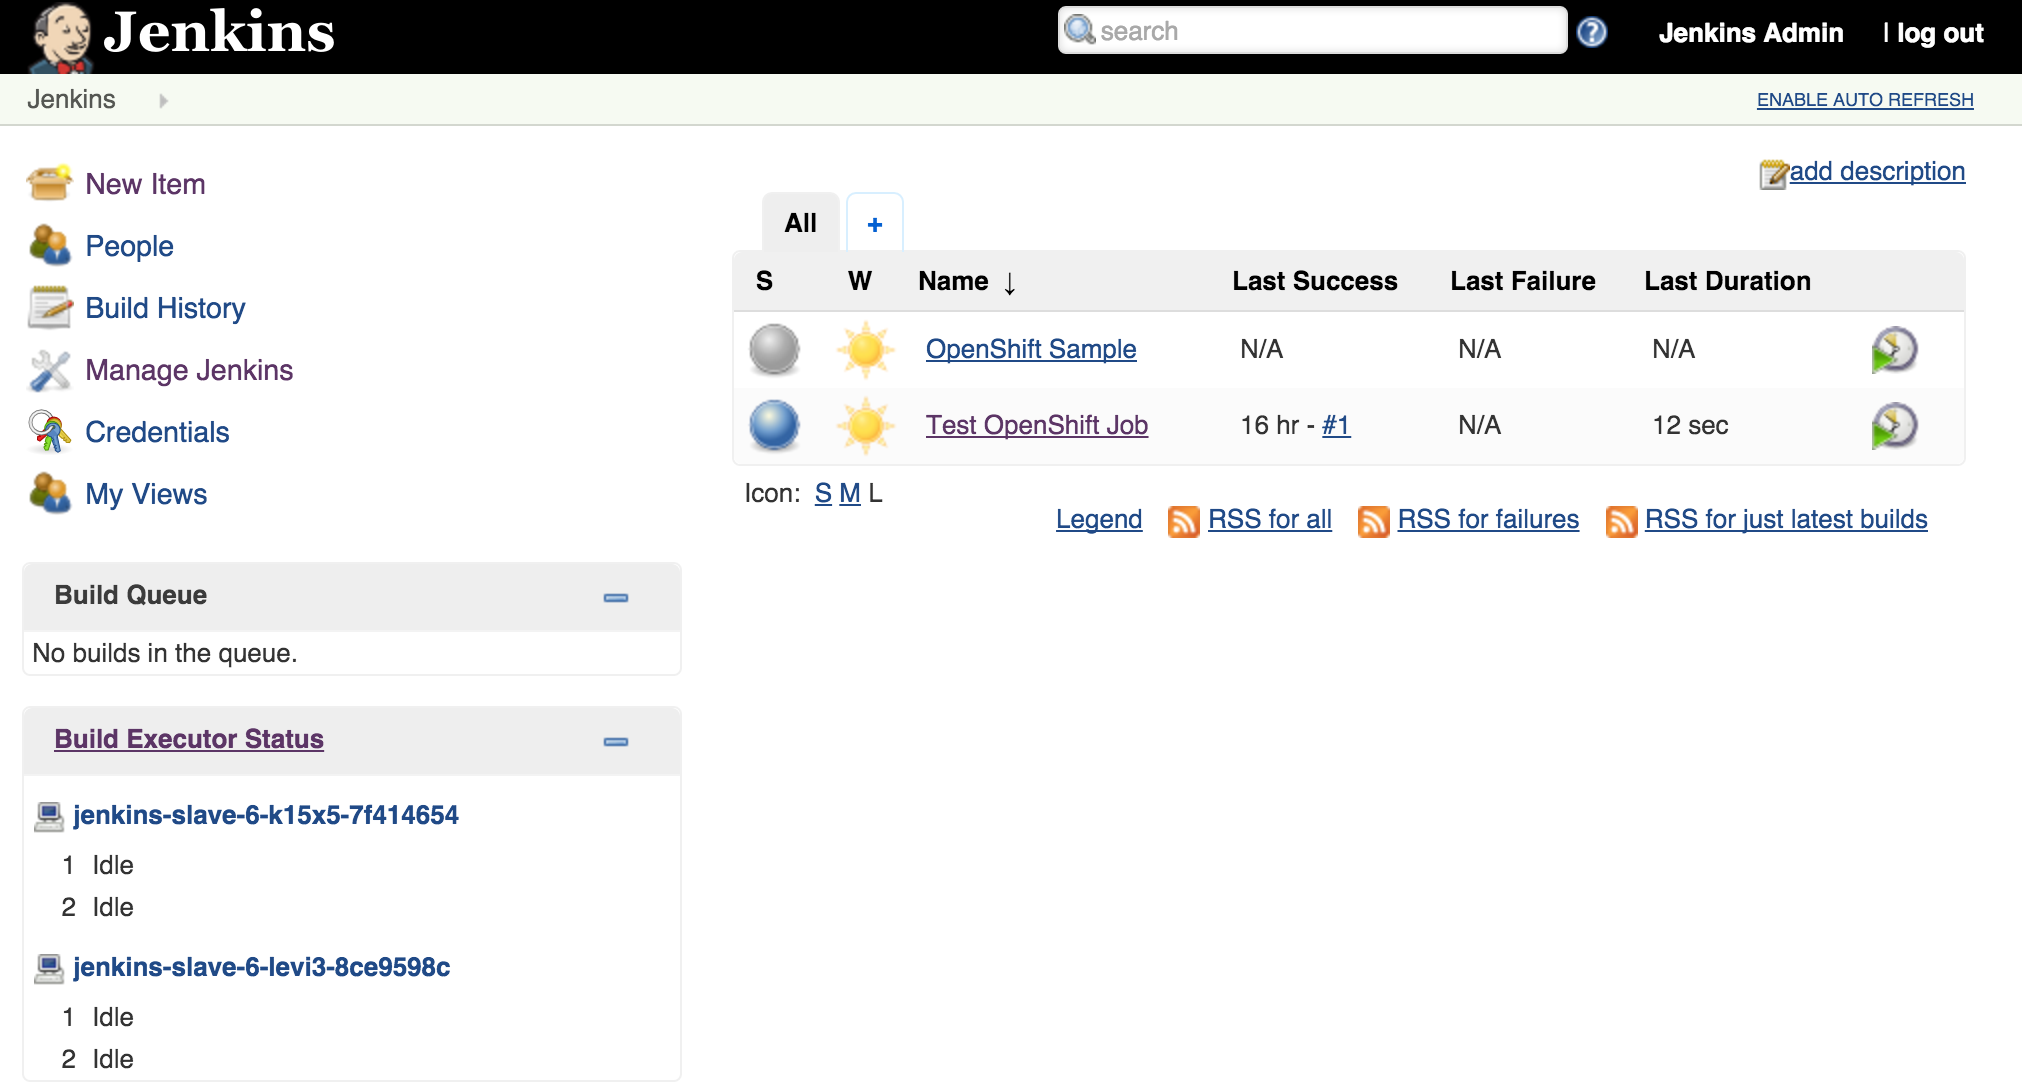
Once the builds complete successfully, the new docker images will be pushed to the integrated registry and new containers will be launched. The Jenkins user interface can then be accessed at http://jenkins.<project>.<default-domain-suffix>. The default username and password is admin:password. Once authenticated, you are presented with the Jenkins main user interface containing a list of jobs. The default Jenkins image from Red Hat contains a sample job called “OpenShift Sample”. While we will not be utilizing this job, feel free to explore how it can be used in conjunction with OpenShift to create a continuous integration and continuous delivery process. On the left side of the page, you will see a list of build executors. This section is where Jenkins slaves will be listed. Since the template configured the build of a docker image and ultimately deployed a container, you should see one slave agent that has automatically connected to the Jenkins master using the Swarm plugin.

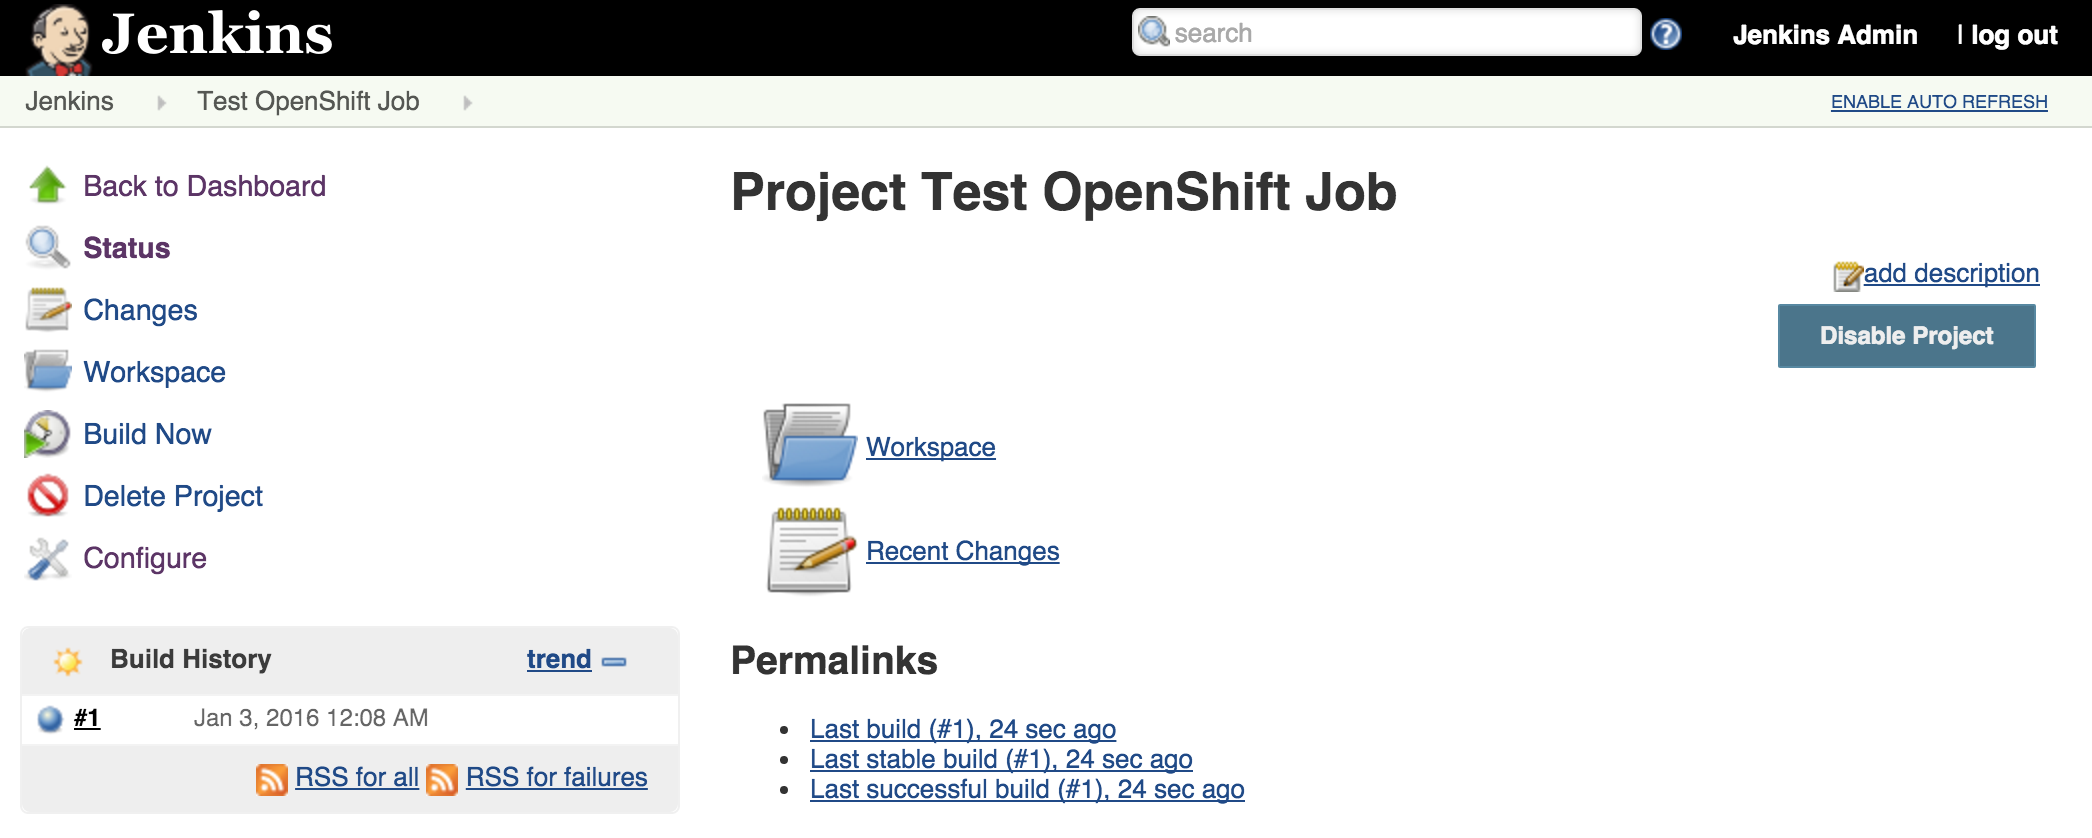
Since there is an available executor to run jobs as it is currently idle, lets create a very simple Jenkins job to validate the setup. On the left side of the page, select New Item Enter a name for the job, such as Test OpenShift Job, select Freestyle Project and then click OK to create the job. A freestyle project will then be created and then take you to the configuration page. Configure a somewhat trivial implementation that will pause for 10 seconds that will allow for the job to be validated running on the slave and then print “hello world” to the console. Still on the job configuration page, click Add Build Step and then Execute Shell. Enter the following into the textbox
sleep 10
echo "Hello World"
Click Save to apply the job configuration Run the job by hitting Build Now on the lefthand side. A new build will be scheduled on the slave and once complete, it will be available in the build history dialog

View the result of the first job execution by clicking #1 under the build history. On the top right corner, the location of where the build occurred should be visible.

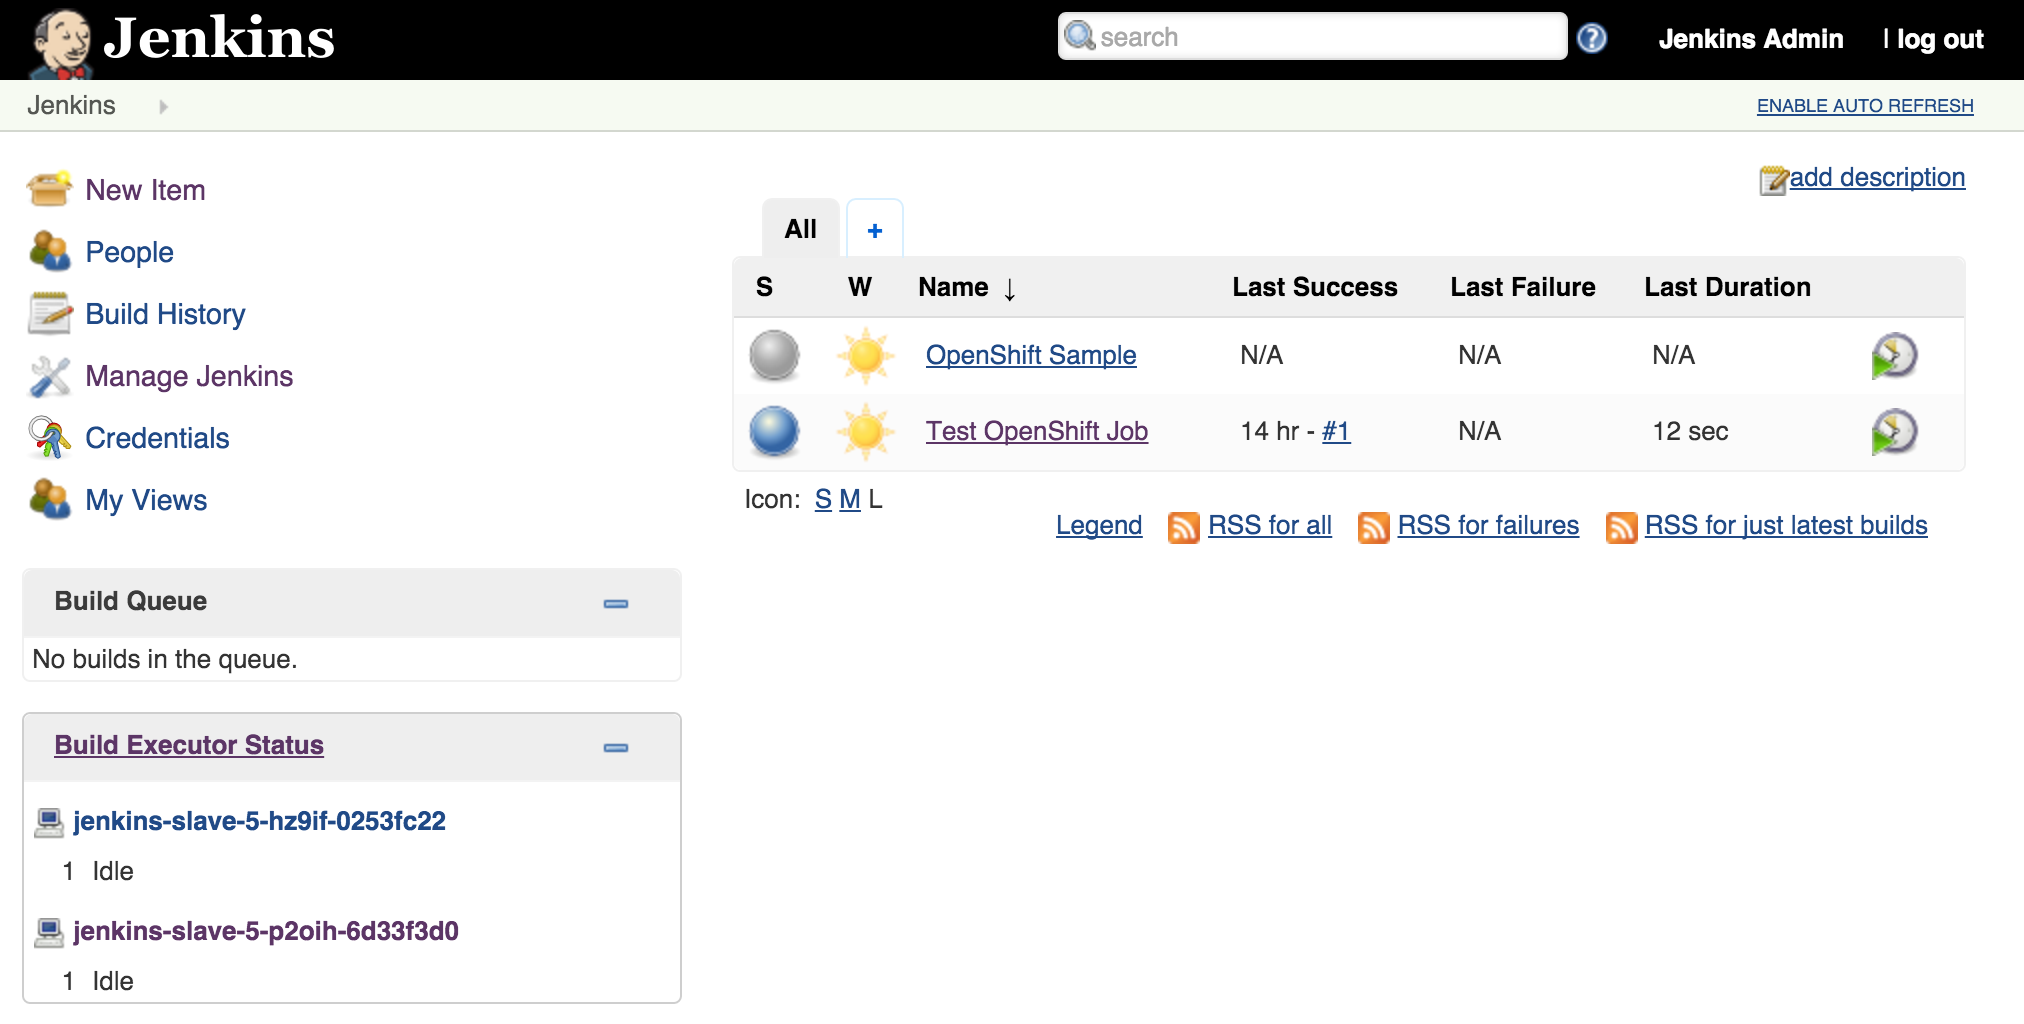
With the job running successfully on the slave, lets discuss how OpenShift will be able to help handle increased load on the slaves in the future. One of the benefits of running within OpenShift is the ability to scale with ease by increasing the number of slave instances that are deployed into the cluster. To scale up the number of slaves, increase the number of replicas on the deploymentConfig.
oc scale dc jenkins-slave --replicas=2
As we saw earlier, new slave instances will automatically discover and register themselves to the master. With a second slave instance created, refreshing the Jenkins user interface should not show both slaves registered:

Increasing the number of slave instances is one way to manage job load from the master. Alternatively, instead of adding additional slave instances, the number of executors within each slave can be manipulated. This will allow for multiple jobs to be run concurrently on each slave. The number of executors that a slave allocates is specified in the wrapper script by reading the value of the EXECUTORS environment variable which is defined in the OpenShift Deployment Configuration. By default, this value is specified to be one. To increase the number of executors for each slave, execute the following command:
oc env dc/jenkins-slave EXECUTORS=2
This will cause a redeployment of the Jenkins slaves as the Deployment Configuration was changed. Refresh the Jenkins user interface to show two executors are now available under each slave.
The ability to manipulate either the number of slaves instances and the number of executors within each slave allows for greater control managing job resources within a Jenkins environment. The combination of the Jenkins Swarm plugin running in an OpenShift environment provides the stability and reliability for a robust continuous integration environment.

Recent Comments