Enabling the OpenShift Cluster Console in Minishift
Posted: October 23rd, 2018 | Author: sabre1041 | Filed under: Technology | 2 Comments »![]() Through the continued evolution of the platform, OpenShift has shifted the focus from the installation and initial deployment of infrastructure and applications to understanding how the platform and their applications are performing, better known as day two operations. As a result of the incorporation of the CoreOS team and their existing ecosystem of tools into the OpenShift portfolio, the release of OpenShift Container Platform 3.11 includes a new administrator focused web console (cluster console) which provides insights into the management of nodes, role base access controls, and the underlying cloud infrastructure objects. While this new console is automatically enabled in the deployment of the OpenShift Container Platform, the console is not enabled in Minishift/Container Development Kit (CDK), the local containerized version of OpenShift. This post will describe the steps necessary for enabling the deployment of the cluster console in Minishift.
Through the continued evolution of the platform, OpenShift has shifted the focus from the installation and initial deployment of infrastructure and applications to understanding how the platform and their applications are performing, better known as day two operations. As a result of the incorporation of the CoreOS team and their existing ecosystem of tools into the OpenShift portfolio, the release of OpenShift Container Platform 3.11 includes a new administrator focused web console (cluster console) which provides insights into the management of nodes, role base access controls, and the underlying cloud infrastructure objects. While this new console is automatically enabled in the deployment of the OpenShift Container Platform, the console is not enabled in Minishift/Container Development Kit (CDK), the local containerized version of OpenShift. This post will describe the steps necessary for enabling the deployment of the cluster console in Minishift.
Before beginning, ensure that you have the latest release of Minishift. You can download the latest release from Github or from the Red Hat Developers website if making use of the Container Development Kit (CDK).
As of the publishing of this article, Minishift makes use of OpenShift version 3.10. To align with the features that are provided with OpenShift 3.11 to support the cluster console, Minishift should also be configured to make use of this version. When starting up an instance of Minishift, the –openshift-version flag can be provided to specify the version that should be utilized (The CDK uses the flag –ocp-tag).
Start an instance of Minishift to make use of OpenShift version 3.11. In addition, be sure to provide the VM containing OpenShift with enough resources to support the containers required for the deployment using the –memory parameter.
minishift start --openshift-version=v3.11.0 --memory=6114
When using the Container Development Kit, use the following command:
minishift start --ocp-tag =v3.11.16 --memory=6114
Once provisioning completes of the VM completes and the necessary container images have been retrieved and started, information on how to access the cluster will be provided in the command line output similar to the following:
The server is accessible via web console at:
    https://192.168.99.100:8443
When the provisioning process completes, you will be logged in to the OpenShift Command Line Interface (CLI) as a user called “developer“. Since the majority of the steps for deploying the cluster console require higher level permissions, you will need to login as a user with higher level permissions. You can login as the system administrator account using the following command as noted in the prior output:
oc login -u system:admin
The entire list of projects configured in OpenShift are then displayed. Unfortunately, this account cannot be used to access the web console. We need to grant another user cluster-admin permissions. Let’s give a user called “admin” cluster-admin privileges by executing the following command:
oc adm policy add-cluster-role-to-user cluster-admin admin
Now, login as this user to confirm that it has the same set of permissions as the system administrator user
$ oc login -u admin
Enter any password when prompted to finalize the login process.
Note: The Container Development Kit (CDK) ships with a set of of addons that provide additional features and functionality on top of the base set of components. One of these addons is the “admin-user” addon which configures a user named admin with cluster-admin privileges. Similar to the admin-user addon, another addon called anyuid is enabled by default in the CDK to streamline the development process. By default, containers running on OpenShift make use of random user ID which increases the overall security of OpenShift. The functionality within OpenShift that aids in this process is called Security Context Constraints (SCC). By default, all containers use the restricted SCC. The anyuid SCC for which the anyuid addon makes use of allows all containers to use the user ID as defined within the container instead of a random user ID. However, the utilization of the anyuid SCC by all OpenShift components has been known to cause challenges. Since new container development is not being emphasized as part of this effort, disable the configurations that were made by the addon by executing the following command:
$ oc adm policy remove-scc-from-group anyuid system:authenticated
With all of the policies now properly configured, let’s try to access the OpenShift web console. Due to a known issue, navigating to the base address in a web browser will result in an error. Instead, add the /console context to the OpenShift server address to work around this issue.
For example, if OpenShift is available at https://192.168.99.100:8443, the console would be accessible at https://192.168.99.100:8443/console
Accept the self signed certificate warning and you should be presented with the OpenShift web console. Login to the web console with the user “admin”. Any password can be entered as no additional validation is performed. Once authenticated successfully, you will be presented with the OpenShift catalog.
While access to the OpenShift web console is great, it only provides a developer’s centric viewpoint into the platform which has been available since the infancy of OpenShift 3. Additional steps will need to be performed to install the cluster console to provide a more operational viewpoint into the platform.
Coinciding with the release of OpenShift 3.11 was also the introduction of the Operator Framework and Operators into the mainstream use. Operators are a method for packaging, deploying and managing Kubernetes based applications. The cluster console makes use of an operator called the console-operator to manage its lifecycle.
To make use of an operator, a set of resources must be deployed to an OpenShift environment. These manifests are stored within the Github repository associated with the operator.
The content of the repository can either be downloaded as zip from Github or cloned. The command below will use git to clone the repository to a local machine and navigate into the directory created.
$ git clone https://github.com/openshift/console-operator
$ cd console-operator
All of the manifests needed to create the necessary project in OpenShift along with the remaining assets are located in a directory called manifests. The contents of the directory can all be created using a single command using the OpenShift CLI.
$ oc apply -f manifests/
A new namespace containing the operator and the console will be deployed. This can be confirmed by viewing the set of running pods in the newly created openshift-console namespace.
$ oc get pods -n openshift-console

NAME                                 READY     STATUS    RESTARTS   AGE
console-operator-7748b877b5-58h2z    1/1       Running   0          5m
openshift-console-67b8f48b9d-dw7dl   1/1       Running   0          5m
In addition, a route is also created to expose access outside the cluster.
$ oc get routes -n openshift-console

NAME      HOST/PORT                                     PATH      SERVICES   PORT      TERMINATION          WILDCARD
console   console-openshift-console.192.168.99.100.nip.io             console    https     reencrypt/Redirect   None
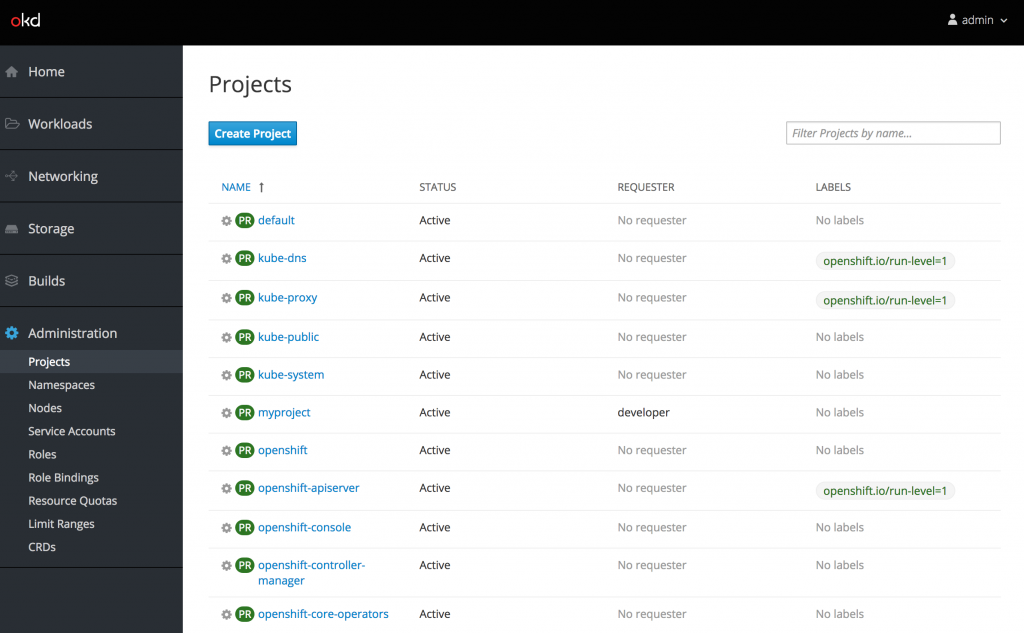
Navigate the the URL provided. Once again, accept the self signed certificate and login using the admin user. Once authenticated, the list of projects is presented.
Note: If you attempt to access the cluster console and are presented with a redirect loop where the login page continues to appear, it indicates a race condition has occurred where the console was not properly configured with the correct permissions to make requests against the OpenShift API. When this situation, occurs, execute the following command to delete the console pod which should mount the secrets properly upon the creation of the newly created pod:
oc delete pod -n openshift-console -l app=openshift-console
Now, under the administration section of the navigation bar, roles and their bindings, quotas along with the set of defined custom resource definitions can be browsed. Take a moment to view each of these sections at your leisure.
Most platform administrators are concerned with a holistic snapshot of the entire OpenShift environment. This is provided on the status page underneath the Home section of the left hand navigation bar.
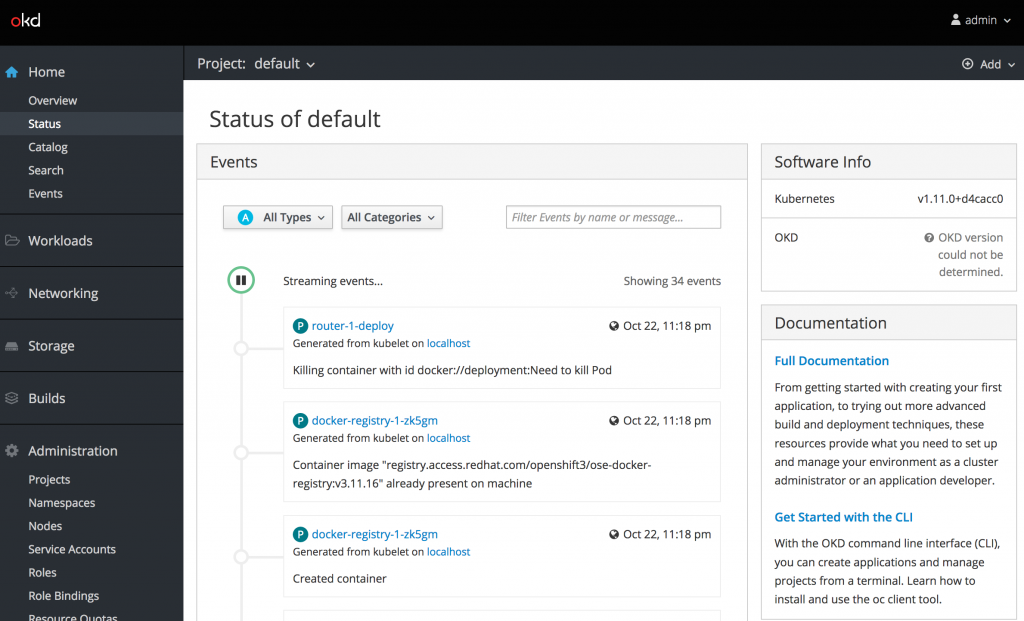
When navigating to the status page for the first time, only the default namespace is displayed. To view all namespaces, select the “all projects” option from the Projects dropdown at the top of the page. This will display an aggregation across all namespaces. Currently, only events are displayed which is only a portion of what platform administrators need to determine the state of the environment. There are key components of this page missing. This is due to the fact that the remaining content is sourced from metrics gathered in Prometheus which is not deployed by default in Minishift.
Fortunately, there is an operator available as of OpenShift 3.11 to manage the deployment of the Prometheus. The ecosystem of Prometheus tools including Alertmanager and Kube State Metrics is made available by the content found in the cluster-monitoring-operator repository. In a similar fashion as completed previously for the console-operator, open up a terminal session and clone the contents of the repository locally and change into the directory.
$ git clone https://github.com/openshift/cluster-monitoring-operator
$ cd cluster-monitoring-operator
Apply the contents of the manifest directory to OpenShift.
$ oc apply -f manifests/
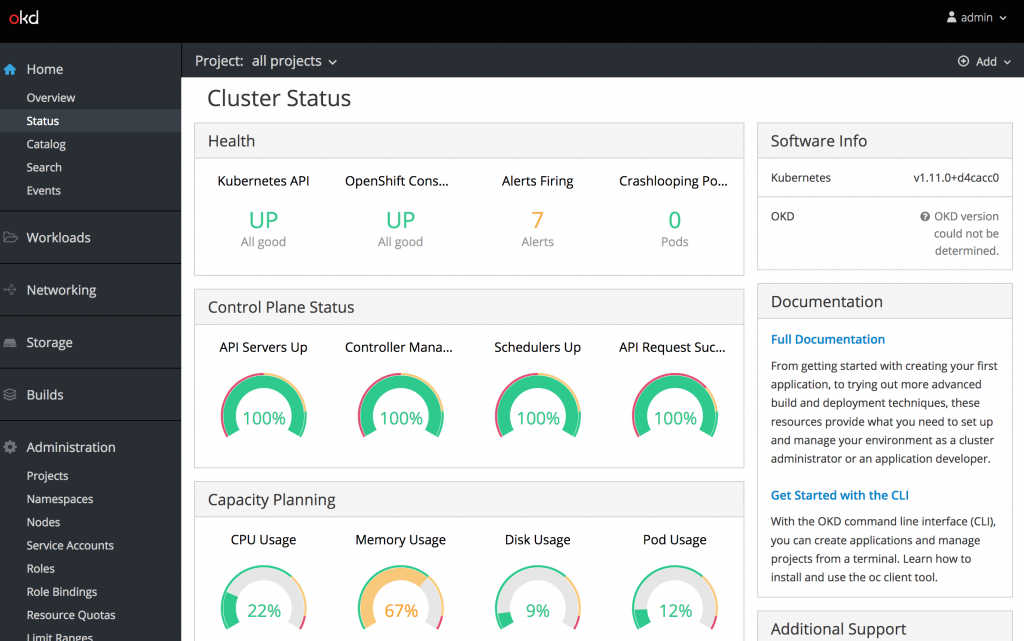
A new namespace called openshift-monitoring will be created along with operators for managing Prometheus and the rest of the monitoring stack. There are a number of components that are deployed by the operators so it may take a few minutes for all of the components to become active. If necessary, refresh the cluster console status page to reveal additional telemetry of the current state of the OpenShift environment.
When reviewing the metrics now presented from Prometheus, a portion of the values may not be displayed. If this is the case, additional permissions may need to be added to allow for the OpenShift controller to perform a TokenReview. The operator configured a ClusterRole called prometheus-k8s which enables access to perform TokenReviews. Execute the following command to associate this ClusterRole to the service account being used by the controller-manager pod.
$ oc adm policy add-cluster-role-to-user prometheus-k8s -n openshift-controller-manager -z openshift-controller-manager
Wait a few moments and the remaining graphs should display values properly.
While the cluster console that is deployed on Minishift does not contain all of the metrics that are typically available in a full OpenShift deployment, it provides insights into the capabilities unlocked by this new administrative console and the expanded day two operations features.
Thanks a lot for your blog post. If I am following your steps, everything works fine, except that I have no web access to the console. I am getting the following error in the log output of the openshift-console pod:
2018/10/24 08:17:49 server: authentication failed: unauthenticated
2018/10/24 08:17:55 auth: unable to verify auth code with issuer: oauth2: cannot fetch token: 400 Bad Request
Response: {“error”:”unauthorized_client”,”error_description”:”The client is not authorized to request a token using this method.”}
2018/10/24 08:17:55 server: authentication failed: unauthenticated
2018/10/24 08:17:55 server: authentication failed: unauthenticated
I am using latest CDK 3.6_1 and have started Minishift with a fresh profile:
$ minishift profile set test
$ minishift config set memory 10GB
$ minishift config set cpus 2
$ minishift start –ocp-tag latest
I also removed the anyuid flag add-on as described.
And then I git cloned into the console-operator and did a
$ oc apply -f manifests/
after logging in with user admin.
I added a note on a resolution to the issue. You need to delete the cluster console pod to ensure all of the necessary secrets have been created by the operator
oc delete pod -n openshift-console -l app=openshift-console