Posted: April 1st, 2015 | Author: sabre1041 | Filed under: Technology | Tags: Camel, Docker, Integration, Spring Boot, Websockets | 1 Comment »
Software today is being developed and released at a breakneck pace. No longer are organizations relying on a yearly, quarterly or monthly release cycle, but can now churn out multiple releases daily or even hourly. Two technologies that help facilitate this type of delivery model are Spring Boot and Docker. Spring Boot provides a lightweight microcontainer architecture for rapid development and deployment. It takes a Configuration over Convention approach to application development by leveraging resources on the java classpath to configure the application, which are then packaged into an executable jar. Since Spring Boot contains an embedded web container, an external container such as Tomcat is not required (Spring boot can be packaged into a traditional archive for deployment if desired). Docker on the other hand is one of the fastest growing technologies today and has changed the way many organizations package and deploy applications. It allows for an entire application environment to be assembled into images and deployed within containers. Docker Images are typically small in size and the creation of container is extremely fast compared to traditional virtualization technologies enabling rapid deployment and portability across machines.
With the recent release of version 2.15.0, the Apache Camel project now provides direct integration and support for both Spring Boot and Docker. The spring-boot component allows for the Camel context to be autoconfigured by components and configurations from a spring boot application. This includes the auto detection of Camel routes and injection of spring boot properties for use within Camel. The Camel Docker component communicates with the Docker daemon through the Docker rest API and exposes operations such as manipulating Docker images and containers within Camel to be notified when events within Docker occur. To illustrate the integration with these technologies along with several other components released in recent versions of Camel, a sample application has been developed.
The sample application is called spring-boot-docker-camel application can be found on GitHub
There are two primary goals of the application:
- Expose statistics from Docker such as listing images and containers
- Expose events originating within Docker
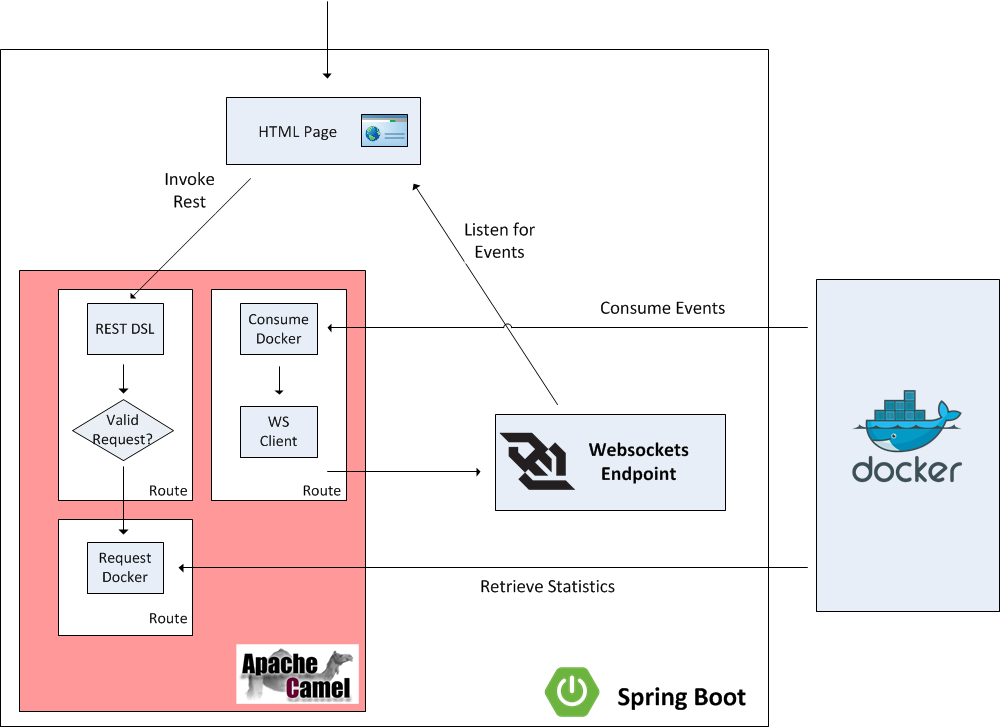
To facilitate user interaction with the application, a web page will be configured to allow users to view events from the Docker daemon in real time and also provide links to retrieve statistics from Docker. Instead of invoking the Docker rest API directly, Camel will be positioned to proxy the requests and expose a restful interface. Camel makes it easy to create restful endpoints by providing a DSL for creation and configuration. Since it is desired for events from Docker to be viewable on the web page, careful considerations should be made on the most efficient method to architect the solution. A polling mechanism to a Camel endpoint could be implemented by the web page, but this would be an expensive operation with regards to network traffic, as the majority of the requests would result in no consumable responses. On the other hand, if websockets were utilized, the amount of network traffic between the client and the server could be drastically reduced and be more efficient as the client would receive a response from the server immediately as an event occurs instead of waiting for the next polling interval. Spring Boot provides the capabilities to define and publish websockets endpoints that Camel can publish events to. Lets step through each aspect of the application to get a better understanding of the components involved and how they are able to integrate with each other.
Posted: April 3rd, 2014 | Author: sabre1041 | Filed under: Technology | Tags: Camel, OpenShift, SwitchYard | 2 Comments »
 In an earlier post, I introduced a custom Apache Camel component that can be used to manage the OpenShift platform. It allows for the invocation of operations that control key components of the OpenShift lifecycle such as displaying user metrics and managing applications. The operations and metrics generated from this component can be used in a variety of applications that leverage the Camel framework to solve business goals. Camel can be deployed to a variety of runtime environments ranging from servlet containers such as Tomcat, application servers such as JBoss , OSGi containers such as Karaf, or even self sufficient as a standalone application. To demonstrate the functionality of the OpenShift Camel component in a project, we will leverage SwitchYard and JBoss as the running environment within a sample project called camel-openshift-switchyard. SwitchYard is a services delivery framework for running and managing service-oriented applications. By running on SwitchYard, it will allow for the opportunity to cover both the OpenShift Camel component and developing and running applications using Switchyard. This post will provide an overview to the sample project including the steps necessary to configure and deploy either in your own environment or on the OpenShift platform. In subsequent posts, we will review the project in depth including how Camel can be integrated into a SwitchYard project and how to integrate the OpenShift Camel component in a project of your own.
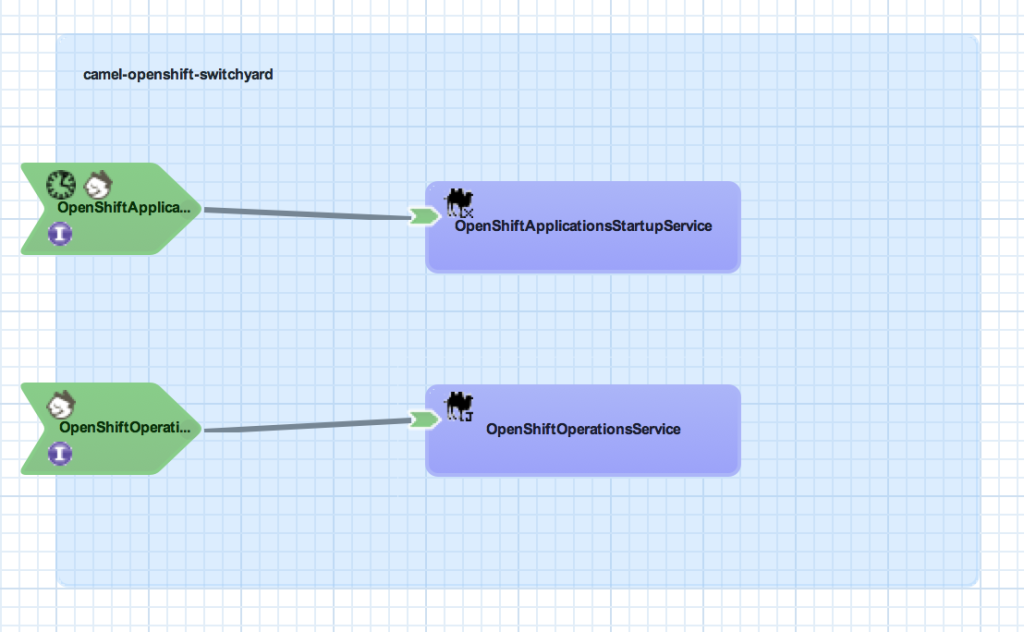
The camel-openshift-switchyard project consists of a SwitchYard application and a basic web application that can be used to invoke services exposed by SwitchYard. The SwitchYard application contains two services: OpenShiftOperationsService and OpenShiftApplicationsStartupService. Each contains Camel routes utilizing the OpenShift Camel Component. The OpenShiftOperationsService invokes operations against a given users’ account such as retrieving the details of a given domain or applications within a domain. Meanwhile, the OpenShiftApplicationStartupService will attempt to start any Application associated to a user that is not currently started. A diagram depicting these services and the overall SwitchYard composite is shown below:
Both services contain a RestEasy binding to allow for external invocation via REST. The OpenShiftApplicationsStatup service also contains a timer binding which will initiate the service at the top of each hour based on a cron schedule. To take advantage of the scheduled service operation, the following two system properties must be configured either within the application itself or on application platform.
- openshift.user – The login of the OpenShift user
- openshift.password – The password on the account
Testing
Included in the project are a series of integration tests designed to validate the functionality of the application and to demonstrate the testing capabilities of SwitchYard applications. Injection of property values and invocation of Services and HTTP resources are some of the components demonstrated.
Building and Deploying
The project is hosted on GitHub and can be cloned into a local environment by running the following command:
git clone https://github.com/sabre1041/camel-openshift-switchyard.git
Prior to built or imported into an IDE, certain project dependencies must be configured. A core project dependency is the OpenShift Camel component which must be installed and available in the local Maven repository. Because this library is not part of any publicly available repository, initialization scripts for both Windows and Unix have been provided to configure the required dependencies. This script is found in the support folder of the project. Execute the init.sh or init.bat depending on your Operating System.
Next, build the project using Maven by running the following command:
mvn clean install
With the project now built, deploy the archive to Fuse Service Works or a JBoss container with SwitchYard installed. Once deployed, the application can be accessed by browsing to http://localhost:8080/camel-openshift-switchyard/

Deployment to OpenShift
The project has been configured to be seamlessly deployed to the OpenShift Platform. OpenShift provides the functionality to utilize custom cartridges which are not part of the core OpenShift platform to host applications. Since this project is built on SwitchYard, we will leverage a custom JBoss EAP 6 cartridge preconfigured with the SwitchYard runtime. The OpenShift Web interface provides the ability to specify a custom cartridge and existing source code during new application creation. However, due to the number of dependencies required by the SwitchYard platform, the project is unable to be built and deployed prior to the default application creation timeout. To get around this limitation, we will create the application using the OpenShift command line tools (RHC), merge the local OpenShift project with the camel-openshift-switchyard project hosted on GitHub, then finally push the application to OpenShift. Using the terminal in the location where the repository of the newly created application will be created on your local machine, issue the following command to create an application using the custom SwitchYard cartridge as the container.
rhc app create <app-name> "http://cartridge-switchyard.rhcloud.com/manifest/466c7020661420c4604e870802fe673244861a5a"
After the application was successfully created and the source code now available on your machine, change into the application directory:
cd <app-name>
First, add the GitHub hosted project as an upstream Git remote repository
git remote add upstream -m master https://github.com/sabre1041/camel-openshift-switchyard.git
Next, pull in the changes from the upstream repository
git pull -s recursive -X theirs upstream master
Finally push the changes to OpenShift
git push origin master
OpenShift will then handle obtaining the required dependencies, building and deploying the project. Once complete, the application can be viewed in a web browser. To determine the URL of an OpenShift application from the command line, execute the following command:
rhc app show <app-name>
You should be able to browse to the URL and utilize the application as you would on your local machine.
As mentioned previously, we will walk through the project in detail in a future post. This will allow for the demonstration of SwitchYard components and provide examples of how the OpenShift Camel component can be used in projects of your own.
Posted: February 10th, 2014 | Author: sabre1041 | Filed under: Technology | Tags: Camel, OpenShift | 3 Comments »
Since its creation in 2007, the Apache Camel project has allowed developers to integrate systems by creating Service Oriented Architecture (SOA) applications using industry standard Enterprise Integration Patterns (EIP). At its core, Camel is a routing engine builder for which messages can be received and processed. The processing of messages uses a standardized API library backed by an extensive collection of components which abstracts the actual implementation of routing and transformation of messages. These components also include the ability to communicate with external systems through an array of protocols ranging from web services, REST and JMS. With more than 80 components in the standard Camel distribution, developers have the flexibility to perform power operations with minimal effort to suit their business needs. One of the benefits of the Camel component framework is that it was designed as a factory system where new components can be easily added to solve a business use case.
As more companies and individuals look to migrate their operations and applications into cloud-based solutions, the management of these resources can prove to be a challenge. The overall architecture may be different than what many individuals are accustomed. The OpenShift Platform as a Service (PaaS) is one such cloud offering where developers can quickly create powerful scaled applications without having to worry about managing infrastructure or complex software installation.
Introducing the OpenShift Camel Component
Imagine being able to communicate with the OpenShift Platform directly through a Camel route? With the OpenShift Camel component, it is now possible. Exposed through an Endpoint as both a Camel Consumer and Producer, OpenShift resource details can be retrieved or modified all within a Camel route. Want to find out information about a particular OpenShift Domain, such as the applications and their details? How about automating application deployments? These are only some of the possibilities now available.
Communication between the OpenShift Camel component and OpenShift is facilitated by using the REST API exposed by the OpenShift platform and the OpenShift Java Client. Responses from the OpenShift Camel component will be returned using the API from the OpenShift Java Client.
Using the OpenShift Camel Component in your project
The OpenShift Camel Component can be easily added to a new or existing project. The following steps will describe how this can be accomplished.
GitHub Project: https://github.com/sabre1041/camel-openshift
- Fork/Clone the GitHub repository
git clone https://github.com/sabre1041/camel-openshift.git
- Build the project using Maven
mvn clean install
- Add the component to a new or existing Camel Project as a Maven dependency in the projects’ POM file.
<dependency>
    <groupId>org.apache.camel</groupId>
    <artifactId>camel-openshift</artifactId>
    <version>0.0.1-SNAPSHOT</version>
</dependency>
- The following example implementation will retrieve information about the authenticated user and print out their user details to the log:Java DSL
import org.apache.camel.builder.RouteBuilder;

public class PrintOpenShiftUserRoute extends RouteBuilder {

    public void configure() throws Exception {
        // Retrieve User Details
        from("openshift://user?userName=<openshift_username>&password=<openshift_password>")
            //Print to Log
            .log("${body}");
    }

}
Spring XML
<route>
<description>Spring XML Route. Full XML omitted for brevity</description>
<from uri="openshift://user?userName=<openshift_user>&password=<openshift_password>"/>
<log message="${body}"/>
</route>
With the steps above complete, the project can be deployed to a running container or unit tests can be created to verify the expected results. Additional functionality including how to leverage Authentication as Message Headers can be found on the GitHub project page.
In an upcoming post, I will demonstrate several uses for the OpenShift Camel including how the component can be leveraged within a SwitchYard application.
Recent Comments