Posted: June 24th, 2015 | Author: sabre1041 | Filed under: Technology | Tags: Fuse, JBoss, Security | No Comments »
 One of the features introduced in JBoss Fuse 6.2 is the ability to utilize Role Based Access Control (RBAC) to govern the capabilities authenticated users have when interacting with the container. RBAC is important because it allows for a delineation of the roles and responsibilities of users managing the Fuse container to exist. For example, a team may have a set of individuals who manage the configuration of the container including all deployed applications in a system administrator role while another team may have a set of individuals whom have the responsibility for monitoring the state of deployed application. RBAC provides the ability to restrict access to the monitoring team to only view the state of the container in a read only manner while providing unrestricted access to the administrator team. Fuse and the underlying Karaf container provide a flexible framework for configuring and managing Role Based Access Control configurations. RBAC was initially introduced in Karaf 3.0.0 and subsequently ported back version 2.4.0 for which Fuse is based off of.
Fuse provides a number of standard roles that can be applied to users. These roles are defined in the following table:
| Roles |
Description |
|---|
| Monitor, Operator, Maintainer |
Read only access |
| Deployer, Auditor |
An appropriate level or read-write access who want the ability to deploy and run applications, but blocks access to sensitive container |
| Administrator, SuperUser |
Unrestricted access to the container |
The enforcement of Role Based Access Control in Fuse is accomplished with the help of two mechanisms: JMX Guard and OSGi guard. JMX guard is a mechanism that is configured at the JVM level to intercept all invocations made against the JMX interface, similar to a Servlet Filter. As an invocation is made, JMX guard verifies the requestor has the appropriate permissions and based on the assentation, they are either granted access to the resource or denied. OSGi guard on the other hand governs the ability to invoke methods on an OSGi service in the form of a proxy between the client and the service. Both JMX and OSGi guard use Access Control List’s (ACL’s) for declaring the methods and services that are to be secured and the roles that have access. All of the ACL files are located within the etc/auth folder of Fuse. There are two types of ACL’s, JMX and command based. Default configurations have been provided, but you are free to modify and customize as necessary.
There are four primary locations where RBAC is enforced:
- JMX – Direct invocations are protected by JMX Guard
- Fuse Management Console – Communicates using REST via Jolokia technology. Since Jolokia it is situated on top of the JMX, it affords the same protection that JMX provides
- Karaf commands – Enforcement is provided whether commands are entered on the virual terminal in the Fuse Management Console, remote connection via SSH or using the CLI
- OSGi Services – Protections against invocations of individual methods
Applying roles to users is dependent on the authentication scheme being used. By default, Fuse comes enabled with the PropertiesLoginModule which utilizes a configuration file located at etc/users.properties to define the authentication and authorization of users. Users can be added one line at a time in the file in the following format:
username=password,role1,role2…
For example, to configure a user called monitor with password monitor and the role Monitor, it would appear in the following format:
monitor=monitor,Monitor
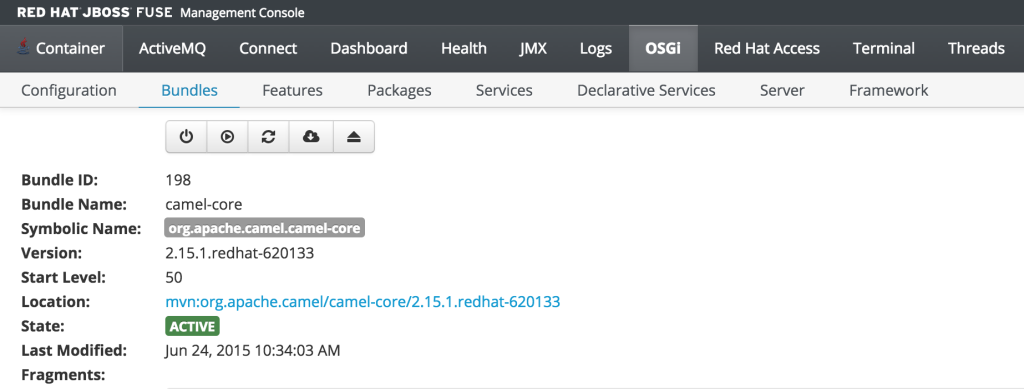
As previously discussed, users who have the monitor role have a read only view of the container. To validate proper enforcement of this role to this newly created user, start up the Fuse container and navigate to the Fuse Management Console at http://localhost:8181. Enter monitor for both the user name and password and click login to access the console. Navigate to the OSGi tab to view the current status of the components running in the OSGi container. The list of installed bundles within the container are shown by defaults and can be sorted and filtered if desired. Select the camel-core bundle. When logged in as a user with access to modify components, a dialog is available for starting, stopping, updating and refreshing the bundle as shown below:
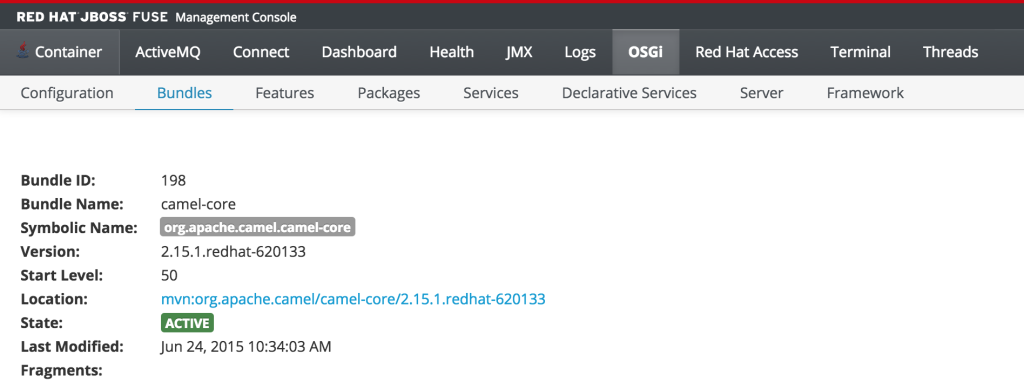
But since the monitor user only has read access, this dialog will not be present and the view will appear as the following:
This type of read only protection is also extended to other core components of the Fuse Management Console such as ActiveMQ and Camel JMX pages and can be further customized. With the inclusion of Role Based Access Control support, it is now even easier to manage and govern access to the JBoss Fuse platform. A full description of the features and capabilities of Role Based Access control can be found in the JBoss Fuse product documentation.
Posted: September 22nd, 2014 | Author: sabre1041 | Filed under: Technology | Tags: Fuse, OSGi, Testing | No Comments »
 As developers, we are cognizant that testing is a critical component of the development process. In a previous post, we demonstrated the importance of testing applications in a remote container using the Red Hat JBoss Fuse platform and JBoss Developer Studio (Eclipse). The process of remote debugging is a form of integration testing. While the majority of testing is primarily composed of unit testing in an isolated environment, integration testing affords the developer the ability to validate their application with the systems they will interact with. When developing OSGi applications, there are several integration testing frameworks to choose from. Pax Exam has established itself as one of the most popular due to its flexibility and support for multiple container types including Apache Karaf, the underlying platform for JBoss Fuse. Integration tests using Pax Exam can simulate functionality not only within the base OSGi container, but also integrate with other core Fuse platform components including Apache Aries Blueprint and Apache Camel. Fuse provides template applications as a starting point for developers to begin creating applications of their own. These typically consist of a project, ready to be deployed to the Fuse container, along with unit tests to validate expected outcomes and to demonstrate unit testing of Fuse technologies. One area which unfortunately lacking is these templates is the use of integration testing. The following will introduce a template application that demonstrates the use of integration testing in JBoss Fuse platform technologies using Pax Exam.
The majority of applications designed for the Fuse platform are built using Apache Maven. Maven is not only the recommended build tool, but is also used by the Fuse platform itself for dependency resolution. It comes as no surprise that Fuse template projects utilize Maven Archetypes, the project templating toolkit for Maven. To be consistent with the Fuse template projects, Maven Archetypes were utilized to demonstrate Pax Exam integrating testing and the Fuse platform. The actual creation of Maven Archetypes is beyond the scope of this discussion, be we will walk through one of the resulting generated projects to demonstrate how you can begin to use Pax Exam for your own integrating testing needs, and to validate these types of applications that can be deployed to the Fuse platform.
First, ensure you have the appropriate tooling installed and configured on your machine. Git and Maven are the two pieces of required software. Full instructions on installation and configuration can be found on their respective websites. It is also recommended that an IDE such as JBoss Developer Studio/Eclipse be installed. This is suggested, though not required. Next, clone the Git repository containing the archetypes onto your local machine.
git clone https://github.com/sabre1041/fuse-archetype-pax-exam.git
With the repository available on your machine, build and install the included archetypes into your local maven repository by navigating to the location where the git repository was cloned and executing the following command:
mvn clean install
Now that the archetypes are installed in your local Maven repository, let’s walk through one of the included projects. One of the most basic Fuse sample projects demonstrates the use of a Camel route within a Blueprint project. As with other Fuse sample projects, the Camel blueprint project can be easily deployed to the Fuse platform and also demonstrates the use of a unit test. We will swap out the unit test in favor of a Pax Exam integration test as part of our template project. Lets go ahead and generate and walkthrough the analogous template project with Pax Exam integration testing. We will generate a project based on the Maven Archetype with the following Maven properties:
- Group ID: com.redhat.fuse
- Artifact Id: camel-blueprint-pax-exam
- Version: 0.0.1-SNAPSHOT
Note: The following set of commands assumes the above values have been configured. If you choose to use your own values, be sure to substitute them accordingly.
Navigate to a directory where you would like the resulting project to be generated and run the following command:
mvn archetype:generate -DinteractiveMode=false -DarchetypeGroupId=com.redhat.fuse -DarchetypeArtifactId=camel-archetype-blueprint-pax-exam -DarchetypeVersion=1.0.0 -DgroupId=com.tgt.fuse -DartifactId=camel-blueprint-pax-exam -Dversion=0.0.1-SNAPSHOT
A Maven project will be created in a folder called camel-archetype-blueprint. At this point, the project can be loaded into an IDE such as JBoss Developer Studio. The project itself is quite simplistic. A Camel route is triggered every five (5) seconds which prints a message to the Fuse server log. This can be seen by inspecting the blueprint descriptor file located at <PROJECT_ROOT>/src/resources/OSGI-INF/blueprint/blueprint.xml.
  <camelContext id="blueprintContext" trace="false" xmlns="http://camel.apache.org/schema/blueprint">
    <route id="timerToLog">
      <from uri="timer:foo?period=5000"/>
      <setBody>
          <method ref="helloBean" method="hello"/>
      </setBody>
      <log message="The message contains ${body}"/>
      <to uri="mock:result"/>
    </route>
  </camelContext>
In the original implementation, a JUnit test using the Camel blueprint testing framework is utilized. The source for this test can be found at the following location.
https://github.com/apache/camel/blob/master/tooling/archetypes/camel-archetype-blueprint/src/main/resources/archetype-resources/src/test/java/RouteTest.java
Posted: September 1st, 2014 | Author: sabre1041 | Filed under: Technology | Tags: Eclipse, Fuse, JBoss Developer Studio, Testing | 2 Comments »
 Testing is one of the primary components of the software development process. It ensures a particular piece of functionality matches a desired expectation. Testing can occur in several forms ranging from unit testing, integration testing, and regression testing to name a few. When developing applications for the JBoss Fuse platform, each of these methodologies can be applied. The JUnit framework can be used to perform unit testing where direct support is made possible from key Fuse components such as Blueprint and Apache Camel. Pax Exam can be used to perform in container testing and validate functionality against a Karaf environment, the underlying container behind Fuse. While each of these methods provides some assurance against the expected functionality of a particular piece of software, many times a developer may want or even need additional assurance by running and testing their software in an actual application container. Fortunately, Fuse provides methods for interacting with the container in a remote fashion. Remote application debugging is not a new concept. Support is available from some of the most popular integrated development environments including NetBeans, IntelliJ and Eclipse. Since JBoss Developer Studio, an Eclipse variant, is the supported development environment for Fuse, we will focus on how to perform remote application debugging using Eclipse.
Starting Fuse in Debug mode
Prior to being able to connect to Fuse from a remote application, Fuse must be configured to accept remote application connections by placing it in debug mode.
Two methods are available to place Fuse into debug mode:
- Start the Fuse container with the debug option set
- Set the KARAF_DEBUG environment variable to true
The simplest method for starting Fuse in debug mode is to start Fuse with the debug option set. To do so, browse to the <FUSE_HOME>/bin folder and start the Fuse container as follows:
Linux or Mac:
./fuse debug
Windows:
fuse.bat debug
During container initialization, Fuse will also check for the presence of the KARAF_DEBUG environmental variable. If the variable has been defined and is set to true, Fuse will start in debug mode. Environmental variables can be defined on the terminal or command line as follows:
Linux or Mac:
export KARAF_DEBUG=true
Windows:
set KARAF_HOME=true
From the same terminal session, the Fuse container can be started without any additional parameters as described earlier. The one shortcoming to this method is that once the terminal session ends, the environment variable is lost and Fuse will no longer be placed into debug mode the next time it is started. To have Fuse consistently start in debug mode, the KARAF_DEBUG environment variable should be set permanently according to your particular operating system.
Remote access in the Fuse container is made possible through the use of the Java Debug Wire Protocol (jdwp). If Fuse has been set into debug mode, it will by default expose port 5005 for remote access which can be verified by observing the following in the server logs during startup.
Listening for transport dt_socket at address: 5005
If the KARAF_DEBUG environment variable has been set, the full set of debug options will be printed:
karaf: Enabling Java debug options: -Xdebug -Xnoagent -Djava.compiler=NONE
-Xrunjdwp:transport=dt_socket,server=y,suspend=n,address=5005
Listening for transport dt_socket at address: 5005
These parameters can be customized by setting the JAVA_DEBUG_OPTS environmental variable. A full discussion the Java Debug Wire Protocol and the options that can be set is found here.
Debugging from JBoss Developer Studio
Once Fuse has been placed into debug mode and capable for accepting remote connections, an application can be debugged within JBoss Developer Studio against the running Fuse container. Open JBoss Developer Studio to a workspace of your choosing. Determine any areas in which you wish to debug and set breakpoints that will suspend the running application when the line of code is hit during the execution of the application. With the appropriate breakpoints set, select the project you wish to debug in the project view and select Run -> Debug as -> Remote Java Application from the menu bar. If your Fuse container is running and has been placed into debug mode, JDBS will prompt with the following menu:
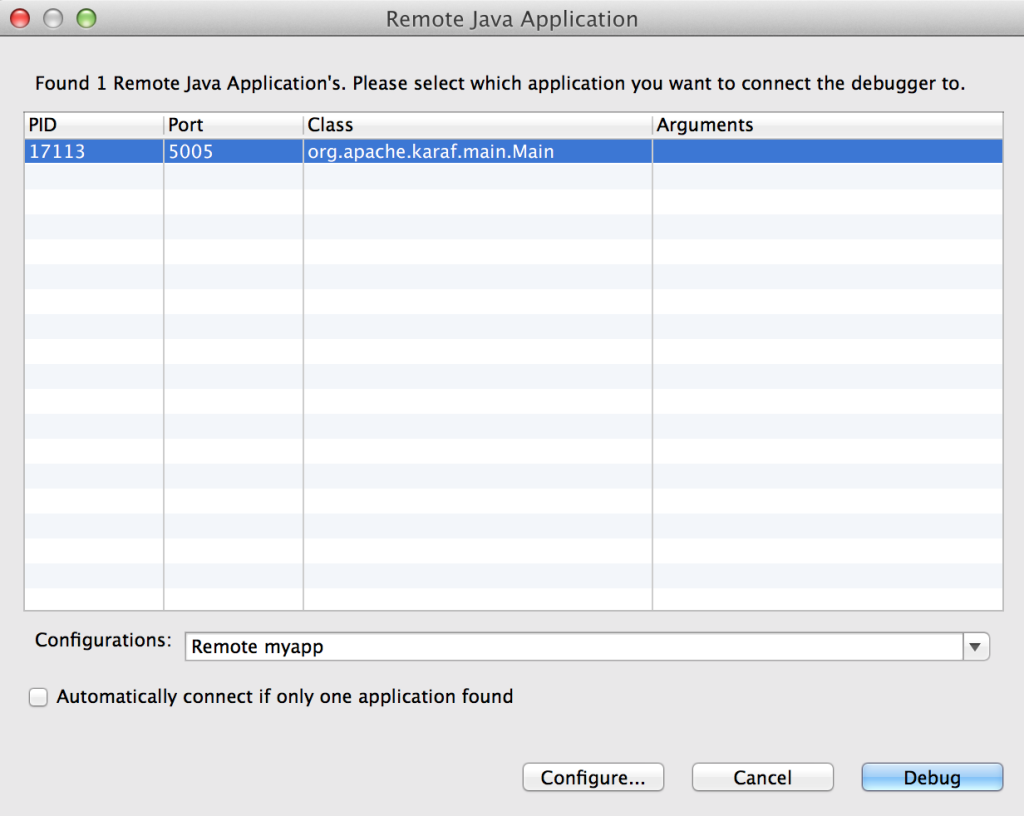
You may choose to customize the debug configurations by selecting the configure button, otherwise select Debug which will connect JDBS to Fuse. When the application running in Fuse hits one of the breakpoints previously set, the application will suspend at that point and JDBS will either prompt to switch into the debug perspective or switch automatically based on the configurations set in the JDBS workspace. With the application suspended, you are able to perform any debugging tasks you desire. A full overview on debugging in Eclipse is beyond the scope of this discussion and additional reference material can be found at the following links:
With only a few configuration steps, application can be tested and validated on a running remote Fuse instance. Remote application debugging is yet another method a developer has for creating reliable, robust applications.
 One of the features introduced in JBoss Fuse 6.2 is the ability to utilize Role Based Access Control (RBAC) to govern the capabilities authenticated users have when interacting with the container. RBAC is important because it allows for a delineation of the roles and responsibilities of users managing the Fuse container to exist. For example, a team may have a set of individuals who manage the configuration of the container including all deployed applications in a system administrator role while another team may have a set of individuals whom have the responsibility for monitoring the state of deployed application. RBAC provides the ability to restrict access to the monitoring team to only view the state of the container in a read only manner while providing unrestricted access to the administrator team. Fuse and the underlying Karaf container provide a flexible framework for configuring and managing Role Based Access Control configurations. RBAC was initially introduced in Karaf 3.0.0 and subsequently ported back version 2.4.0 for which Fuse is based off of.


Recent Comments