January 25, 2020. At the time, just another day at Devconf.cz in Brno Czech Republic delivering hands-on workshops for an emerging concept in the Kubernetes space, GitOps. Looking back, it would become the last in person conference that I would have the opportunity to attend due to the COVID-19 pandemic.
Fast forward 21 months, and while the world continues to be ravaged by the pandemic, there are reasons to believe things are headed in the right direction. Case in point, KubeCon and Cloud Native Con 2021 where adopters and technologists from leading open source cloud communities come together and share the latest and greatest news within this space.
This, like many other conferences these days, will be available in a virtual format, but there will also be an in person participation as well. After all these months, I am excited to be able to participate on site at the event where I will be able to once again share some of my recent efforts with the community. The following are some of the areas that you can find me either at the physical event or virtually.
OpenShift Commons Gathering – AMA Session
When: Tuesday October 12, 2021 – 2:30 PM PDT
If you or your organization uses the OpenShift Container Platform, what else could be better than hearing about how the community uses OpenShift to drive application deployments to deliver real business value as OpenShift Commons Gathering once again returns to KubeCon as one of the Day-0 events.
As many of you are aware, one of my key responsibilities is to help organizations achieve success by delivering solutions with OpenShift. I will be joining a group of Red Hat engineers and guest speakers for an Ask Me Anything (AMA) session on the OpenShift ecosystem during the OpenShift Commons Gathering event. This session provides an opportunity for you to ask any burning questions that you always wanted to ask as well our thoughts on where we all see OpenShift and Kubernetes headed in the future.
GitOpsCon North America 2021 – Securing GitOps
When: Tuesday October 12, 2021 – 3:30 PM PDT
GitOps is no longer an emerging concept in the Kubernetes space as it might have been back in January 2020, and this is evident by the second GitOpsCon returning to KubeCon as another Day-0 event. Adopting a GitOps based approach is fundamentally a paradigm shift for managing both applications and infrastructure for many organizations. It is important that proper considerations be made to properly enforce property security controls at each step and component involved in GitOps.
This lightning talk on Securing GitOps will highlight many of the key areas that anyone implementing a GitOps based approach should consider for implementing GitOps securely. Not only will the key areas of concerns be highlighted, but a set of tools will be introduced that you can take advantage of immediately.
KubeCon North America 2021 – Helm: The Charts and the Curious
When: Wednesday October 12, 2021 – 11:00 AM PDT
Helm is a package manager for Kubernetes and is one of the most popular ways that applications are deployed to Kubernetes. Charts are the packaged Kubernetes manifests and there is a vast ecosystem out there for building, packaging and distributing.
This talk will focus primarily on how to accelerate and secure the packaging and distribution of Helm charts including some of the approaches and tools that you can integrate into your Continuous Integration and Continuous Delivery process. You really do not want to miss this session, especially those who do use Helm as part of their standard workflow.
Booth Duty
Aside from the formal presentations, I will also be on the expo floor working several of the booths. This affords you the opportunity to “talk shop” and experience open source and cloud native solutions in action.
Red Hat Booth
What should not come as a surprise, I will be present at the Red Hat booth at various times throughout the convention. Aside from stopping by to say hi, be sure to check the associated activities delivered by Red Hat’s best including demos, workshops and live office hours.
More information related to Red Hat’s presence at KubeCon can be found here.
sigstore Booth
One the open source projects that I am heavily involved in these days is sigstore, a Linux Foundation sponsored project that aims to make signing and verifying content easier. Stop by, learn and take the sigstore tooling for a spin by signing content of your very own. Trust me, as soon as you see it, you will be hooked!
I’ll be around for the entire week so feel free to contact me via my various social media channels (LinkedIn, Twitter, Facebook) if you are interested in chatting. For those who are not attending the in-person event in Los Angeles, happy to set aside time so that you do not miss out either.
OpenShift includes the capabilities to integrate with a variety of identity providers to enable the authentication of users accessing the platform. When an OpenShift cluster is installed, a default kubeadmin administrator user is provided which enables access to complete some of the initial configuration, such as setting up identity providers and bootstrapping the cluster.
While steps are available to remove the kubeadmin user from OpenShift, there may be a desire for the account to be retained longterm as one of the break glass methods for gaining elevated access to the cluster (another being the kubeconfig file that is also provided at installation time and uses certificate based authentication).
In many organizations, policies are in place that require accounts with passwords associated with them to be rotated on a periodic basis. Given that the kubeadmin account provides privileged access to an OpenShift environment, it is important that options be available to not only provide additional security measures for protecting the integrity of the account, but to also comply with organizational policies.
The credentials for the kubeadmin password consists of four sets of five characters separated with dashes (xxxxx-xxxxx-xxxxx-xxxxx) and is generated by the OpenShift installer and stored in a secret called kubeadmin in the kube-system namespace. If you query the content stored within the secret, you will find a hashed value instead of the password itself.
To properly rotate the kubeadmin password, a new password must be generated in a format that aligns with OpenShift’s standard kubeadmin password format followed by a hashing function being applied so that it can be stored within the platform.
There are a variety of methods in which a password representative of the kubeadmin user can be generated. However, it only made sense to create a program that aligns with the functions and libraries present in the OpenShift installation binary. The following golang program performs not only the generation of the password and hash, but the base64 value that should be updated in the secret as a convenience.
package main

import (
	"fmt"
	"crypto/rand"
	"golang.org/x/crypto/bcrypt"
	b64 "encoding/base64"
	"math/big"
)

// generateRandomPasswordHash generates a hash of a random ASCII password
// 5char-5char-5char-5char
func generateRandomPasswordHash(length int) (string, string, error) {
	const (
		lowerLetters = "abcdefghijkmnopqrstuvwxyz"
		upperLetters = "ABCDEFGHIJKLMNPQRSTUVWXYZ"
		digits       = "23456789"
		all          = lowerLetters + upperLetters + digits
	)
	var password string
	for i := 0; i < length; i++ {
		n, err := rand.Int(rand.Reader, big.NewInt(int64(len(all))))
		if err != nil {
			return "", "", err
		}
		newchar := string(all[n.Int64()])
		if password == "" {
			password = newchar
		}
		if i < length-1 {
			n, err = rand.Int(rand.Reader, big.NewInt(int64(len(password)+1)))
			if err != nil {
				return "", "",err
			}
			j := n.Int64()
			password = password[0:j] + newchar + password[j:]
		}
	}
	pw := []rune(password)
	for _, replace := range []int{5, 11, 17} {
		pw[replace] = '-'
	}

	bytes, err := bcrypt.GenerateFromPassword([]byte(string(pw)), bcrypt.DefaultCost)
	if err != nil {
		return "", "",err
	}

	return string(pw), string(bytes), nil
}

func main() {
        password, hash, err := generateRandomPasswordHash(23)

        if err != nil {
           fmt.Println(err.Error())
           return
        }
	fmt.Printf("Actual Password: %s\n", password)
	fmt.Printf("Hashed Password: %s\n", hash)
	fmt.Printf("Data to Change in Secret: %s", b64.StdEncoding.EncodeToString([]byte(hash)))
}
If you do not have the go programming language installed on your machine, you can use the following link to interact with the program on the Go Playground.
Hit the Run button to execute the program and a response similar to the following will be provided:
Actual Password: WbRso-QnRdn-6uE3e-x2reD
Hashed Password: $2a$10$sNtIgflx/nQyV51IXMuY7OtyGMIyTZpGROBN70vJZ4AoS.eau63VG
Data to Change in Secret: JDJhJDEwJHNOdElnZmx4L25ReVY1MUlYTXVZN090eUdNSXlUWnBHUk9CTjcwdkpaNEFvUy5lYXU2M1ZH
As you can see, the plaintext value that you can use to authenticate as the kubeadmin user, the hashed value that should be stored in the secret within the kube-system namespace and the value that can be substituted in the secret is provided.
To update the value of the kubeadmin password, execute the following command and replace the SECRET_DATA text with the value provided next to the “Data to Change in Secret” from the program execution above.
Once the password has been updated, all active OAuth tokens and any associated sessions will be invalidated and you will be required to reauthenticate. Confirm that you are able to login to either the OpenShift CLI or web console using the plain text password provided above.
It really is that easy to manage the password associated with the kubeadmin user. The ability for the password to be rotated as desired allows for the compliance against most organizational password policies. Keep in mind that the secret containing the kubeadmin password can always be removed, thus eliminating this method for authenticating into the cluster. The generated kubeconfig file provided at install time can be used as a method of last resort for accessing an OpenShift environment if a need arises.
The world of cloud native architectures have enabled solutions to be delivered faster than ever before. Even as the overall time to delivery has been reduced, one area that continues to be of utmost importance is understanding the contents of the software package at each level. In a containerized environment, this includes everything from the base operating system, core libraries, and everything in between including the application itself. The assurance that each layer meets an agreed upon standard prior to being deployed into a production environment is known as the Trusted Software Supply Chain (TSSC). This assembly line approach to software delivery typically makes use of Continuous Integration and Continuous Delivery (CI/CD) tool(s) in a series of processes, modeled in a pipeline of steps, that every application must undergo.
Given that there are various layers of a containerized application, when a change occurs at any layer, the entire validation process must be repeated to ensure that the application continues to meet the expected level of compliance. In a cloud native world, this can occur frequently and it is important that the revalidation process occurs as soon as a change is detected to mitigate any potential vulnerability. The primary questions to ask is how to detect when a change occurs and what should be done? The answer first depends on the source. If source code changes, an event can be triggered from the source code management (SCM) system. Similar actions can be undertaken when a container image is pushed to an image registry. Then, the event can trigger some form of action or remediation.
Within the context of the Trusted Software Supply Chain, the trigger will typically invoke a pipeline along with a series of steps. This pipeline execution engine can take many forms, but Tekton is one such tool that has been gaining popularity in the Kubernetes ecosystem as it makes use of cloud native principles, such as declarative configurations (Custom Resources) and a distributed execution model. In the scenario where an image is pushed to a container registry, a triggering action would invoke a Tekton pipeline that includes a series of Tasks (steps), such as retrieving the image, scanning, and validating the contents.
Triggering a Tekton Pipeline when an Image is pushed
In OpenShift, one of the key features of the platform is that it contains an image registry along with an entire ecosystem of resources to aid in the life cycle of images (Images, ImageStreams along with several virtual resources including ImageStreamTags). As container images are either pushed to the integrated registry or referenced in an ImageStream, the metadata contained within these custom resources are updated to reflect the latest values. These changes as with any change to a resource in OpenShift can be monitored (one of the key principles of Operators) to invoke other actions in response. Such an action could be the triggering of a Tekton pipeline. The remainder of this article will describe how Tekton pipelines can be triggered based on changes to resources in OpenShift using cloud native event patterns.
There are many components encompassing the Tekton project. While the primary feature set focuses on the pipeline itself, another subproject, called triggers, provides the functionality for detecting and extracting information events in order to execute pipelines. Tekton and the combination the pipelines and triggers subproject is only half of the overall solution. Another component must provide the capability for not only monitoring when changes occur within OpenShift, but have the capability to send events. The missing piece of the puzzle is Knative. Knative is a platform for building serverless applications, and similar to Tekton, the full feature set is broken down into several subjects. Knative serving is responsible for managing serverless applications while Knative eventing provides support for passing events from producers to consumers. The functionality of Knative eventing provides the desired capabilities of sending events based on actions from the Kubernetes API which are then consumed by Tekton triggers to start pipelines. The diagram below provides an overview of the end state architect.
High level architecture
To begin, you will need access to an OpenShift environment with cluster administrator rights.
Note: While the use case described in this implementation are specific to OpenShift, the concepts are applicable to any Kubernetes environment with the associated project deployed.
Then, you will need to install two operators from OperatorHub: OpenShift Pipelines which will provide support for Tekton and OpenShift Serverless, which will provide support for Knative.
Navigate to the OpenShift Web Console and select OperatorHub and then OperatorHub.
In the textbox, search for OpenShift Pipelines and then click Install. A page will be presented with the available channels and approval modes. Click Install again to install the operator.
Next, install OpenShift Serverless. Once again, select OperatorHub and then search for OpenShift Serverless. Click Install and on the subsequent page, select the channel matching your version of OpenShift and then click Install.
Once the operator has been installed, one additional step needs to be completed. Recall that Knative features several subprojects: serving and evening. By default, when the operator is deployed, both subprojects are not installed. Given that only Knative eventing will be used in this scenario, it will be the only subproject that will be installed. Under the OperatorHub section of the left hand navigation pane, select Installed Operators. At the top of the page, you will see a dropdown indicating the name of the current OpenShift project that you are in. Select the dropdown and select knative-eventing. Even though the subproject is not installed, OperatorHub will still create the project at deployment time.
With the Installed Operators page still loaded, select the OpenShift Serverless. On the operator page, select the Knative Eventing tab. Click the Create Knative button and then click Create. The OpenShift Serverless operator will then go ahead and deploy and configure Knative Eventing into the cluster.
With the necessary cluster prerequisites complete, clone the git repository containing the OpenShift manifests as they will be referenced in each of the following sections:
git clone https://github.com/sabre1041/image-trigger-tekton
cd image-trigger-tekton
Next, create a new namespace called image-watcher where we will be able to deploy our resources:
Security continues to be a priority in most organizations. Any breach may result in intellectual or financial losses. Reducing access to external systems by internal resources is one was to limit the threat potential. One such method is to place a middleman, or proxy, between internal and external resources to govern the types of traffic. Considerations for how the Container Development Kit (CDK) can traverse proxy servers were covered in a prior blog. However, many organizations are further reducing the need for communicating with remote systems and placing all resources within their infrastructure. Systems operating in a manner where access to external resources is completely restricted is known as running in a disconnected environment. OpenShift supports operating in a disconnected environment and cluster operators can take steps to prepare for normal operation. A full discussion on managing OpenShift in a disconnected environment is beyond the scope of this discussion, but can be found here. While there are several areas the must be accounted for when operating in a disconnected environment, having access to the container images that reside in external image registries is essential. The CDK, like the full platform is driven by container images sourced from external locations. Fortunately, the CDK does contain the functionality to specify an alternate location for which images that control the execution can originate from.
OpenShift’s container images are stored by default in the Red Hat Container Catalog (RHCC) by default. Many organizations operate their own container registry internally for providing content either from remote locations or created internally. Common registry examples in use include a standalone docker registry (docker distribution), Sonatype Nexus, JFrog Artifactory and Red Hat Quay. Since the same container images that are used by OpenShift Container Platform are used by the CDK, organizations can serve them using an internal registry and satisfy both sets of consumers. One requirement that must be adhered to is that the name of the image repository, name and tag must match the source from the Red Hat Container Catalog (it can differ, however several manual changes would then be required).
Once the images are available in the local registry, a few configuration changes can be made to fully support their use in the CDK (See the section on syncing images). First, several of the options that will be leveraged in the CDK are classified as “Experimental features”. To enable support for experimental feature, set the “MINISHIFT_ENABLE_EXPERIMENTAL” environmental variable to “y” as shown below:
export MINISHIFT_ENABLE_EXPERIMENTAL=y
With experimental features enabled, the CDK can now be started. For this example, let’s assume that there is an image registry located at registry.mycorp.com which has been seeded with the images to support OpenShift. Execute the following command to utilize the CDK with images sourced from this internal registry:
Phew, that was a long command. Lets take a moment to break it down.
minishift start
This is the primary command and subcommand used to start the CDK
–insecure-registry registry.mycorp.com
While the registry may be served using trusted SSL certificates, many organizations have their own Certificate Authority instead of leveraging a public CA, such as Comodo. Since the VM running the CDK only trusts certificates from public CA’s, this will allow docker to be able to communicate with the registry
–docker-opt add-registry= registry.mycorp.com
Many OpenShift components do not include the registry portion of the image and instead rely on the configuration of the underlying Docker daemon to provide a default set of registries to use. Both the OpenShift Container Platform and the Container Development Kit have the RHCC configured by default. By specifying the location of the internal registry, the CDK will be able to reference it when images are specified without the value of the registry.
To ensure images are only being sourced from the corporate registry not the default location (RHCC), the CDK VM can configured to place a restriction at the docker daemon level.
OpenShift in the context of the CDK as of OpenShift version 3.9 utilizes the same image as containerized installation and contains all of the necessary logic to manage an OpenShift cluster. Under the covers of the CDK, the “oc cluster up” utility is leveraged to deploy OpenShift. By default, “oc cluster up” references the full path of the image, including registry. This experimental feature flag allows this value to be overridden with the location of the image from the enterprise registry.
The CDK will now start by pulling the container image and once this image is started, all dependent images by the platform will be retrieve. After the CDK has started fully, verify all running images are using the enterprise container registry.
First, check the names of the images currently running at a Docker level using the minishift ssh command:
The final component that requires modification to support leveraging an enterprise registry is to update all of the ImageStreams that are populated in OpenShift. By default, they reference images from the RHCC. The Ansible based OpenShift installer does contain logic to update ImageStreams if the location differs from the RHCC. Unfortunately, the CDK does not contain this logic. Fortunately, this issue can be corrected with only a few commands.
oc login -u admin
Similar to all other accounts in the CDK, any password can be specified.
Next replace the RHCC with the location of the enterprise registry for all ImageStreams by executing the following command:
oc get is -n openshift -o json | sed -e 's|registry.access.redhat.com|registry.mycorp.com|g' | oc replace -n openshift -f-
Make sure to replace registry.mycorp.com with the address of the enterprise registry.
With the ImageStreams now utilizing all of the enterprise registry as the source, reimport all of the ImageStreams:
for x in `oc get is -n openshift -o name`; do oc import-image $x -n openshift --all --insecure=true; done
After the command completes, all ImageStreams will be updated.
At this point the CDK is fully functional with images being referenced from the enterprise registry, thus enabling productivity in environments where security is a high priority
One of the many hallmarks of Open Source Software is the ability for anyone in the community to freely contribute to a software project. This open model provides an opportunity to garner insight into the direction of a project from a larger pool of resources in contrast to a closed sourced model where software may be regulated by a single organization or group. Many enterprises also see the value of Open Source Software to power their most critical systems. However, enterprises must be cognizant that Open Source Software from the community may not have the integrity that they have been accustomed to when using software obtained directly from a vendor. Red Hat, as a leader of Open Source Software solutions, provides a subscription model that can be used to meet the quality and support requirements necessary by any organization. A subscription includes fully tested and hardened software, patches, and customer support. Once a subscription has been purchases, licensed software must be registered to activate the necessary included features.
The Container Development Kit (CDK) is the supported version of the upstream minishift project, and given that the software package is built on top of a Red Hat Enterprise Linux base, a valid subscription associated with a Red Hat account is required to access the entire featureset provided by the CDK. To enable the development on Red Hat’s ecosystem of tools, a no-cost developer subscription is available through the Red Hat Developer program and includes an entitlement to Red Hat Enterprise Linux along with a suite of development tools that are regularly updated with the latest enhancements and features. Information about the Red Hat Developer Subscription along with the steps to create an account can be found at the Red Hat Developer Website.
Once a Red Hat Developer account has been obtained, the configuration of associating the account within the CDK can be completed. These steps were detailed in the prior post, Minishift and the Enterprise: Installation.
While the Red Hat Developer subscription is a great way for developers to take advantage of enterprise Linux software, many organizations frown upon the use of personal licenses operating within the organization, especially on company owned machines. The CDK is configured to automatically register and associate subscriptions against Red Hat’s hosted subscription management infrastructure. Accounts for developers can be created within the Red Hat Customer Portal for use with the CDK. As described in the post Minishift and the Enterprise: Proxies, subscription-manager, the tool within RHEL for tracking and managing subscriptions, is automatically configured to traverse a corporate proxy server to the public internet when this option is enabled. This feature, as previously mentioned, is useful as most enterprises employ some form of barrier between the end user and external network.
Unfortunately, many enterprises do not use Red Hat’s hosted subscription management system to register machines on their network and instead leverage Red Hat Satellite within their internal network. The CDK, as of version 3.3, is only able to register subscriptions against Red Hat automatically as part of normal startup. Fortunately, there are methods in which the user can configure the CDK to register against a satellite server instead of Red Hat. These options include:
Executing commands to facilitate the registration process
Leveraging an add-on which streamlines the registration process
Regardless of the method utilized, the CDK should be instructed to not attempt to register the machine during startup. This is accomplished by passing the –skip-registration parameter when executing the minishift start command as shown below:
minishift start --skip-registration
Even though the RHEL machine within the CDK is not registered, the majority of the functionality will remain unaffected. The key exception is managing software packages using the yum utility. Since RHEL based images inherit subscription and repository information from the host they are running on, operations both on the host machine as well as within a container making use of yum will fail due to the lack of valid subscriptions. This is primarily noticeable at image build time as it typically involves the installation of packages using yum.
The RHEL machine within the CDK can be registered manually in a similar fashion to any other RHEL machine using the subscription-manager utility. To gain access to a prompt within the CDK, the minishift ssh command can be used.
minishift ssh
By default, an ssh session is established within the CDK using the “docker” user. Since subscription-manager requires root privileges, access must be elevated using the sudo command. Execute the following command to elevate to the root user:
sudo su -
With access to root privileges, the machine can now be registered to Red Hat using the subscription-manager register command. Either a username/password or activation key/organization combination can be used as follows:
In either case, adding the –auto-attach parameter to each command will attach a subscription automatically to the new registration.
To subscribe the CDK against an instance of Red Hat Satellite instead of Red Hat’s hosted infrastructure, many of the same commands can be reused. An additional step is required to first download the bundle containing the certificates for the Satellite server so that the CDK can communicate securely to facilitate the registration process. Execute the following command to install the certificates into the CDK:
To validate the CDK is properly subscribed, lets start a new container and attempt to install a package using yum. Once again, in a session within the CDK as the root user, execute the following command:
docker run -it --rm rhel:7.5 yum install -y dos2unix
If the above command succeeded, the CDK is properly registered and subscribed.
Automate Satellite Registration using an Add-on
Active users of the CDK routinely delete the RHEL VM that is part of the CDK using the minishift delete command and start with a clean slate as it eliminates the artifacts that have accumulated from prior work. As demonstrated previously, registration of the CDK against a Red Hat Satellite does involve a number of manual steps. Fortunately, there is a way to automate this process through the use of a minishift add-on. An add-on is a method to extend the base minishfit startup process by injecting custom actions. This is ideal as the add-on can streamline the repetitive manual processes that would normally need to be executed to register against satellite.
An addon called satellite-registration is available to facilitate the registration of the CDK against a Satellite instance. To install the add-on, first clone the repository to the local machine:
Confirm the add-on was installed successfully by executing the following command:
minishift addons list
When any new add-on is installed, it is disabled by default (as indicated by the disabled designation). Add-ons can be enabled which will automatically execute them at startup or they can be manually invoked using the minishift apply command. If you recall, registration against a satellite instance required several values be provided to complete the process:
Location of the satellite server to obtain the certificate bundle
Organization ID
Activation Key
The add-on similarly requires these also be provided so that it can register the CDK successfully. Add-on’s offer a method of injecting parameters during the execution process through the –addon-env flag. The above items are associated with the add-on environment variables listed below:
SATELLITE_CA_URL
SATELLITE_ORG
SATELLITE_ACTIVATION_KEY
To test the add-on against a satellite server, first start up the CDK with auto registration disabled:
minishift start --skip-registration
Once the CDK has started, apply the satellite-registration add-on along with the required flags:
Confirm the registration was successful by checking the status as reported by subscription manager from the local machine
minishift ssh sudo subscription-manager status
If the “Overall Status” as reported by the previous command returns “Current”, the CDK was successfully subscribed to the satellite instance.
Whether using Red Hat hosted infrastructure or Red Hat Satellite, developers in the community or within an enterprise setting have access to build powerful applications using trusted Red Hat software by registering and associating subscriptions to the Container Development Kit.
Separation of concerns is one of the fundamental principles in a multitenant environment. It ensures that multiple users can coexist without knowledge or access to each others resources. While OpenShift supports multitenancy through a number of different mechanisms, the use of projects provide users with their own separate workspace with the cluster. Built on top of Kubernetes namespaces, projects in OpenShift not only allows for a single user, but an entire community of users the ability to effectively collaborate within the cloud. One of the unique features of projects is that when they are initially created, they are preconfigured with a set of service accounts and permissions (roles/role bindings) that allow for users to be immediately productive. While the initial set of customized resources within a project provides a suitable baseline for end users, cluster administrators may want to enforce additional policies and configurations whenever a new project is created. Fortunately, OpenShift provides the capability of defining a default project template that will be instantiated whenever a new project is created. The following steps describe how to create a new default project template:
Export the default project template to a file
Make the appropriate modifications
Add the template to the cluster
Edit the master-config.yaml configuration on each master to designate the template that should be used as the default project template
In most of the clusters that I regularly deploy, I have automated these actions as a post installation step (obviously driven through Ansible). Even with the additional automation, it still presents another dependency that must be maintained when installing a new OpenShift environment. Fortunately starting with OpenShift 3.7.14, native support for configuring the default project template is available within the installation. Similar to the other options that are available during an installation of OpenShift, all that is required is defining a few Ansible variables. The rest of this post describes how to automate the configuration of a default project template through the OpenShift installer.
Before specifying the mechanisms necessary to configure the installer, let’s define a common use case of how the default project template could be modified. To protect the stability of the cluster, ResourceQuotas and LimitRanges can be applied to any new project to define the and restrict the amount of resources that can be consumed by running applications. While these metrics can vary from cluster to cluster, a middle of the road set of resources can be defined as follows:
ResourceQuotas
Name
CPU
Memory
Scope
quota
2
12Gi
NonTerminating
burst-quota
4
16
LimitRanges
Name
Pod Max
Pod Min
Container Max
Container Min
Container Default
limits
CPU: 200m Memory: 2Gi
CPU: 10m Memory: 128Mi
CPU: 200m Memory: 2Gi
CPU: 20m Memory: 256Mi
CPU: 50 Memory: 256Mi
The openshift_project_request_template Ansible role is ultimately responsible for implementing many of the steps that would normally need to be manually configured. This role makes use of an Ansible library called yedit that allows for the modification of YAML files. As the role executes, it exports the default project template and modifies the file with customized values. Any modification to the default project template must be defined by the variable openshift_project_request_template_edits which takes in an array of modifications that should be executed by yedit. This variable, similar to other variables that allow for the customization of the OpenShift installation are defined within the [OSEv3:vars] section of the Ansible inventory. Formatting the variable in a manner in which the module can properly process the changes is the most complex aspect of the customization process.
Each array value must define a set of values to perform the desired results of customizing the default project template. First is a key within the yaml file that should be modified. For those familiar with OpenShift templates, there are two primary key properties: objects which define the resources that are applied to OpenShift and parameters which allow for values to be dynamically injected at runtime. Since default project templates do not support additional parameter values, the only the object key can be modified. Since the desired outcome of the execution process is to append the existing list of objects, yedit has a module option called `append` that when set to True, will append the newly defined values with the existing values. Finally, the newly created object itself must be defined. Each additional resource to be added to the default project template must be separated into its own array object. In our use case, three objects will be created as shown below:
Once the openshift_project_request_template_edits variable has been defined, a few more variables must also be defined. First, openshift_project_request_template_name should be defined in order to specify the name of the template that should be created and then openshift_project_request_template_namespace specifies the namespace (or project) in which the template will be created. To create a template called project-request in the default namespace, the following variables can be specified:
Next, the OpenShift installation must be instructed to execute the logic in the openshift_project_request_template through the use of the openshift_project_request_template_manage boolean variable which should be set to True as shown below:
openshift_project_request_template_manage: True
The final step is to define the name along with the namespace in the format namespace/name that will be added to the projectRequestTemplate field of the master-config.yaml file. This is defined by the osm_project_request_template as shown below:
After the four (4) variables have been added, execute the installer against a new or existing OpenShift cluster.
Once the installer has completed, verify the expected results by logging in to the OpenShift environment and creating a new project. Create a new project called test-project-template.
oc new-project test-project-template
Verify the ResourceQuotas are present:
$ oc get resourcequotas

NAME          AGE
burst-quota   1m
quota         1m
Now verify the LimitRange was created:
$ oc get limitrange

NAME      AGE
limits    1m
With just a few Ansible variables, the OpenShift installer streamlined the steps necessary to configure the default project template for an OpenShift cluster.
Note: This post contains details about components which may be in active development. Please refer to any release notes or documentation as it relates to the current status and supportability
Jenkins, the Open Source continuous integration server, has been included as a supported offering on OpenShift since the release of OpenShift version 3.1. With only a few simple clicks, an entire continuous integration and delivery pipeline for automating and simplifying the application build and deployment process can be created. All a user needs to do is use the OpenShift web console or command line tool, select the Jenkins template, and log in to the deployed Jenkins environment using the password entered or automatically generated. The Jenkins image for OpenShift provides a fully containerize solution supported by plugins specifically designed for integration with OpenShift. One feature that had been missing previously was the ability to leverage OpenShift as a single sign on (SSO) provider and apply the same authentication mechanisms to access Jenkins. As a user attempts to access a protected resource, they are redirected to authenticate with OpenShift. After authenticating successfully, they are redirected back to the original application with an OAuth token that can be used by the application to make requests on behalf the user. A similar approach already exists for the Kibana integrated aggregated logging solution. A newly released Jenkins plugin, called the OpenShift Login Plugin, now provides the support to enable this functionality.
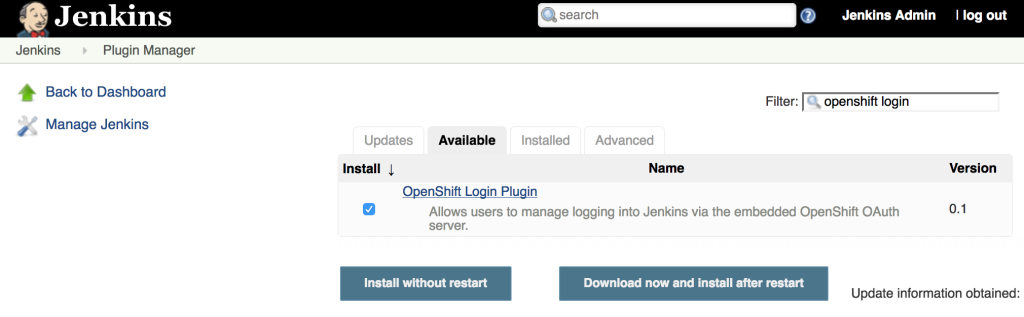
The first step towards implementing this solution is to add the OpenShift Login Plugin to Jenkins. Adding a plugin to Jenkins takes only a few steps. Login to Jenkins and on the left side of the page, select Manage Jenkins and then Manage Plugins. On the Available tab, enter “OpenShift Login” in the textbox to limit the available plugins presented.
Select the “OpenShift Login Plugin” and click Download Now and Install After Restart. As it’s downloading, be sure to check the “Restart Jenkins when the installation is complete and no jobs are running” so that Jenkins restarts once the plugin has been downloaded. After Jenkins restarts, login once again.
Since the OpenShift Login Plugin interacts with the OpenShift OAuth server to facilitate the single sign on process, Jenkins must be first configured as an OAuth client within OpenShift. There are two ways this can be configured:
Create a new OAuth client
Use a service account to represent an OAuth client
The first method is to create a new standalone OAuth client. An OAuthClient is another API object type, similar to other API objects such as a Pod, Service and Route. However, since it is configured at the cluster level, the ability to create or modify is restricted to only elevated users, such as cluster administrators. If your user does not have this level of access, the service account method as described in a subsequent section must be used.
An OAuthClient is represented by a structure similar to the following:
When configuring the OAuth client within an application such as Jenkins, the name in the metadata section is analogous to a client_id. The secret is an access credential that is shared with both the authorization server (OpenShift) and the client (Jenkins) and is used to determine trust between each other. Finally, the redirect URI field specifies the location the OAuth server will redirect the user once the authorization process completes (successfully or unsuccessfully).
To simplify the creation of an OAuth client, an OpenShit template has been created to streamline the process and allows for the user to provide values for the OAuthClient name, secret and a single redirect URI. If a secret is not provided, one will be automatically generated.
Execute the following command to add the template to OpenShift.
The most important parameter, and only required parameter, in the template is the redirect URI. Jenkins exposes an endpoint at /securityRealm/finishLogin that processes the OAuth response and stores the OAuth token for subsequent use. The following command will create the OAuth client by first looking up the hostname of the exposed route and pass the returned value as an input parameter:
oc process -v=OAUTH_CLIENT_REDIRECT_URI=`oc get route jenkins --template='{{if .spec.tls }}https{{ else }}http{{ end }}://{{ .spec.host }}/securityRealm/finishLogin'` jenkins-oauth-template | oc create -f-
Confirm the new OAuthClient called oauth-jenkins has been created by running the following command:
oc get oauthclients
As mentioned previously, if the client secret is not provided during template instantiation, one will be randomly generated. This secret will need to be configured in Jenkins to establish the client/server trust. To locate the secret that was configured in the OAuthClient API object, execute the following command:
oc get oauthclients jenkins-oauth --template='{{ .secret }}'
With the OAuthClient in place, configure Jenkins to make use of the OpenShift Login plugin. Navigate to the Jenkins summary page and click Manage Jenkins and then Configure Global Security. Select the Login with OpenShift radio button to expose several textboxes for further configuration.
The OpenShift login plugin will attempt to make use of preconfigured variables based on the environment, however, several fields do require manual input. The following fields require modifications:
OpenShift Server Prefix: Location of the internal OpenShift service (For externally hosted Jenkins servers, utilize the Master API address)
Enter https://openshift.default.svc
OpenShift Redirect URL: Location of the OpenShift Master API which will be used to redirect the user to authenticate with OpenShift
Dependent on the environment. An example could be https://master.example.com:8443
Client Id: Name of the OAuth Client
Enter the name of the OAuthClient created previously: jenkins-oauth
Client Secret. OAuth Client Secret
Enter the client secret value obtained from the oauth client previously
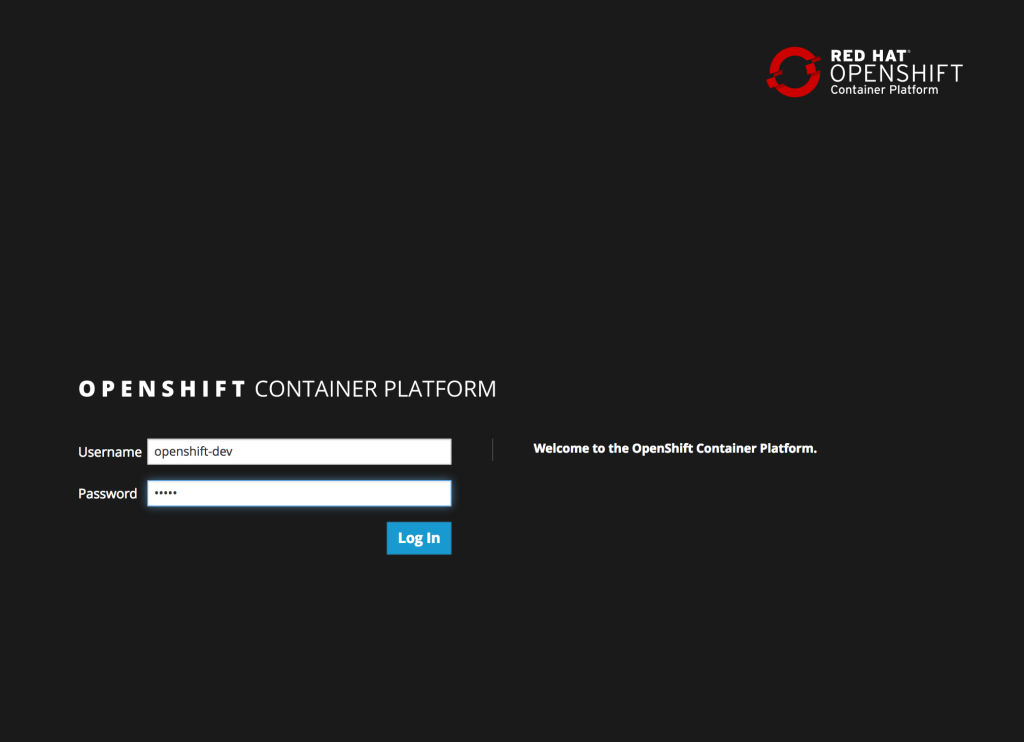
Click Save to apply the changes. Once the changes have been made, click the logout button on the top right corner of the page. This will trigger a new authentication process and redirect the user to the OpenShift web console to authenticate.
Enter a valid username and password, click Login and authentication will be performed against the realm configured within OpenShift and upon success, the browser will redirect back to the Jenkins home page.
Several months ago, an article was published by OpenShift lead engineer Clayton Coleman on how the OpenShift API can be expressed using Swagger. For those who have never heard of Swagger previously, it is a framework for describing and producing a visualization of a RESTful API. The post gave users an excellent introduction to the resources exposed by OpenShift. Fast forward a few months, and now that OpenShift has been officially released, it is a fine time to revisit Clayton’s post and provide updates to allow users to interact with the GA version of the the product and cover any necessary configurations that need to be made beforehand.
First, let’s revisit the OpenShift architecture and how the Swagger framework is integrated into the product. Two restful endpoints are exposed by OpenShift: The Kubernetes API and the OpenShift API. Each provide decorated swagger endpoints which can be accessed at the following locations:
The cURL command can be used to validate the endpoints against an existing OpenShift environment which will produce a Swagger formatted json result. The power of the Swagger framework is realized by the ability to take this API representation and present it in a consumable form for the user to interact with such as retrieving results and invoking requests. These interactions are facilitated using the Swagger UI.
User Interface
The Swagger UI is a set of HTML, CSS and JavaScript components that produce the representation of the API. An updated customized Swagger UI implementation is available to communicate with OpenShift and can be found at http://openshiftv3swagger-sabre1041.rhcloud.com/.
Since the Swagger UI is a client based application that may be served from a domain other than OpenShift, settings within OpenShift would need to be configured on the master to allow for Cross-origin resource sharing (CORS). The OpenShift master configuration file located at /etc/openshift/master/master-config.yaml contains the key coorsAllowOrigins which defines the origins that are allowed to invoke the API. To allow all origins, add a – “.*” to the list similar to the following:
Restart the OpenShift service on the master to apply the changes:
systemctl openshift-master restart
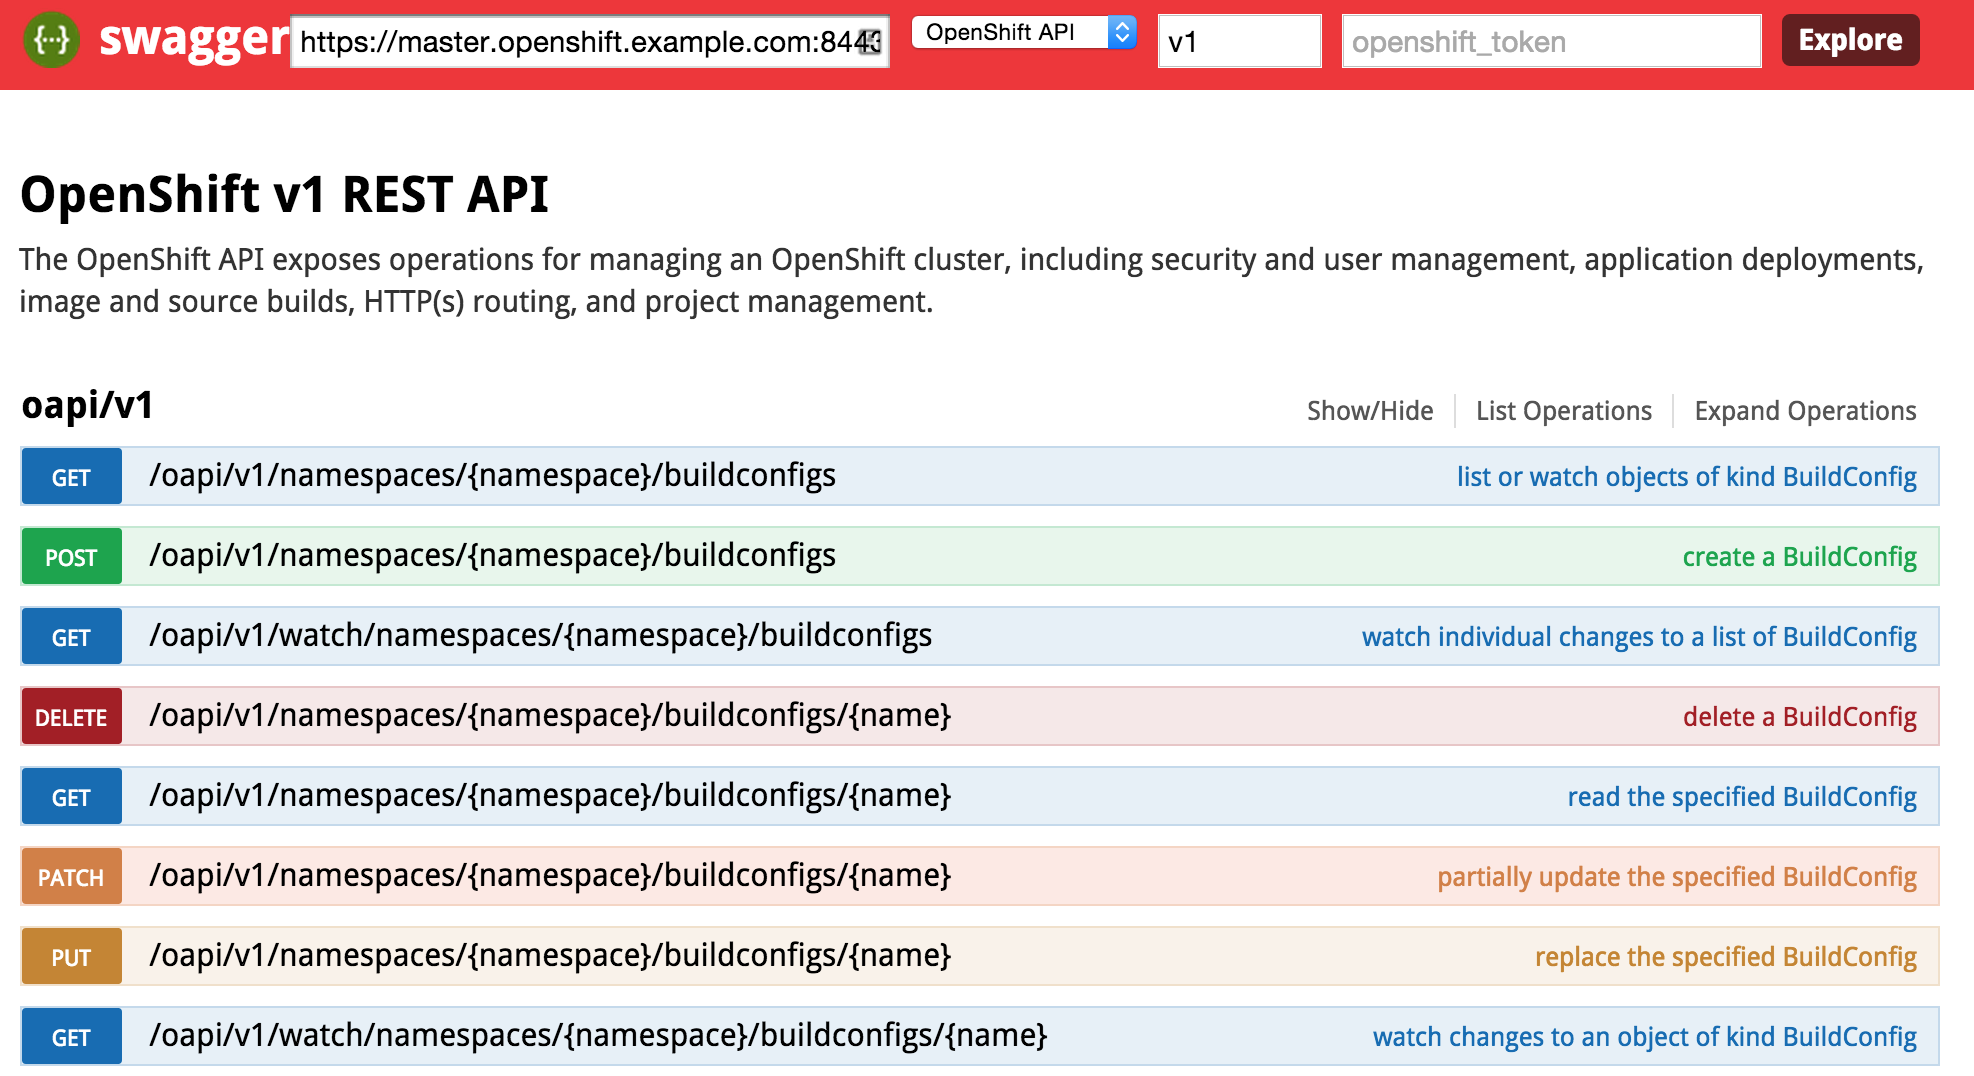
Return back to the Swagger UI and you will notice several input fields at the top of the page which correspond to the following fields:
Master Base URL – URL (host and port) of the OpenShift Master
API Type – Type of API to invoke (Kubernetes or OpenShift)
API Version – Version of the OpenShift API (use v1 for OpenShift V3 GA)
Authentication Token – User token of a privileged user to execute commands as (explained later)
The endpoint is unsecured by default so listing the functions can be completed without entering a token. First, enter the URL of your OpenShift master. For example, this could be https://master.openshift.example.com:8443. Next, select the API to invoke (either the Kubernetes or OpenShift API) from the dropdown. Then enter the api version in the next textbox (A dropdown of values is available to aid with input selection). Then hit the Explore button. It may take a moment for the page to render, but once finished, the list of functions for the selected API should be presented.
Consult the Swagger documentationfor the full range of capabilities provided by the the framework.
Authentication Token
Many of the API functions require an authenticated user for invocation. An authentication token can be obtained from a user registered in OpenShift to invoke additional functions in the swagger UI. The token can be obtained using the OpenShift CLI from a developer machine.
Assuming the CLI tools have been previously installed, first login to OpenShift
oc login https://<openshift_master>:8443
After successfully authenticating, obtain the token for the session
oc whoami -t
The token value should be provided. Enter this value in the token textbox in the Swagger UI to allow for the execution of additional resources the user is authorized to invoke.
In an earlier post, I introduced a custom Apache Camel component that can be used to manage the OpenShift platform. It allows for the invocation of operations that control key components of the OpenShift lifecycle such as displaying user metrics and managing applications. The operations and metrics generated from this component can be used in a variety of applications that leverage the Camel framework to solve business goals. Camel can be deployed to a variety of runtime environments ranging from servlet containers such as Tomcat, application servers such as JBoss , OSGi containers such as Karaf, or even self sufficient as a standalone application. To demonstrate the functionality of the OpenShift Camel component in a project, we will leverage SwitchYard and JBoss as the running environment within a sample project called camel-openshift-switchyard. SwitchYard is a services delivery framework for running and managing service-oriented applications. By running on SwitchYard, it will allow for the opportunity to cover both the OpenShift Camel component and developing and running applications using Switchyard. This post will provide an overview to the sample project including the steps necessary to configure and deploy either in your own environment or on the OpenShift platform. In subsequent posts, we will review the project in depth including how Camel can be integrated into a SwitchYard project and how to integrate the OpenShift Camel component in a project of your own.
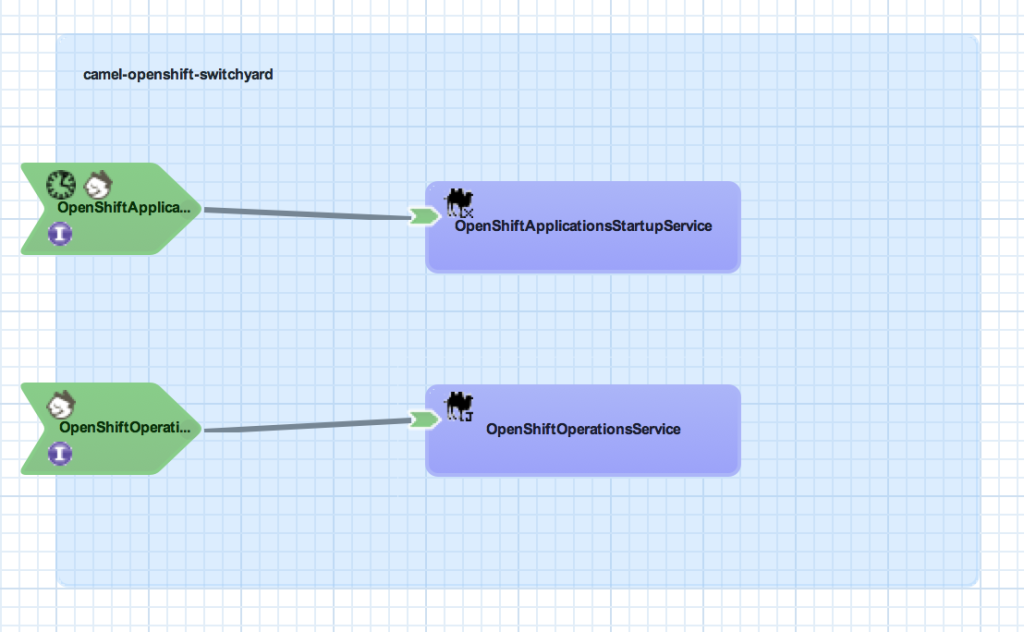
The camel-openshift-switchyard project consists of a SwitchYard application and a basic web application that can be used to invoke services exposed by SwitchYard. The SwitchYard application contains two services: OpenShiftOperationsService and OpenShiftApplicationsStartupService. Each contains Camel routes utilizing the OpenShift Camel Component. The OpenShiftOperationsService invokes operations against a given users’ account such as retrieving the details of a given domain or applications within a domain. Meanwhile, the OpenShiftApplicationStartupService will attempt to start any Application associated to a user that is not currently started. A diagram depicting these services and the overall SwitchYard composite is shown below:
Both services contain a RestEasy binding to allow for external invocation via REST. The OpenShiftApplicationsStatup service also contains a timer binding which will initiate the service at the top of each hour based on a cron schedule. To take advantage of the scheduled service operation, the following two system properties must be configured either within the application itself or on application platform.
openshift.user – The login of the OpenShift user
openshift.password – The password on the account
Testing
Included in the project are a series of integration tests designed to validate the functionality of the application and to demonstrate the testing capabilities of SwitchYard applications. Injection of property values and invocation of Services and HTTP resources are some of the components demonstrated.
Building and Deploying
The project is hosted on GitHub and can be cloned into a local environment by running the following command:
Prior to built or imported into an IDE, certain project dependencies must be configured. A core project dependency is the OpenShift Camel component which must be installed and available in the local Maven repository. Because this library is not part of any publicly available repository, initialization scripts for both Windows and Unix have been provided to configure the required dependencies. This script is found in the support folder of the project. Execute the init.sh or init.bat depending on your Operating System.
Next, build the project using Maven by running the following command:
mvn clean install
With the project now built, deploy the archive to Fuse Service Works or a JBoss container with SwitchYard installed. Once deployed, the application can be accessed by browsing to http://localhost:8080/camel-openshift-switchyard/
Deployment to OpenShift
The project has been configured to be seamlessly deployed to the OpenShift Platform. OpenShift provides the functionality to utilize custom cartridges which are not part of the core OpenShift platform to host applications. Since this project is built on SwitchYard, we will leverage a custom JBoss EAP 6 cartridge preconfigured with the SwitchYard runtime. The OpenShift Web interface provides the ability to specify a custom cartridge and existing source code during new application creation. However, due to the number of dependencies required by the SwitchYard platform, the project is unable to be built and deployed prior to the default application creation timeout. To get around this limitation, we will create the application using the OpenShift command line tools (RHC), merge the local OpenShift project with the camel-openshift-switchyard project hosted on GitHub, then finally push the application to OpenShift. Using the terminal in the location where the repository of the newly created application will be created on your local machine, issue the following command to create an application using the custom SwitchYard cartridge as the container.
Next, pull in the changes from the upstream repository
git pull -s recursive -X theirs upstream master
Finally push the changes to OpenShift
git push origin master
OpenShift will then handle obtaining the required dependencies, building and deploying the project. Once complete, the application can be viewed in a web browser. To determine the URL of an OpenShift application from the command line, execute the following command:
rhc app show <app-name>
You should be able to browse to the URL and utilize the application as you would on your local machine.
As mentioned previously, we will walk through the project in detail in a future post. This will allow for the demonstration of SwitchYard components and provide examples of how the OpenShift Camel component can be used in projects of your own.
In the past, I have demonstrated several projects and features for OpenShift, Red Hat’s Platform as a Service product. You may be aware of OpenShift Online, available at http://openshift.com, for seamless deployment of applications to the cloud. What you may not be aware is that OpenShift Online is only one of the OpenShift products available. The OpenShift line of products features 3 solutions: Online, Origin and Enterprise. While OpenShift Online may suit your public cloud needs, there may be interest in establishing a private or hybrid cloud solution within your enterprise. The best way to become familiar with a product is to install and configure it yourself on a local machine, such as a personal desktop or laptop. Evaluating cloud-based technologies on a single machine typically requires the use of virtual machines to replicate multiple machines or environments. However, applying the appropriate configurations when leveraging multiple virtual machines can be challenging as they must be able to communicate both with each other as well as the external Internet. In the following discussion, we will walk through the process of configuring the supporting infrastructure of a minimal installation of a private OpenShift environment using Oracle VirtualBox.
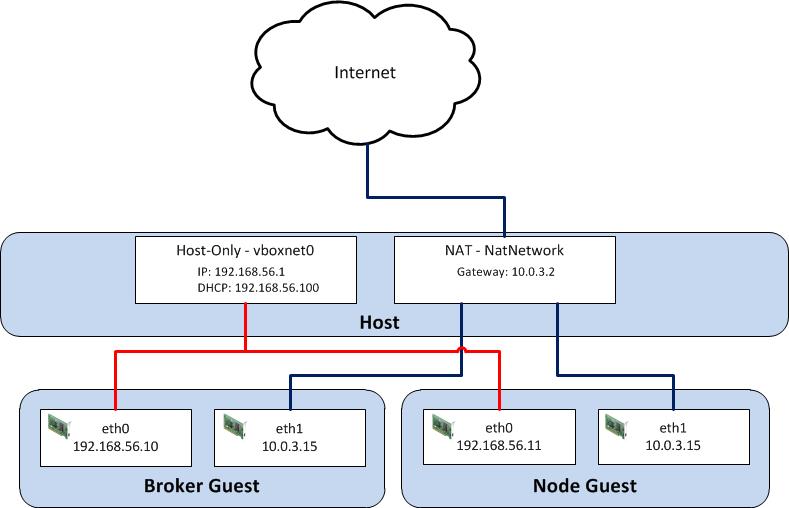
While there are several virtualization products on the market today, we will utilize Oracle VirtualBox primarily due to its ease of use and compatibility with multiple platforms. Before we begin the configuration process, let’s discuss what an OpenShift environment consists of. A typical basic installation of OpenShift requires the allocation of two machines: A Broker, which handles user and application management, and a Node which provides hosting of cartridges and the actual storage of applications deployed by users, which are contained within gears. Communication between broker and node instances is critical to the performance of the OpenShift environment and presents the greatest challenge when configuring the virtual instances. We need to provide an environment that fulfills the following requirements:
Host can communicate with each virtual guest
Virtual guests can communicate with each other
Virtual guests can access external resources on the Internet
VirtualBox, similar to most virtualization software, supports several network hardware devices that can be run in a variety of networking modes. A full discussion of the different types of network devices and modes VirtualBox can be configured in can be found on the VirtualBox website . To accommodate the aforementioned requirements, we will leverage multiple network adapters running in separate networking modes. The first adapter will be configured in host-only mode as it creates a private network among each virtual machine configured with this network type and the host. The limitation when running in host-only mode is there is no access to external resources such as the Internet. To allow access to external networks within each guest, a second adapter is configured in NAT networking mode. NAT networking is one of the modes VirtualBox provides for allowing a guest to connect to external resources. It was chosen as it requires the least amount of work and configuration by the end user and is ideal for simple access to external systems. An overall diagram of the virtual machine network architecture can be found below.


Recent Comments