Posted: February 23rd, 2014 | Author: sabre1041 | Filed under: Technology | Tags: OpenShift, VirutalBox | No Comments »

In the past, I have demonstrated several projects and features for OpenShift, Red Hat’s Platform as a Service product. You may be aware of OpenShift Online, available at http://openshift.com, for seamless deployment of applications to the cloud. What you may not be aware is that OpenShift Online is only one of the OpenShift products available. The OpenShift line of products features 3 solutions: Online, Origin and Enterprise. While OpenShift Online may suit your public cloud needs, there may be interest in establishing a private or hybrid cloud solution within your enterprise. The best way to become familiar with a product is to install and configure it yourself on a local machine, such as a personal desktop or laptop. Evaluating cloud-based technologies on a single machine typically requires the use of virtual machines to replicate multiple machines or environments. However, applying the appropriate configurations when leveraging multiple virtual machines can be challenging as they must be able to communicate both with each other as well as the external Internet. In the following discussion, we will walk through the process of configuring the supporting infrastructure of a minimal installation of a private OpenShift environment using Oracle VirtualBox.
While there are several virtualization products on the market today, we will utilize Oracle VirtualBox primarily due to its ease of use and compatibility with multiple platforms. Before we begin the configuration process, let’s discuss what an OpenShift environment consists of. A typical basic installation of OpenShift requires the allocation of two machines: A Broker, which handles user and application management, and a Node which provides hosting of cartridges and the actual storage of applications deployed by users, which are contained within gears. Communication between broker and node instances is critical to the performance of the OpenShift environment and presents the greatest challenge when configuring the virtual instances. We need to provide an environment that fulfills the following requirements:
- Host can communicate with each virtual guest
- Virtual guests can communicate with each other
- Virtual guests can access external resources on the Internet
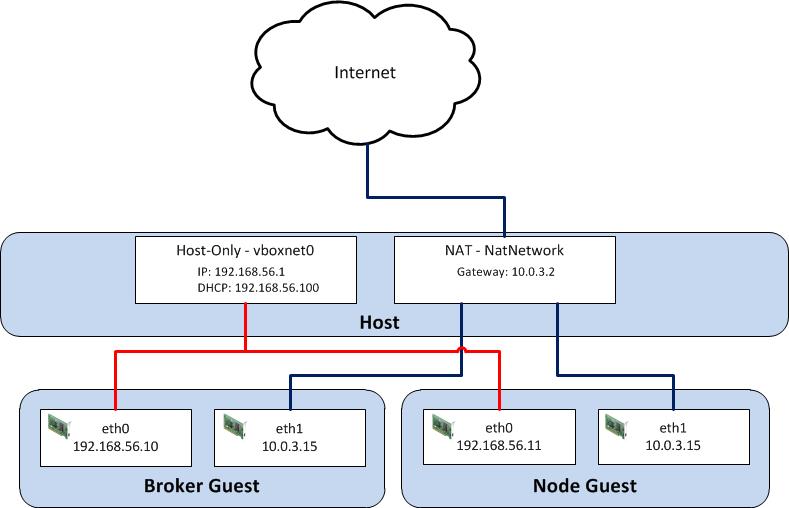
VirtualBox, similar to most virtualization software, supports several network hardware devices that can be run in a variety of networking modes. A full discussion of the different types of network devices and modes VirtualBox can be configured in can be found on the VirtualBox website . To accommodate the aforementioned requirements, we will leverage multiple network adapters running in separate networking modes. The first adapter will be configured in host-only mode as it creates a private network among each virtual machine configured with this network type and the host. The limitation when running in host-only mode is there is no access to external resources such as the Internet. To allow access to external networks within each guest, a second adapter is configured in NAT networking mode. NAT networking is one of the modes VirtualBox provides for allowing a guest to connect to external resources. It was chosen as it requires the least amount of work and configuration by the end user and is ideal for simple access to external systems. An overall diagram of the virtual machine network architecture can be found below.

Posted: February 10th, 2014 | Author: sabre1041 | Filed under: Technology | Tags: Camel, OpenShift | 3 Comments »

Since its creation in 2007, the Apache Camel project has allowed developers to integrate systems by creating Service Oriented Architecture (SOA) applications using industry standard Enterprise Integration Patterns (EIP). At its core, Camel is a routing engine builder for which messages can be received and processed. The processing of messages uses a standardized API library backed by an extensive collection of components which abstracts the actual implementation of routing and transformation of messages. These components also include the ability to communicate with external systems through an array of protocols ranging from web services, REST and JMS. With more than 80 components in the standard Camel distribution, developers have the flexibility to perform power operations with minimal effort to suit their business needs. One of the benefits of the Camel component framework is that it was designed as a factory system where new components can be easily added to solve a business use case.
As more companies and individuals look to migrate their operations and applications into cloud-based solutions, the management of these resources can prove to be a challenge. The overall architecture may be different than what many individuals are accustomed. The OpenShift Platform as a Service (PaaS) is one such cloud offering where developers can quickly create powerful scaled applications without having to worry about managing infrastructure or complex software installation.
Introducing the OpenShift Camel Component
Imagine being able to communicate with the OpenShift Platform directly through a Camel route? With the OpenShift Camel component, it is now possible. Exposed through an Endpoint as both a Camel Consumer and Producer, OpenShift resource details can be retrieved or modified all within a Camel route. Want to find out information about a particular OpenShift Domain, such as the applications and their details? How about automating application deployments? These are only some of the possibilities now available.
Communication between the OpenShift Camel component and OpenShift is facilitated by using the REST API exposed by the OpenShift platform and the OpenShift Java Client. Responses from the OpenShift Camel component will be returned using the API from the OpenShift Java Client.
Using the OpenShift Camel Component in your project
The OpenShift Camel Component can be easily added to a new or existing project. The following steps will describe how this can be accomplished.
GitHub Project: https://github.com/sabre1041/camel-openshift
- Fork/Clone the GitHub repository
git clone https://github.com/sabre1041/camel-openshift.git
- Build the project using Maven
mvn clean install
- Add the component to a new or existing Camel Project as a Maven dependency in the projects’ POM file.
<dependency>
    <groupId>org.apache.camel</groupId>
    <artifactId>camel-openshift</artifactId>
    <version>0.0.1-SNAPSHOT</version>
</dependency>
- The following example implementation will retrieve information about the authenticated user and print out their user details to the log:Java DSL
import org.apache.camel.builder.RouteBuilder;

public class PrintOpenShiftUserRoute extends RouteBuilder {

    public void configure() throws Exception {
        // Retrieve User Details
        from("openshift://user?userName=<openshift_username>&password=<openshift_password>")
            //Print to Log
            .log("${body}");
    }

}
Spring XML
<route>
<description>Spring XML Route. Full XML omitted for brevity</description>
<from uri="openshift://user?userName=<openshift_user>&password=<openshift_password>"/>
<log message="${body}"/>
</route>
With the steps above complete, the project can be deployed to a running container or unit tests can be created to verify the expected results. Additional functionality including how to leverage Authentication as Message Headers can be found on the GitHub project page.
In an upcoming post, I will demonstrate several uses for the OpenShift Camel including how the component can be leveraged within a SwitchYard application.


Recent Comments