OpenStack provides scalable Infrastructure as a Service (IaaS) resources that can be used to gain access to assets on demand. With only a few clicks in the user interface or commands from the API based command line interface, server instances and associated supporting resources can be created. These instances are typically created based on preconfigured images in one of several supported formats. However, there are usually steps that must be taken up front in order to prepare these images for use within the platform. This process in many cases requires the use of specialized software tools that can not only consume the raw content, but output in a format that is supported and can be consumed by OpenStack.
Instead of going through the up front work to perform the preparation and customization steps of a cloud image, there is a common desire to leverage the raw source content that is provided by software vendors. This article will discuss how these base ISO images, ones that are typically responsible for aiding in booting an Operating System from a remote source or installing an Operating System from the included media, can be used to create new server instances in an OpenStack environment.
An overview of the architecture that will described throughout the remainder of the article is shown below:
OpenStack server instances are highly configurable. However, in order to demonstrate the architectural principles of this approach, only a base level set of configurations will be provided. A common use case which aligns to this requirement is a server instance that boots off of a remote network server. This PXE based boot uses local media which contains the minimum set of assets in order to install an Operating System and leans on the content from the remote server. The first step is to identify the installation media (boot ISO in this case) and add it to OpenStack. This task can be completed via the user interface or by using the command line. Most of the interaction with the OpenStack platform in this post will use the openstack command. While any ISO image could be used, for our use case, a RHEL Enterprise Linux Boot ISO will be used. More information on the RHEL Boot ISO along with how to obtain the source can be found here. Create the image called rhel-8.4-x86_64-boot by executing the following command.
openstack image create --disk-format iso --container-format bare rhel-8.4-x86_64-boot -f=value -c=id
With the image loaded into OpenStack, let’s talk about how the image will be used when the server instance is created. OpenStack supports booting instances from either an image or a volume. Cloud based images are typically configured with the Operating System already installed and the root disk that is provided by the particular flavor selected at instantiation time. Since an ISO is a read-only source, storage must be provided separately. Instead of referencing the ISO as an image source which will automatically set the boot order at the highest precedence (0), the image can be instead converted to a volume, offering an alternative boot path. A separate volume can then be created and serve as the primary storage for the root disk serving the instance along with being set with a lower boot precedence so that it will be activated once the Operating system is installed. The following table describe the volumes that will be created in further detail using this approach:
Volume
Mount Point
Boot Order
Extra Parameters
Root OS
/dev/vda
0
bus=ide
RHEL Boot Disk
/dev/hda
1
type=cdrom
The first volume that should be created is based on the content of the previously created image. Let’s call this volume rhel-8.4-x86_64-boot-vol. Execute the following command to create the volume.
The should refer to the output from the previously created image. Also note the bootable flag is being set so that the volume is eligible to be used as a boot device. Be sure to also set an appropriate volume side based on the size of the image.
Next, create a new volume that will serve as the root disk for the newly created server instance. In this example, a volume called rhel-8.4-boot-test-vol will be used. Set an appropriate volume size based on the expected needs of your server instance.
With the tasks associated for volume management complete, collect the remaining parameters needed to boot the server instance. While the openstack command has been used thus far, it does not provide the necessary options that we will need for managing the volumes appropriately. Instead, the nova command will be used. Feel free to view the options supported by the nova command to determine which are appropriate for your use case. Common options include --flavor for defining the type of instance that will be created, --nic for managing network interfaces, --security-group for associating security groups, or --key-name for attaching an SSH key to the instance.
Once all of the parameters have been collected, proceed to create a new server instance called rhel-8.4-boot-test using the following command.
The --block-device parameter associates how the volumes created previously are applied to the newly created server instance. Be sure to include the id’s of the volumes created previously and their associated sizes. You may also choose to omit certain parameters or include additional parameters based on your use case, but the command listed here should cover the minimum set of configurations.
The details of the newly provisioned server instance will be provided once the nova boot command returns. Management of the new instance can be facilitated by connecting to the console and performing the necessary installation steps. Locate the URL of the in-browser based console by executing the following command.
openstack console url show rhel-8.4-boot-test
Once connected to the console, you will notice that the instance used the volume containing the operating system boot image since it is the only volume present with bootable media. Complete the necessary steps to boot and install the Operating System from either a remote server or local media. Once the installation is complete and the machine is restarted, the instance will now boot from the volume containing the installed Operating System root disk as it has a lower boot index.
The final step is to detach the volume containing the Boot ISO as it is no longer needed anymore by the server instance. Once the volume is detached, it can then either be deleted or reused by another server instance requiring the use of a Boot ISO.
Volumes cannot be removed while the server is running. Either poweroff the instance from within the Operating System or stopping the instance through the CLI by executing the following command:
openstack server stop <server_instance_id>
The id of the server was displayed within the output printed upon the completion of the nova boot command. It can also be found through the use of the openstack server list command as shown below:
openstack server list --name=rhel-8.4-boot-test -f=value -c=ID
Use this value to stop the rhel-8.4-boot-test server instance
With the server instance stopped, the volume associated with the Boot ISO can be detached.
<server_instance_id>
openstack server remove volume <server_instance_id> <image_volume_id>
Confirm the rhel-8.4-x86_64-boot volume is once again available
openstack volume list --name=rhel-8.4-x86_64-boot
Now, the server instance can be started once again and resume normal operation
openstack server start <server_instance_id>
As demonstrated in this post, by configuring how an ISO image is loaded and made available to the server instance, along with controlling the boot order, additional options are made available when operating in an OpenStack environment.
Helm has become the de facto tool for packaging and deploying applications in a Kubernetes environment not strictly due to its ease of use, but also because of its versatility. What once was a complex process for managing applications now can be facilitated with ease. In more complex deployments, an application may have one or more components that it relies on for normal operation, such as a database for a front end application. Helm uses the concept of dependencies to define a relationship between the current chart and any other chart that is required to be deployed in order for a release to be deemed both complete and successful. In most cases, dependencies are sourced from Helm repositories, where a chart has been packaged and served on an external web server. An example of how dependencies can be defined in a Chart.yaml file can be found below:
However, another approach is to source dependent charts from the local file system. This method has several advantages including avoiding a reliance on any external resource (the chart repository) as well as the ability to test dependent charts that may also be in development without formal packaging to be complete.
Instead of specifying the location of the remote chart repository server using the http(s) protocol, the file protocol can be used instead:
The process of Installing a chart containing dependencies is the same regardless if they are sourced from a remote repository or the local file system. Dependent charts are referenced from the charts directory at install time and the helm dependency subcommand can be used to build or update the contents of this directory.
While the file system approach of managing dependent charts sounds appetizing, it does introduce challenges when it is time to version the Chart in a source code management tool, such as a Git repository. Do you want to include the entire contents of each dependent chart in your repository? As your git repository evolves with the content of your own chart (or others), including the contents from other dependencies within the same repository may cause unwanted and excessive bloat. As most charts that would be consumed as dependencies are stored in their own Git repository, an alternate method for sourcing dependent charts is to reference them from their own Git repositories using Git submodules. A submodule allows for a separate Git repository to be embedded within another repository. Some of the benefits using this approach is that only a reference to the associated repository is tracked instead of the entire contents. In addition, since the repository referenced in the submodule uses the fixed SHA of a given commit, it is akin to a tag that is commonly associated with a chart packaged within a helm repository. This ensures that the contents used today will be the same as in the future.
Dependencies also enable another approach used in the Helm ecosystem called subcharts. A subchart is a mechanism of providing inheritance to one or more charts as the parent of the associated subchart(s) can provide overriding values along with additional content (templates) of their own. To demonstrate an end to end overview of using Git submodules in Helm, let’s walk through an example to highlight how this approach can be accomplished.
The following repository contains the associated resources
By using the subchart approach, we are going to make use of the Quarkus Helm chart found within the Red Hat Developers Helm Chart repository as the subchart and specify overriding values within our parent chart.
Installing the Helm Chart
Before beginning, ensure that you have the following prerequisites satisfied:
Git
Helm CLI
Kubernetes CLI
First, clone the repository to your local machine and change into the repository directory:
git clone https://github.com/sabre1041/helm-dependency-submodules.git
cd helm-dependency-submodules
This chart provides many of the common attributes that you would find in any other chart including a values.yaml and Chart.yaml files.
The git submodule is located in the dependencies directory named redhat-helm-charts. However, if you list the contents of this directory, it will be empty.
ls -l dependencies/redhat-helm-charts/
This is due the fact that submodules are not initialized or updated to bring in the contents of the referenced repository when a repository is cloned by default. To clone the content of the submodule, initialize and update the submodule:
Initialize the submodule
git submodule init

Submodule 'dependencies/redhat-helm-charts' (https://github.com/redhat-developer/redhat-helm-charts) registered for path 'dependencies/redhat-helm-charts'
Update the submodule
git submodule update

Cloning into '<base_directory>/helm-dependency-submodules/dependencies/redhat-helm-charts'...
Submodule path 'dependencies/redhat-helm-charts': checked out '47ae04c40a4e75b33ad6a2ae84b09a173f739781'
If you inspect the contents of the Chart.yaml file, you will note the dependency referencing the quarkus helm chart within the submodule path:
Note: By default, the Quarkus Helm chart assumes a deployment to an OpenShift environment and therefore creates a Route resource. To skip the creation of the Route, pass in the --set quarkus.deploy.route.enabled=false flag to the helm update command.
A new namespace called helm-dependency-submodules will be created if it did not exist previously and the Quarkus application will be deployed. If running in an OpenShift, a new Route will be created exposing the application. Execute the following command to obtain the URL of the application.
kubectl get routes -n helm-dependency-submodules helm-dependency-submodules -o jsonpath=https://’{ .spec.host }’
Finally, uninstall the application by using the helm uninstall command as shown below
More and more organizations are adopting GitOps as a mechanism for managing applications. Argo CD is one such tool that implements GitOps principles and it provides support for not only Helm charts, but submodules found within Git repositories. Using the Git repository covered in the last section, let’s describe how Argo CD can facilitate deployment of the Quarkus application within the Helm chart to the Kubernetes cluster.
First, deploy an instance of Argo CD to the environment and ensure that the Argo CD controller has the necessary permissions to create a namespace and resources in a project called helm-dependency-submodules-argocd. There are multiple ways that Argo CD can be deployed including the community based operator, OpenShift GitOps when operating in an OpenShift environment, as well as static manifest files.
Once Argo CD has been deployed and is operational, create the Application using the manifest found in the argocd directory of the git repository.
Argo CD will take care of all the heavy lifting for us that we had to perform manually previously including:
Cloning the repository
Initializing and updating the submodule
Updating the chart dependencies
Installing the chart
Navigating to the quarkus Argo CD will illustrate the resources that were deployed and synchronized to the newly created helm-dependency-submodules-argocd namespace.
Application deployed using Argo CD
When changes are made to the repository, Argo CD will pick up the modifications and apply them based on the settings of the application.
By either using the Helm CLI or a GitOps based tool like Argo CD as described during this discussion, Git submodules can provide yet another approach by which Helm can be used to streamline the deployment and management of applications in a kubernetes environment.
The world of cloud native architectures have enabled solutions to be delivered faster than ever before. Even as the overall time to delivery has been reduced, one area that continues to be of utmost importance is understanding the contents of the software package at each level. In a containerized environment, this includes everything from the base operating system, core libraries, and everything in between including the application itself. The assurance that each layer meets an agreed upon standard prior to being deployed into a production environment is known as the Trusted Software Supply Chain (TSSC). This assembly line approach to software delivery typically makes use of Continuous Integration and Continuous Delivery (CI/CD) tool(s) in a series of processes, modeled in a pipeline of steps, that every application must undergo.
Given that there are various layers of a containerized application, when a change occurs at any layer, the entire validation process must be repeated to ensure that the application continues to meet the expected level of compliance. In a cloud native world, this can occur frequently and it is important that the revalidation process occurs as soon as a change is detected to mitigate any potential vulnerability. The primary questions to ask is how to detect when a change occurs and what should be done? The answer first depends on the source. If source code changes, an event can be triggered from the source code management (SCM) system. Similar actions can be undertaken when a container image is pushed to an image registry. Then, the event can trigger some form of action or remediation.
Within the context of the Trusted Software Supply Chain, the trigger will typically invoke a pipeline along with a series of steps. This pipeline execution engine can take many forms, but Tekton is one such tool that has been gaining popularity in the Kubernetes ecosystem as it makes use of cloud native principles, such as declarative configurations (Custom Resources) and a distributed execution model. In the scenario where an image is pushed to a container registry, a triggering action would invoke a Tekton pipeline that includes a series of Tasks (steps), such as retrieving the image, scanning, and validating the contents.
Triggering a Tekton Pipeline when an Image is pushed
In OpenShift, one of the key features of the platform is that it contains an image registry along with an entire ecosystem of resources to aid in the life cycle of images (Images, ImageStreams along with several virtual resources including ImageStreamTags). As container images are either pushed to the integrated registry or referenced in an ImageStream, the metadata contained within these custom resources are updated to reflect the latest values. These changes as with any change to a resource in OpenShift can be monitored (one of the key principles of Operators) to invoke other actions in response. Such an action could be the triggering of a Tekton pipeline. The remainder of this article will describe how Tekton pipelines can be triggered based on changes to resources in OpenShift using cloud native event patterns.
There are many components encompassing the Tekton project. While the primary feature set focuses on the pipeline itself, another subproject, called triggers, provides the functionality for detecting and extracting information events in order to execute pipelines. Tekton and the combination the pipelines and triggers subproject is only half of the overall solution. Another component must provide the capability for not only monitoring when changes occur within OpenShift, but have the capability to send events. The missing piece of the puzzle is Knative. Knative is a platform for building serverless applications, and similar to Tekton, the full feature set is broken down into several subjects. Knative serving is responsible for managing serverless applications while Knative eventing provides support for passing events from producers to consumers. The functionality of Knative eventing provides the desired capabilities of sending events based on actions from the Kubernetes API which are then consumed by Tekton triggers to start pipelines. The diagram below provides an overview of the end state architect.
High level architecture
To begin, you will need access to an OpenShift environment with cluster administrator rights.
Note: While the use case described in this implementation are specific to OpenShift, the concepts are applicable to any Kubernetes environment with the associated project deployed.
Then, you will need to install two operators from OperatorHub: OpenShift Pipelines which will provide support for Tekton and OpenShift Serverless, which will provide support for Knative.
Navigate to the OpenShift Web Console and select OperatorHub and then OperatorHub.
In the textbox, search for OpenShift Pipelines and then click Install. A page will be presented with the available channels and approval modes. Click Install again to install the operator.
Next, install OpenShift Serverless. Once again, select OperatorHub and then search for OpenShift Serverless. Click Install and on the subsequent page, select the channel matching your version of OpenShift and then click Install.
Once the operator has been installed, one additional step needs to be completed. Recall that Knative features several subprojects: serving and evening. By default, when the operator is deployed, both subprojects are not installed. Given that only Knative eventing will be used in this scenario, it will be the only subproject that will be installed. Under the OperatorHub section of the left hand navigation pane, select Installed Operators. At the top of the page, you will see a dropdown indicating the name of the current OpenShift project that you are in. Select the dropdown and select knative-eventing. Even though the subproject is not installed, OperatorHub will still create the project at deployment time.
With the Installed Operators page still loaded, select the OpenShift Serverless. On the operator page, select the Knative Eventing tab. Click the Create Knative button and then click Create. The OpenShift Serverless operator will then go ahead and deploy and configure Knative Eventing into the cluster.
With the necessary cluster prerequisites complete, clone the git repository containing the OpenShift manifests as they will be referenced in each of the following sections:
git clone https://github.com/sabre1041/image-trigger-tekton
cd image-trigger-tekton
Next, create a new namespace called image-watcher where we will be able to deploy our resources:
GitOps, the process for declaring the state of resources in a Git repository, has become synonymous with managing Kubernetes, and one of the most popular GitOps tools is Argo CD. The ability to drastically reduce the time and effort required to manage cluster configuration and associated applications has further accelerated the adoption of Kubernetes. However, as Kubernetes becomes more commonplace, there becomes a need to segregate the levels of access granted to users and tools to enable the proliferation of the technology.
In many enterprise organizations and managed services offerings, multi-tenancy is the norm and access is restricted for the types of operations that can be performed. This poses a challenge for Argo CD, which by default, manages resources at a cluster scope, meaning that it will attempt to perform operations across all namespaces, effectively breaking multi-tenancy. Contributors to the Argo CD project realized this concern early on and actually added support for namespace isolation back in version 1.4. Unfortunately, the namespace isolation feature in Argo CD is poorly documented, with most end users being unaware of such functionality. This article will illustrate the namespace isolation feature of Argo CD, how it can be used, as well as some of the limitations that currently exist.
Argo CD can be deployed to a Kubernetes environments in several ways:
The only method that currently supports namespace isolation is through the use of raw manifests and a separate manifest for namespace isolation has been included with each Argo CD release since version 1.4 (You can find the manifests on the releases page of Argo CD. The name of the file is called namespace-install.yaml instead of install.yaml for both the standard and highly available deployment).
The typical deployment of Argo CD creates two ClusterRoles:
Argo CD server – to provide the necessary level of access for resources that are made available through the browser, such as viewing logs from pods or events within namespaces.
Argo CD application controller – Full, unrestricted access to manage resources in a cluster as declared by the manifests from the Git repository
Any unprivileged user would be unable to successfully apply these resources which required the creation of a separate set of manifests. When using the set of manifests that supports namespace isolation, instead of ClusterRoles being created at a cluster scope, Roles and associated RoleBindings are created in the namespace where Argo CD is deployed. In addition, the Argo CD controller is granted only a limited number of resources instead of full access. The process for which Argo CD can apply and manage the resources that are declared in Git repositories will be described later on.
Deploying Argo CD in Namespace Isolation Mode
To demonstrate how the namespace isolation feature of Argo CD can be used, an OpenShift Container Platform environment will be used (any Kubernetes environment will work, however there are several considerations that need to be made when running in OpenShift).
First, obtain access to an OpenShift environment and create a new project called argocd which will be where the set of Argo CD resources will be deployed:
For this demonstration, version 1.7.8 was used. Feel free to replace with a version of your choosing.
After applying the manifests, the resources will be deployed. You may notice that the Deployment for Redis will not be running. As of version 1.7, the Redis deployment has considerations for ensuring that the container does not run as the root user. The configuration in the pod securityContext conflicts with the standard security mechanisms employed in OpenShift through the use of Security Context Constraints (SCC’s). Given that OpenShift already enforces that all pods by default run with a non-root user using a randomly generated ID, the value in the securityContext field can be safely removed.
Execute the following command to patch the deployment to remove the field from the Deployment:
The hostname for the route created can be found by executing the following command:
$ oc get route argocd -o jsonpath='{ .spec.host }'
Argo CD supports several methods for securing access to the server, including SSO. The most straightforward is to use the out of the box integrated authentication provider. By default, the password of the admin password is set as the name of the pod the first time the Argo CD server starts
The Argo CD CLI can be used to change the admin password so that if the server pod restarts, the password will not be lost.
Login to the Argo CD CLI:
$ argocd --insecure --grpc-web login "$(oc get routes argocd -o jsonpath='{ .spec.host }')":443 --username "admin" --password "$(oc get pod -l app.kubernetes.io/name=argocd-server -o jsonpath='{.items[*].metadata.name}')"
Set the admin password for Argo CD to be “password” by executing the following command
$ argocd account update-password --current-password=$(oc get pod -l app.kubernetes.io/name=argocd-server -o jsonpath='{.items[*].metadata.name}') --new-password=password
With the default password changed, launch a web browser and navigate to the url of the route discovered previously. Enter the admin username and password to access the console.
Namespace Isolation
Clusters define the Kubernetes environments for which resources will be deployed to. A cluster can be either the environment Argo CD is deployed on or a remote instance. When Argo CD is first deployed, a single local cluster is created called in-cluster which references the local environment for Which Argo CD is running on and communicates against the internal Kubernetes service (https://kubernetes.default.svc). If we were to create an application that attempted to manipulate cluster level resources, the process would fail as the Argo CD does not have the necessary permissions. As described previously, Argo CD uses the argocd-application-controller service account to manage resources and this service account has a ClusterRoleBinding against a ClusterRole with unrestricted permissions. In a namespace deployment of Argo CD, this level of permission does not exist and the service account is only granted a limited level of access to manage Argo CD related resources and internal functions.
For Argo CD to be able to function as desired, access to namespaces must be explicitly granted. This process requires the use of the Argo CD CLI and the argocd cluster add subcommand to specify the namespaces that should be granted access to manage.
Create a namespace called argocd-managed for which we will be able to test against
The --skip-config-write option was specified to avoid changing into the newly created project since the majority of our actions will remain in the argocd project.
To grant Argo CD access to manage resources in the argocd-managed project, add a new cluster called “argocd-managed” using the following command:
You may have noticed a few interesting options in the above
--name – Friendly name of the cluster --in-cluster – Specifies that the internal Kubernetes service should be used to communicate with the OpenShift API. --system-namespace – Configurations for clusters managed by Argo CD are typically written to a secret in the kube-system namespace. As the kube-system namespace requires elevated access, the argocd namespace for which Argo CD is deployed within will be used instead --namespace – Namespace that Argo CD should be granted access to manage. Multiple iterations of the namespaces parameter can be specified in the argocd cluster add command to manage multiple namespaces.
The command will then return the following result.
INFO[0002] ServiceAccount "argocd-manager" created in namespace "argocd"
INFO[0002] Role "argocd-managed/argocd-manager-role" created
INFO[0003] RoleBinding "argocd-managed/argocd-manager-role-binding" created
Cluster 'https://kubernetes.default.svc' added
A new service account called argocd-manager is created in the argocd namespace along with a role and rolebinding in the targeted namespace that grants the argocd-manager service account unrestricted privileges.
The details for the cluster are written in a secret in the argocd</code namespace and contain the following key properties:
name – Friendly name for the cluster
server – Hostname for the cluster
config – json data structure describing how to communicate with the cluster
The bearerToken that is defined in the cluster config is associated with the newly created argocd-manager service account which was granted access in the argocd-managed namespace. The namespaces field is a comma separated list of namespaces that Argo CD can manage resources against .
Let’s demonstrate that Argo CD can be used to deploy resources against the argocd-managed namespace and validate namespace isolation.
Using the Argo CD CLI, create a new application called nexus to deploy a Sonatype Nexus instance:
You can verify the application in the Argo CD web console using the route, username and password that was previously created.
By selecting the nexus application, you will be presented with a depiction similar to the following indicating Argo CD was successfully configured for namespace isolation:
Note: You may ignore the “OutOfSync” message as it is indicating that the live OpenShift Route for Nexus within the cluster contains differences than the manifest declared. These types of situations are managed through the use of customizing the differences.
Validating Namespace Isolation Enforcement
The enforcement of namespace isolation can be validated using multiple approaches. First, Argo CD will forbid the management of resources in a cluster that is not specified by a value present in the namespaces field of the cluster configuration when configured in namespace isolation mode. Otherwise, standard Kubernetes RBAC will forbid the argocd-application-controller service account from managing resources in a namespace it cannot access.
Let’s validate this assessment by creating a new namespace called argocd-not-managed and attempt to deploy the same nexus application.
Verify the application was not successfully deployed either in the ArgoCD web console or using the command line by executing the following command:
$ argocd app get nexus-not-managed

Name: nexus-not-managed
Project: default
Server: https://kubernetes.default.svc
Namespace: argocd-not-managed
Repo: https://github.com/redhat-canada-gitops/catalog
Target:
Path: nexus2/base
SyncWindow: Sync Allowed
Sync Policy: Automated
Sync Status: Unknown (5978975)
Health Status: Missing

CONDITION MESSAGE LAST TRANSITION
ComparisonError Namespace "argocd-not-managed" for Service "nexus" is not managed 2020-11-15 23:12:28 -0600 CST

GROUP KIND NAMESPACE NAME STATUS HEALTH HOOK MESSAGE
PersistentVolumeClaim argocd-not-managed nexus Unknown Missing
Service argocd-not-managed nexus Unknown Missing
apps.openshift.io DeploymentConfig argocd-not-managed nexus Unknown Missing
image.openshift.io ImageStream argocd-not-managed nexus Unknown Missing
route.openshift.io Route argocd-not-managed nexus Unknown Missing
Notice how under the condition, it explains that the application cannot be deployed to the argocd-not-managed namespace as it is not managed in this cluster, thus validating namespace isolation is functioning as expected.
Namespace Isolation Automation
The primary goal of Argo CD is to apply resources that are expressed in a declarative manner. The Argo CD server itself embraces declarative configuration through the use of Custom Resource Definitions, Secrets and ConfigMaps and given that the argocd cluster add command creates a series of resources itself, we can avoid having to use the Argo CD CLI to manage cluster configuration by being able to specify them in a declarative fashion.
Let’s automate the steps that the argocd cluster add command performs. Recall, the command added a Service Account, Role, RoleBinding and Secret.
Note: It is best to have a fresh environment of Argo CD available to work through these steps. To reuse the existing environment, execute the following command which should reset the environment to a semi-clean state.
Finally, the cluster secret can be created. Execute the following command to create the secret which will contain the bearer token for the argocd-manager service account and the namespace that the cluster will manage (among a few others).
Notice how the secret created above contains the label argocd.argoproj.io/secret-type: cluster. Any secret with this label will be interpreted by Argo CD as a cluster secret.
At this point, Argo CD has been set up in the same manner as the CLI. This type of configuration affords greater flexibility and avoids needing to use the Argo CD CLI to perform common and repeatable configurations. Feel free to repeat the application creation and deployment as described previously to confirm a successful synchronization of resources into the cluster.
Additional Forms of Restricting Access
Aside from using namespaces and clusters to limit access to where resources can be deployed, Argo CD does have other constructs available for supporting multi-tenancy. Projects allow for a logical grouping of applications and policies within Argo CD and can either supplement or act as a replacement for the namespace isolation feature.
For example, there may be a need for a single Argo CD instance to be deployed with access to manage cluster level resources instead of separate instances, but still provide some form of isolation between teams. By using a combination of Argo CD projects and RBAC, this can be achieved.
Projects provide the capability to limit the source repositories containing content (Git), the clusters resources can be deployed to, the namespaces, and the types of resources that can be deployed in a whitelist/blacklist fashion, both at a cluster and namespace scope. Finally, RBAC policies through the use of group association can be applied to determine the rights that users have against projects.
While projects do provide a finer grained access mode and configuration model, it does require additional work in order to achieve the desired rights granted to users. Since Argo CD is deployed with rights to manage resources at a cluster level, it is imperative that proper considerations be made in order to protect the integrity of the cluster as well as to restrict the level of access that can be achieved by various tenants.
Limitations of Argo CD Namespace Isolation
While the namespace isolation feature in Argo CD does provide a path towards supporting true multi-tenancy, there are still additional hurdles that must be overcome (as of version 1.7.8) before it can be achieved. An Argo CD cluster configuration provides a method for specifying the Kubernetes cluster URL, credentials that can be used to communicate with the cluster, as well as the namespaces that resources can be deployed to. However, regardless of the number cluster configurations made against a single cluster, only one can be active at a time. This gap limits being able to use the namespace isolation feature to provide access to a namespaced scoped deployment of Argo CD and provide two separate teams that manage different namespaces the ability to easily manage their own set of resources without the knowledge of each other.
The other limitation, as described near the beginning of the article is the lack of documentation around the support for namespace isolation. It may be possible that you, the reader, are learning about this feature. If there was more awareness of this type of functionality, existing issues could be resolved and new features could be developed to expand the potential capabilities.
The creators and community surrounding Argo CD realize that multi-tenant support is important for broader adoption of the tool into enterprise organizations and those with a high security posture. The namespace isolation feature is a great first step, but additional work still needs to be achieved. For now, the recommended approach is to deploy separate namespace scoped instances of Argo CD for teams that do not require access to cluster scoped resources and are looking to leverage a specific set of namespaces. Fortunately, given that Argo CD emphasizes declarative configuration, the implementation can be easily achieved.
OpenShift contains a number of included security features and pods running within the cluster are governed by Security Context Constraints (SCC’s) which specify the actions that can be achieved as well as the resources that it can access. For new users beginning to work with OpenShift, their first experience with SCC’s is that their container will not run as the designed user ID and instead be assigned a random ID from a range. This is the anyuid SCC at work and it not only protects the container, but the underlying host.
There are circumstances where it may be necessary to modify the SCC the a pod is able to use (The restricted SCC is the default associated to pods). Traditionally, granting access to an SCC was accomplished by specifying the user (Service Account in most cases as it is used to run a pod) or group within the SCC.
For example, if a Service Account named my-special-pod was designated to run a particular workload in a namespace called example, the following command can be used to grant the pod access to the anyuid SCC and allow it to leverage the UID as specified in the container image:
While this method for modifying SCC’s has been around since the beginning of OpenShift 3, more recent versions of OpenShift 4 have recommended against directly modifying the included set of SCC’s as challenges have been seen during upgrades as the expected state of the SCC does not match the actual state.
Instead, an alternate approach for managing SCC’s through Role Based Access Control can accomplish the same goal without requiring direct intervention. By incorporating RBAC, policies can be created declaratively and integrate into an existing GitOps process.
Using RBAC to manage access to SCC’s is similar to managing any other aspects of OpenShift/Kubernetes, such as rights to another namespace. It requires the combination of a Role/ClusterRole and a binding to a particular resource. Since SCC’s are used by pods, and pods are run using Service Accounts, a Service Account is the resource that needs to be bound to the role.
Implementing RBAC
The first step is to create a new ClusterRole (since SCC’s are cluster scoped instead of namespace scoped) that will provide access to a given SCC. Roles/ClusterRoles make use of rules that allow access to resources and API verb operations. While the majority of roles that you will see leverage verbs, such as create, list, and delete, RBAC for SCC’s leverage the use verb for granting access. To provide access to the anyuid SCC requires the combination of the use verb, the anyuid resourceName, the security.openshift.io and the securitycontextconstraints resource. Fortunately the OpenShift CLI can be use to generate a ClusterRole with the combination of parameters previously:
With the ClusterRole now in place, it can then be bound to the Service Account that is used to run the pod. If you have not done so already, create a the project and Service Account:
$ oc new-project example
$ oc create sa my-special-pod
To bind the my-special-pod Service Account in the example namespace with the allow-anyuid-scc SCC, execute the following command:
With the ClusterRole and RoleBinding now in place, newly created pods in the example namespace using he my-special-pod Service Account will run using the User ID as specified in the container. This can be confirmed by deploying a sample container within this namespace.
Create a sample application that starts up a basic RHEL8 based image using the my-special-pod service account which should enable the pod to run as the designated user ID.
$ oc run ubi8 --image=registry.redhat.io/ubi8/ubi --serviceaccount=my-special-pod --command -- /bin/bash -c 'while true; do sleep 3; done'
Since the pod was launched using the my-special-pod Service Account, confirm that is leveraging the anyuid SCC as enabled through the use of RBAC policies:
$ oc get pod -l=run=ubi8 -o jsonpath="{ .items[*].metadata.annotations['openshift\.io/scc'] }"anyuid
The use of RBAC polices to manage access to Security Context Constraints avoids modifying the out-of-the-box policies that ship with OpenShift which could potentially compromise the stability of the platform, but more importantly aligns with the declarative nature of how OpenShift and Kubernetes is managed. Security has always been top of mind in OpenShift and it is great to see the management of the key features evolve with the platform.
Starting in OpenShift 4.5, RBAC ClusterRoles are now automatically created for the included set of SCC’s:
One of the methodologies of cloud native architectures is to externalize applications configurations and store them within the environment. OpenShift provides multiple mechanisms for storing configurations within the platform, which include the use of Secrets and ConfigMaps. These resources can then be exposed to applications as either environment variables or as file system volumes mounted within pods and containers. By default, volume mounts uses the standard operating system mount command to inject the external content into the container. While this implementation works well for the majority of use cases, there are situations where there is a desire to retain the contents of the existing directory and only inject a specific file instead of an entire directory. Fortunately, OpenShift and Kubernetes have a solution for this challenge using the subPath property of the container volumeMount for which this discussion will highlight.
To demonstrate how one can utilize subPath volume mounting, let’s deploy an application that can benefit from this feature. Applications commonly consume configuration files within dedicated directories, such as a conf or conf.d. One such application that leverages this paradigm is the Apache HTTP Server, better known as httpd. A variety of configuration files are spread across these two directories within the /etc/httpd folder. If custom configuration files were injected using a typical volume mount to one of these locations, key assets the application server had been expecting to find may not be available. The conf.d directory is the common location for user defined configurations. For example, one can specify that all requests that are made to specific context paths are automatically redirected to another location as shown below:
In the example above, requests to the /redhat context path are redirected to https://www.redhat.com while requests made against the /openshift context path are redirected to https://www.openshift.com. While one could configure this file to be placed in this directory at image build time, there may be a desire to customize the contents per deployed environment. This is where externalizing the configuration outside the image and injecting the contents at runtime becomes valuable. Given that this file does not contain any sensitive data, it is ideal to be stored in a ConfigMap. First, create a new file on the local file system called subpath-redirect.conf with the contents from the example above.
Now, lets use an OpenShift environment to demonstrate this use case. Login and create a new project called subpath-example:
oc new-project subpath-example
By default, OpenShift provides a ImageStream containing an Apache HTTPD server which can be deployed with a single command. Execute the following to create a new application called subpath-example:
A new deployment of the httpd image will be initiated. When the new-app command is used against an ImageStream, no route to expose the application outside the cluster is created. Execute the following command to expose the service to allow for ingress traffic.
oc expose svc httpd
Locate the hostname of the application by executing the following command:
oc get route subpath-example -–template=’{{ .spec.host }}’
Copy the resulting location into a web browser which should display the default Apache welcome page.
Now, lets use the contents of the subpath-redirect.conf file previously create a new ConfigMap that can then be injected into the application.
Before mounting the ConfigMap, explore the running application by starting a remote shell session into the running container.
First, confirm the container is running by locating the name of the running pod:
oc get pods
Start the remote shell session:
oc rsh <pod_name>
List the files in the /etc/httpd/conf.d directory:
ls –l /etc/httpd/conf.d

-rwxrwxrwx. 1 root       root        366 Nov  7 12:26 README
-rwxrwxrwx. 1 root       root         63 Jan  8  2018 auth_mellon.conf
-rwxrwxrwx. 1 root       root       2966 Nov  7 12:25 autoindex.conf
-rwxrwxrwx. 1 1000150000 root       9410 Feb 14 06:33 ssl.conf
-rwxrwxrwx. 1 root       root       1252 Nov  7 12:21 userdir.conf
-rwxrwxrwx. 1 root       root        556 Nov  7 12:21 welcome.conf
As demonstrated by the above output, there are a number of user defined configurations already present within the httpd image (inside the conf.d directory) and overwriting these files by a standard volume mount could cause the container to fail to operate.
Define a new volume in the pod referencing the ConfigMap containing the contents of the Apache HTTPD configuration file along with a volumeMount to the /etc/httpd/conf.d by editing the httpd DeploymentConfig by executing oc edit dc subpath-example.
Notice how the subPath property of the volumeMount specifies the name of the file in within the ConfigMap (oc describe configmap subpath-example would display this name as well) along with the full mountPath to the file that will be created in the Apache configuration directory.
Save the changes which will trigger a new deployment of the application
Running oc get pods again will confirm that the new version of the application has been deployed.
Once again, obtain a remote shell to the running pod using the steps previously described.
List the files in the /etc/httpd/conf.d and notice the presence of the subpath-redirect.conf file from the ConfigMap:
-rwxrwxrwx. 1 root       root        366 Nov  7 12:26 README
-rwxrwxrwx. 1 root       root         63 Jan  8  2018 auth_mellon.conf
-rwxrwxrwx. 1 root       root       2966 Nov  7 12:25 autoindex.conf
-rwxrwxrwx. 1 1000150000 root       9410 Feb 14 06:33 ssl.conf
-rw-r--r--. 1 root       1000150000  150 Feb 14 06:33 subpath-reverse.conf
-rwxrwxrwx. 1 root       root       1252 Nov  7 12:21 userdir.conf
-rwxrwxrwx. 1 root       root        556 Nov  7 12:21 welcome.conf
Confirm the configuration has been applied to the application by navigating to the /redhat context of the application in your browser. If successful, you should be redirected to https://www.redhat.com. In addition, navigating to the /openshift context will redirect to https://www.openshift.com.
The ability to inject individual files from externally stored resources within the platform using the subPath feature of volumes expands and accelerates the delivery of applications to achieve greater business value.
Through the continued evolution of the platform, OpenShift has shifted the focus from the installation and initial deployment of infrastructure and applications to understanding how the platform and their applications are performing, better known as day two operations. As a result of the incorporation of the CoreOS team and their existing ecosystem of tools into the OpenShift portfolio, the release of OpenShift Container Platform 3.11 includes a new administrator focused web console (cluster console) which provides insights into the management of nodes, role base access controls, and the underlying cloud infrastructure objects. While this new console is automatically enabled in the deployment of the OpenShift Container Platform, the console is not enabled in Minishift/Container Development Kit (CDK), the local containerized version of OpenShift. This post will describe the steps necessary for enabling the deployment of the cluster console in Minishift.
Before beginning, ensure that you have the latest release of Minishift. You can download the latest release from Github or from the Red Hat Developers website if making use of the Container Development Kit (CDK).
As of the publishing of this article, Minishift makes use of OpenShift version 3.10. To align with the features that are provided with OpenShift 3.11 to support the cluster console, Minishift should also be configured to make use of this version. When starting up an instance of Minishift, the –openshift-version flag can be provided to specify the version that should be utilized (The CDK uses the flag –ocp-tag).
Start an instance of Minishift to make use of OpenShift version 3.11. In addition, be sure to provide the VM containing OpenShift with enough resources to support the containers required for the deployment using the –memory parameter.
When using the Container Development Kit, use the following command:
minishift start --ocp-tag =v3.11.16 --memory=6114
Once provisioning completes of the VM completes and the necessary container images have been retrieved and started, information on how to access the cluster will be provided in the command line output similar to the following:
The server is accessible via web console at:
    https://192.168.99.100:8443
When the provisioning process completes, you will be logged in to the OpenShift Command Line Interface (CLI) as a user called “developer“. Since the majority of the steps for deploying the cluster console require higher level permissions, you will need to login as a user with higher level permissions. You can login as the system administrator account using the following command as noted in the prior output:
oc login -u system:admin
The entire list of projects configured in OpenShift are then displayed. Unfortunately, this account cannot be used to access the web console. We need to grant another user cluster-admin permissions. Let’s give a user called “admin” cluster-admin privileges by executing the following command:
Now, login as this user to confirm that it has the same set of permissions as the system administrator user
$ oc login -u admin
Enter any password when prompted to finalize the login process.
Note: The Container Development Kit (CDK) ships with a set of of addons that provide additional features and functionality on top of the base set of components. One of these addons is the “admin-user” addon which configures a user named admin with cluster-admin privileges. Similar to the admin-user addon, another addon called anyuid is enabled by default in the CDK to streamline the development process. By default, containers running on OpenShift make use of random user ID which increases the overall security of OpenShift. The functionality within OpenShift that aids in this process is called Security Context Constraints (SCC). By default, all containers use the restricted SCC. The anyuid SCC for which the anyuid addon makes use of allows all containers to use the user ID as defined within the container instead of a random user ID. However, the utilization of the anyuid SCC by all OpenShift components has been known to cause challenges. Since new container development is not being emphasized as part of this effort, disable the configurations that were made by the addon by executing the following command:
With all of the policies now properly configured, let’s try to access the OpenShift web console. Due to a known issue, navigating to the base address in a web browser will result in an error. Instead, add the /console context to the OpenShift server address to work around this issue.
For example, if OpenShift is available at https://192.168.99.100:8443, the console would be accessible at https://192.168.99.100:8443/console
Accept the self signed certificate warning and you should be presented with the OpenShift web console. Login to the web console with the user “admin”. Any password can be entered as no additional validation is performed. Once authenticated successfully, you will be presented with the OpenShift catalog.
While access to the OpenShift web console is great, it only provides a developer’s centric viewpoint into the platform which has been available since the infancy of OpenShift 3. Additional steps will need to be performed to install the cluster console to provide a more operational viewpoint into the platform.
Coinciding with the release of OpenShift 3.11 was also the introduction of the Operator Framework and Operators into the mainstream use. Operators are a method for packaging, deploying and managing Kubernetes based applications. The cluster console makes use of an operator called the console-operator to manage its lifecycle.
To make use of an operator, a set of resources must be deployed to an OpenShift environment. These manifests are stored within the Github repository associated with the operator.
The content of the repository can either be downloaded as zip from Github or cloned. The command below will use git to clone the repository to a local machine and navigate into the directory created.
$ git clone https://github.com/openshift/console-operator
$ cd console-operator
All of the manifests needed to create the necessary project in OpenShift along with the remaining assets are located in a directory called manifests. The contents of the directory can all be created using a single command using the OpenShift CLI.
$ oc apply -f manifests/
A new namespace containing the operator and the console will be deployed. This can be confirmed by viewing the set of running pods in the newly created openshift-console namespace.
$ oc get pods -n openshift-console

NAME                                 READY     STATUS    RESTARTS   AGE
console-operator-7748b877b5-58h2z    1/1       Running   0          5m
openshift-console-67b8f48b9d-dw7dl   1/1       Running   0          5m
In addition, a route is also created to expose access outside the cluster.
$ oc get routes -n openshift-console

NAME      HOST/PORT                                     PATH      SERVICES   PORT      TERMINATION          WILDCARD
console   console-openshift-console.192.168.99.100.nip.io             console    https     reencrypt/Redirect   None
Navigate the the URL provided. Once again, accept the self signed certificate and login using the admin user. Once authenticated, the list of projects is presented.
Note: If you attempt to access the cluster console and are presented with a redirect loop where the login page continues to appear, it indicates a race condition has occurred where the console was not properly configured with the correct permissions to make requests against the OpenShift API. When this situation, occurs, execute the following command to delete the console pod which should mount the secrets properly upon the creation of the newly created pod:
oc delete pod -n openshift-console -l app=openshift-console
Now, under the administration section of the navigation bar, roles and their bindings, quotas along with the set of defined custom resource definitions can be browsed. Take a moment to view each of these sections at your leisure.
Most platform administrators are concerned with a holistic snapshot of the entire OpenShift environment. This is provided on the status page underneath the Home section of the left hand navigation bar.
When navigating to the status page for the first time, only the default namespace is displayed. To view all namespaces, select the “all projects” option from the Projects dropdown at the top of the page. This will display an aggregation across all namespaces. Currently, only events are displayed which is only a portion of what platform administrators need to determine the state of the environment. There are key components of this page missing. This is due to the fact that the remaining content is sourced from metrics gathered in Prometheus which is not deployed by default in Minishift.
Fortunately, there is an operator available as of OpenShift 3.11 to manage the deployment of the Prometheus. The ecosystem of Prometheus tools including Alertmanager and Kube State Metrics is made available by the content found in the cluster-monitoring-operator repository. In a similar fashion as completed previously for the console-operator, open up a terminal session and clone the contents of the repository locally and change into the directory.
$ git clone https://github.com/openshift/cluster-monitoring-operator
$ cd cluster-monitoring-operator
Apply the contents of the manifest directory to OpenShift.
$ oc apply -f manifests/
A new namespace called openshift-monitoring will be created along with operators for managing Prometheus and the rest of the monitoring stack. There are a number of components that are deployed by the operators so it may take a few minutes for all of the components to become active. If necessary, refresh the cluster console status page to reveal additional telemetry of the current state of the OpenShift environment.
When reviewing the metrics now presented from Prometheus, a portion of the values may not be displayed. If this is the case, additional permissions may need to be added to allow for the OpenShift controller to perform a TokenReview. The operator configured a ClusterRole called prometheus-k8s which enables access to perform TokenReviews. Execute the following command to associate this ClusterRole to the service account being used by the controller-manager pod.
Wait a few moments and the remaining graphs should display values properly.
While the cluster console that is deployed on Minishift does not contain all of the metrics that are typically available in a full OpenShift deployment, it provides insights into the capabilities unlocked by this new administrative console and the expanded day two operations features.
Security continues to be a priority in most organizations. Any breach may result in intellectual or financial losses. Reducing access to external systems by internal resources is one was to limit the threat potential. One such method is to place a middleman, or proxy, between internal and external resources to govern the types of traffic. Considerations for how the Container Development Kit (CDK) can traverse proxy servers were covered in a prior blog. However, many organizations are further reducing the need for communicating with remote systems and placing all resources within their infrastructure. Systems operating in a manner where access to external resources is completely restricted is known as running in a disconnected environment. OpenShift supports operating in a disconnected environment and cluster operators can take steps to prepare for normal operation. A full discussion on managing OpenShift in a disconnected environment is beyond the scope of this discussion, but can be found here. While there are several areas the must be accounted for when operating in a disconnected environment, having access to the container images that reside in external image registries is essential. The CDK, like the full platform is driven by container images sourced from external locations. Fortunately, the CDK does contain the functionality to specify an alternate location for which images that control the execution can originate from.
OpenShift’s container images are stored by default in the Red Hat Container Catalog (RHCC) by default. Many organizations operate their own container registry internally for providing content either from remote locations or created internally. Common registry examples in use include a standalone docker registry (docker distribution), Sonatype Nexus, JFrog Artifactory and Red Hat Quay. Since the same container images that are used by OpenShift Container Platform are used by the CDK, organizations can serve them using an internal registry and satisfy both sets of consumers. One requirement that must be adhered to is that the name of the image repository, name and tag must match the source from the Red Hat Container Catalog (it can differ, however several manual changes would then be required).
Once the images are available in the local registry, a few configuration changes can be made to fully support their use in the CDK (See the section on syncing images). First, several of the options that will be leveraged in the CDK are classified as “Experimental features”. To enable support for experimental feature, set the “MINISHIFT_ENABLE_EXPERIMENTAL” environmental variable to “y” as shown below:
export MINISHIFT_ENABLE_EXPERIMENTAL=y
With experimental features enabled, the CDK can now be started. For this example, let’s assume that there is an image registry located at registry.mycorp.com which has been seeded with the images to support OpenShift. Execute the following command to utilize the CDK with images sourced from this internal registry:
Phew, that was a long command. Lets take a moment to break it down.
minishift start
This is the primary command and subcommand used to start the CDK
–insecure-registry registry.mycorp.com
While the registry may be served using trusted SSL certificates, many organizations have their own Certificate Authority instead of leveraging a public CA, such as Comodo. Since the VM running the CDK only trusts certificates from public CA’s, this will allow docker to be able to communicate with the registry
–docker-opt add-registry= registry.mycorp.com
Many OpenShift components do not include the registry portion of the image and instead rely on the configuration of the underlying Docker daemon to provide a default set of registries to use. Both the OpenShift Container Platform and the Container Development Kit have the RHCC configured by default. By specifying the location of the internal registry, the CDK will be able to reference it when images are specified without the value of the registry.
To ensure images are only being sourced from the corporate registry not the default location (RHCC), the CDK VM can configured to place a restriction at the docker daemon level.
OpenShift in the context of the CDK as of OpenShift version 3.9 utilizes the same image as containerized installation and contains all of the necessary logic to manage an OpenShift cluster. Under the covers of the CDK, the “oc cluster up” utility is leveraged to deploy OpenShift. By default, “oc cluster up” references the full path of the image, including registry. This experimental feature flag allows this value to be overridden with the location of the image from the enterprise registry.
The CDK will now start by pulling the container image and once this image is started, all dependent images by the platform will be retrieve. After the CDK has started fully, verify all running images are using the enterprise container registry.
First, check the names of the images currently running at a Docker level using the minishift ssh command:
The final component that requires modification to support leveraging an enterprise registry is to update all of the ImageStreams that are populated in OpenShift. By default, they reference images from the RHCC. The Ansible based OpenShift installer does contain logic to update ImageStreams if the location differs from the RHCC. Unfortunately, the CDK does not contain this logic. Fortunately, this issue can be corrected with only a few commands.
oc login -u admin
Similar to all other accounts in the CDK, any password can be specified.
Next replace the RHCC with the location of the enterprise registry for all ImageStreams by executing the following command:
oc get is -n openshift -o json | sed -e 's|registry.access.redhat.com|registry.mycorp.com|g' | oc replace -n openshift -f-
Make sure to replace registry.mycorp.com with the address of the enterprise registry.
With the ImageStreams now utilizing all of the enterprise registry as the source, reimport all of the ImageStreams:
for x in `oc get is -n openshift -o name`; do oc import-image $x -n openshift --all --insecure=true; done
After the command completes, all ImageStreams will be updated.
At this point the CDK is fully functional with images being referenced from the enterprise registry, thus enabling productivity in environments where security is a high priority
One of the many hallmarks of Open Source Software is the ability for anyone in the community to freely contribute to a software project. This open model provides an opportunity to garner insight into the direction of a project from a larger pool of resources in contrast to a closed sourced model where software may be regulated by a single organization or group. Many enterprises also see the value of Open Source Software to power their most critical systems. However, enterprises must be cognizant that Open Source Software from the community may not have the integrity that they have been accustomed to when using software obtained directly from a vendor. Red Hat, as a leader of Open Source Software solutions, provides a subscription model that can be used to meet the quality and support requirements necessary by any organization. A subscription includes fully tested and hardened software, patches, and customer support. Once a subscription has been purchases, licensed software must be registered to activate the necessary included features.
The Container Development Kit (CDK) is the supported version of the upstream minishift project, and given that the software package is built on top of a Red Hat Enterprise Linux base, a valid subscription associated with a Red Hat account is required to access the entire featureset provided by the CDK. To enable the development on Red Hat’s ecosystem of tools, a no-cost developer subscription is available through the Red Hat Developer program and includes an entitlement to Red Hat Enterprise Linux along with a suite of development tools that are regularly updated with the latest enhancements and features. Information about the Red Hat Developer Subscription along with the steps to create an account can be found at the Red Hat Developer Website.
Once a Red Hat Developer account has been obtained, the configuration of associating the account within the CDK can be completed. These steps were detailed in the prior post, Minishift and the Enterprise: Installation.
While the Red Hat Developer subscription is a great way for developers to take advantage of enterprise Linux software, many organizations frown upon the use of personal licenses operating within the organization, especially on company owned machines. The CDK is configured to automatically register and associate subscriptions against Red Hat’s hosted subscription management infrastructure. Accounts for developers can be created within the Red Hat Customer Portal for use with the CDK. As described in the post Minishift and the Enterprise: Proxies, subscription-manager, the tool within RHEL for tracking and managing subscriptions, is automatically configured to traverse a corporate proxy server to the public internet when this option is enabled. This feature, as previously mentioned, is useful as most enterprises employ some form of barrier between the end user and external network.
Unfortunately, many enterprises do not use Red Hat’s hosted subscription management system to register machines on their network and instead leverage Red Hat Satellite within their internal network. The CDK, as of version 3.3, is only able to register subscriptions against Red Hat automatically as part of normal startup. Fortunately, there are methods in which the user can configure the CDK to register against a satellite server instead of Red Hat. These options include:
Executing commands to facilitate the registration process
Leveraging an add-on which streamlines the registration process
Regardless of the method utilized, the CDK should be instructed to not attempt to register the machine during startup. This is accomplished by passing the –skip-registration parameter when executing the minishift start command as shown below:
minishift start --skip-registration
Even though the RHEL machine within the CDK is not registered, the majority of the functionality will remain unaffected. The key exception is managing software packages using the yum utility. Since RHEL based images inherit subscription and repository information from the host they are running on, operations both on the host machine as well as within a container making use of yum will fail due to the lack of valid subscriptions. This is primarily noticeable at image build time as it typically involves the installation of packages using yum.
The RHEL machine within the CDK can be registered manually in a similar fashion to any other RHEL machine using the subscription-manager utility. To gain access to a prompt within the CDK, the minishift ssh command can be used.
minishift ssh
By default, an ssh session is established within the CDK using the “docker” user. Since subscription-manager requires root privileges, access must be elevated using the sudo command. Execute the following command to elevate to the root user:
sudo su -
With access to root privileges, the machine can now be registered to Red Hat using the subscription-manager register command. Either a username/password or activation key/organization combination can be used as follows:
In either case, adding the –auto-attach parameter to each command will attach a subscription automatically to the new registration.
To subscribe the CDK against an instance of Red Hat Satellite instead of Red Hat’s hosted infrastructure, many of the same commands can be reused. An additional step is required to first download the bundle containing the certificates for the Satellite server so that the CDK can communicate securely to facilitate the registration process. Execute the following command to install the certificates into the CDK:
To validate the CDK is properly subscribed, lets start a new container and attempt to install a package using yum. Once again, in a session within the CDK as the root user, execute the following command:
docker run -it --rm rhel:7.5 yum install -y dos2unix
If the above command succeeded, the CDK is properly registered and subscribed.
Automate Satellite Registration using an Add-on
Active users of the CDK routinely delete the RHEL VM that is part of the CDK using the minishift delete command and start with a clean slate as it eliminates the artifacts that have accumulated from prior work. As demonstrated previously, registration of the CDK against a Red Hat Satellite does involve a number of manual steps. Fortunately, there is a way to automate this process through the use of a minishift add-on. An add-on is a method to extend the base minishfit startup process by injecting custom actions. This is ideal as the add-on can streamline the repetitive manual processes that would normally need to be executed to register against satellite.
An addon called satellite-registration is available to facilitate the registration of the CDK against a Satellite instance. To install the add-on, first clone the repository to the local machine:
Confirm the add-on was installed successfully by executing the following command:
minishift addons list
When any new add-on is installed, it is disabled by default (as indicated by the disabled designation). Add-ons can be enabled which will automatically execute them at startup or they can be manually invoked using the minishift apply command. If you recall, registration against a satellite instance required several values be provided to complete the process:
Location of the satellite server to obtain the certificate bundle
Organization ID
Activation Key
The add-on similarly requires these also be provided so that it can register the CDK successfully. Add-on’s offer a method of injecting parameters during the execution process through the –addon-env flag. The above items are associated with the add-on environment variables listed below:
SATELLITE_CA_URL
SATELLITE_ORG
SATELLITE_ACTIVATION_KEY
To test the add-on against a satellite server, first start up the CDK with auto registration disabled:
minishift start --skip-registration
Once the CDK has started, apply the satellite-registration add-on along with the required flags:
Confirm the registration was successful by checking the status as reported by subscription manager from the local machine
minishift ssh sudo subscription-manager status
If the “Overall Status” as reported by the previous command returns “Current”, the CDK was successfully subscribed to the satellite instance.
Whether using Red Hat hosted infrastructure or Red Hat Satellite, developers in the community or within an enterprise setting have access to build powerful applications using trusted Red Hat software by registering and associating subscriptions to the Container Development Kit.
In part 1 of this series, an overview was provided on how to install and configure Minishift/Container Development Kit (CDK) for use in an enterprise environment. During this discussion, the primary concern focused on the preparation of the host with the proper prerequisite software and to confirm the user executing the tool has the appropriate access to execute the required commands for operation. For those who have spent any amount of time in an enterprise environment, one of the primary challenges is how to manage resources that have a dependency on communicating with external resources.
Most organizations have some form of security or filtering layer that all ingress and egress traffic must traverse through before reaching the intended destination. These types of systems are commonplace and take the form of a software or hardware proxy and are implemented for security and compliance reasons. Computers on a corporate network are preconfigured to redirect all traffic (typically at an Operating System level) through the proxy before being allowed on the public Internet.
Unfortunately for developers (and in reality all users), proxy servers tend to cause the most distress and can negatively affect their productivity. Users must be cognizant of the transport mechanisms involved in any tool they are working with and any reliance on external systems. In addition, they must have the knowledge and understanding of whether the tool supports proxying connections, and if so, how to complete the configuration. With an understanding of the vital role proxies play in an enterprise setting, the remainder of this discussion will provide an overview on the support Minishift has for proxy servers and the various ways the various included components can be configured.
Determine required external resources
Minishift is one of those tools that makes requests to external resources. Over the course of normal operation, several different external resources are accessed by the various components within not only Minishift’s architecture, but also the underlying OpenShift ecosystem. When working a proxy in any corporate environment, one of the first questions before determining how to configure the tool for proxy support is to pinpoint the list of resources that the tool will need access to and if access is currently allowed. This step is akin to the process that was completed in the prior blog post for determining any prerequisite software Minishift needed. In addition, having a list prepared upfront aids in any discussion with security teams or as part of a site exemption process.
The following is a high level list of sites that Minishift requires access to for minimal operation.
Docker Images (From DockerHub)
docker.io – Authentication and registry
cloudfront.net – Image content is served through the CloudFront CDN
Red Hat Container Catalog
registry.access.redhat.com
access.redhat.com
Red Hat Subscription Manager (CDK)
subscription.rhsm.redhat.com
Build assets
If external resources are being leveraged such as source code from github.com or build artifacts from the Maven public repository.
OpenShift and Proxies
With an understanding of the different types of external resources that are accessed during the normal operation of Minishift, how are they used by the various included components? I would be flat out lying if I were to say that the proxy configuration in OpenShift and its components are straightforward. In fact, there is an entire document dedicated to detailing the components that have proxy support and the mechanisms in which they can be configured. These include:
Master and node services
Docker
Image builds
Usage in running containers
As you can see, the number of components is not trivial and each has their own set of configuration files and rules that can be applied. At times, it can be dizzying.
Configuring Minishift for Proxies
Fortunately, Minishift takes away the majority of the pain involved with managing proxies by supporting the auto configuration of many of the items presented in the prior section through a set of startup flags and options. Since proxies are typically targeted at managing HTTP traffic, there are three primary considerations:
How to manage insecure traffic (HTTP)
How to manage secure traffic (HTTPS)
Which type of traffic should not be routed through the proxy
Most operating systems provide support for these items through a set of configurable variables:
http_proxy
https_proxy
no_proxy
(Along with their all uppercase counterparts).
Likewise, proxy support in Minishift is facilitated by making use of these types of variables. Let’s see how to configure Minishift to make use of a proxy.
The most declarative method for managing proxy connections is to specify the options as parameters when starting Minishift with the minishift start command. As indicated previously, three command line options are available: The –http-proxy option is used for insecure communication while –https-proxy for secure communication. Finally, –no-proxy allows for a list of addresses to be provided which will not make use of a proxy.
For example, to start Minishift and to configure the instance to make use of a proxy server listening at http://corporate-proxy:8080 and to avoid using the proxy for a resource located at internal-resource.mycorp.com, the following command can be executed:
Note: If authentication is required to communicate with the proxy, it can be provided using the format “http://<user>:<password>@<ip_addr>:<port>”
You can verify Minishift is being configured with proxy support when the following appears during startup:
-- Setting proxy information ... .OK
Instead of specifying the proxy parameters each time Minishift is started, the values can be persistently set using the minishift config command as shown below using the aforementioned example values:
minishift config set http-proxy http://corporate-proxy:8080
minishift config set https-proxy http://corporate-proxy:8080
minishift config set no-proxy internal-resource.mycorp.com
So What Did Minishift Configure?
While an overview was provided that described the various ways proxies can be configured in OpenShift, which areas in particular did Minishift implement with regards to proxies?
Preflight checks to verify connectivity prior to launch
Host level operating system environment variables
Subscription manager to support registering the CDK
Docker daemon of the underlying host running the containerized version of OpenShift
Global build defaults to support accessing source code and build dependencies
If Only It Were That Easy….
Recall previously where I had mentioned that proxies cause the most heartache of all other obstacles in an enterprise environment? Well, even after Minishift is configured to make use of a proxy server, there are a number of gotcha’s that trip up even the most seasoned developer. Let’s discuss some of the areas that have been known to cause issues when working with Minishift and proxies.
Running Containers
Even though the docker daemon of the underlying host is configured with proxy support, these values are not inherited by the underlying containers. Instead, the container (or more accurately Pod), must be defined with values which the included components can make use of. These typically take the form of the aforementioned proxy values. The following is an example of how to define proxy values within a pod specification.
As previously mentioned, it is up to the underlying application on how and whether it supports proxies.
Command Line
The most common method when interacting with Minishift is through the executable using the command line. Once Minishift is up and running, focus shifts to the running OpenShift cluster and management through the Command Line Interface (even though the web console is also available). While the majority of CLI commands specifically target the OpenShift cluster, there are several commands that have the potential to fail within an environment containing proxies. As part of the “oc new-app” and “oc new-build” commands, the target images and source code repositories are inspected in order to satisfy the actions of the command. If the target location requires the traversal through the proxy server and the proxy details are not within the command line environment, the query and subsequent commands will fail.
Fortunately, since most organizations configure proxies at an Operating System level, these values are inherited within the command line session. If they are not defined, set the HTTP_PROXY and HTTPS_PROXY environment variables accordingly. However, this does cause a problem with communicating with OpenShift along with Minishift itself. If the IP address of Minishift is not specified in the list of NO_PROXY values, traffic intended for Minishift will instead be bound for the proxy and in most cases terminate at that point as the proxy has no knowledge of the networking on an individual developers machine.
To add Minishift to the list of addresses that should bypass proxies, utilize the following steps:
Find the IP address of Minishift:
minishift ip
Take the address provided by the previous command and add it to the list of addresses:
export NO_PROXY=$NO_PROXY,<minishift ip>
OpenShift CLI commands should once again return valid results
Final thoughts
As has been described, Minishift provides a number of solutions for utilizing the tool within an environment that contains a proxy server. While the majority of the most common scenarios were addressed within this article, it is almost certain that there will be other situations depending on the environment for which the tool is deployed within. Fortunately, as a result of its core architecture for supporting proxies, Minishift has the capabilities to be leveraged successfully in an enterprise environment.
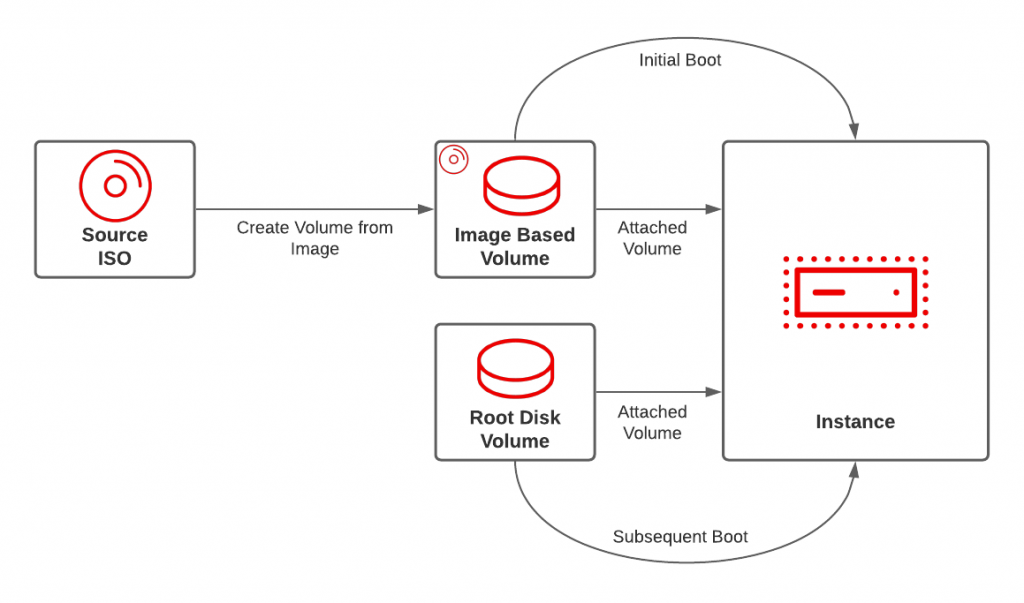
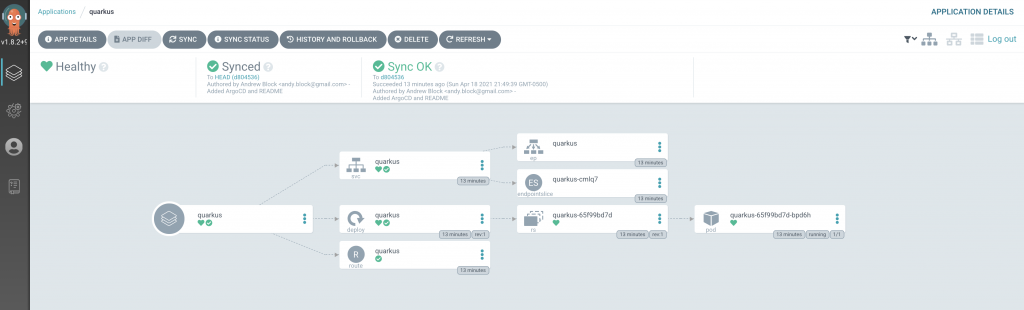


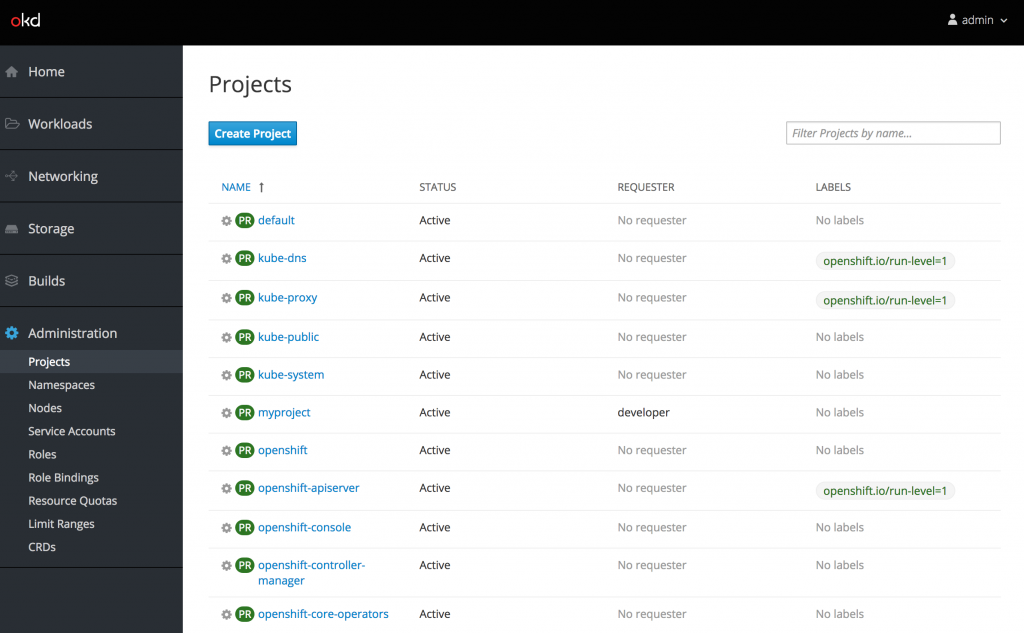
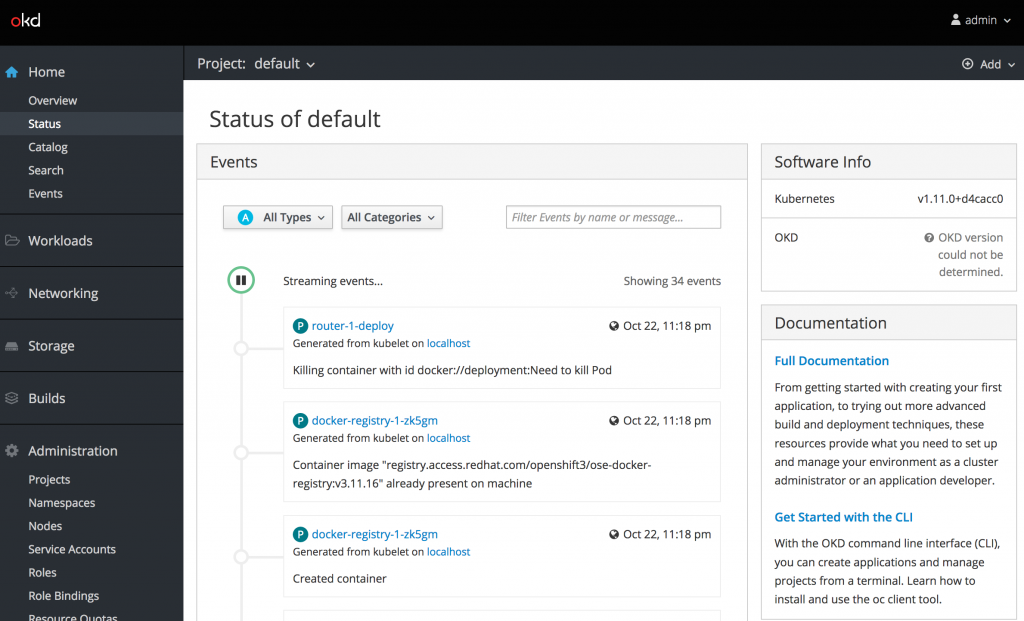
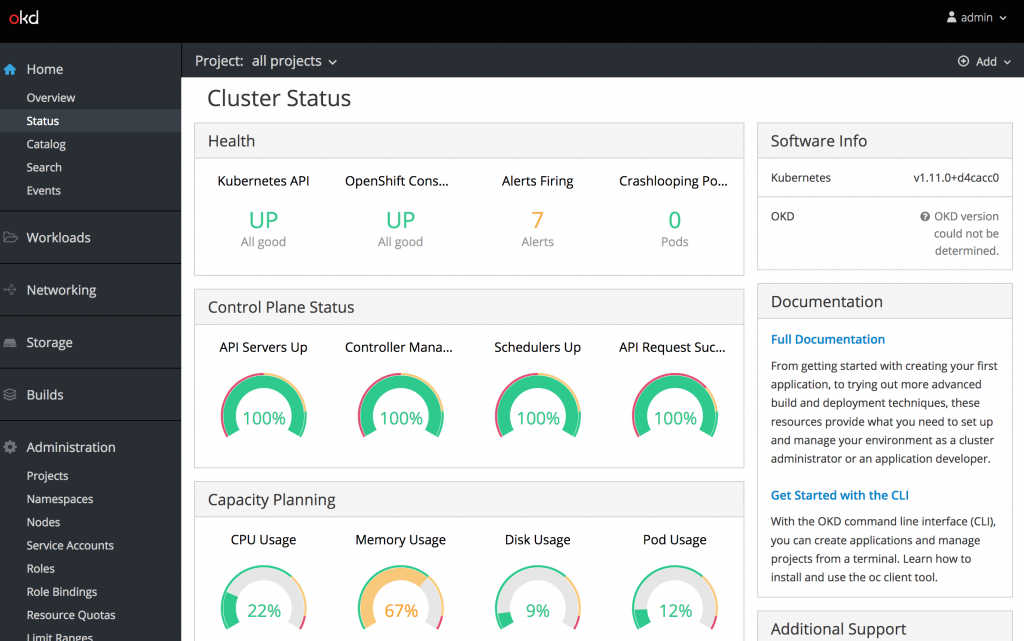
Recent Comments