Booting ISO’s in OpenStack Environments
Posted: June 13th, 2021 | Author: sabre1041 | Filed under: Uncategorized | No Comments »OpenStack provides scalable Infrastructure as a Service (IaaS) resources that can be used to gain access to assets on demand. With only a few clicks in the user interface or commands from the API based command line interface, server instances and associated supporting resources can be created. These instances are typically created based on preconfigured images in one of several supported formats. However, there are usually steps that must be taken up front in order to prepare these images for use within the platform. This process in many cases requires the use of specialized software tools that can not only consume the raw content, but output in a format that is supported and can be consumed by OpenStack.
Instead of going through the up front work to perform the preparation and customization steps of a cloud image, there is a common desire to leverage the raw source content that is provided by software vendors. This article will discuss how these base ISO images, ones that are typically responsible for aiding in booting an Operating System from a remote source or installing an Operating System from the included media, can be used to create new server instances in an OpenStack environment.
An overview of the architecture that will described throughout the remainder of the article is shown below:
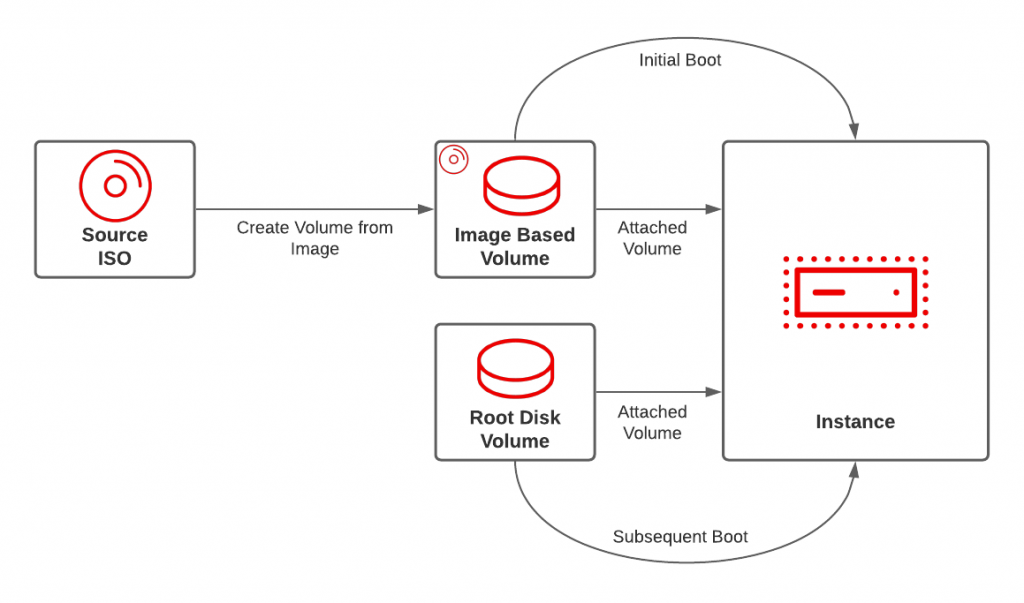
OpenStack server instances are highly configurable. However, in order to demonstrate the architectural principles of this approach, only a base level set of configurations will be provided. A common use case which aligns to this requirement is a server instance that boots off of a remote network server. This PXE based boot uses local media which contains the minimum set of assets in order to install an Operating System and leans on the content from the remote server. The first step is to identify the installation media (boot ISO in this case) and add it to OpenStack. This task can be completed via the user interface or by using the command line. Most of the interaction with the OpenStack platform in this post will use the openstack command. While any ISO image could be used, for our use case, a RHEL Enterprise Linux Boot ISO will be used. More information on the RHEL Boot ISO along with how to obtain the source can be found here. Create the image called rhel-8.4-x86_64-boot by executing the following command.
openstack image create --disk-format iso --container-format bare rhel-8.4-x86_64-boot -f=value -c=id
With the image loaded into OpenStack, let’s talk about how the image will be used when the server instance is created. OpenStack supports booting instances from either an image or a volume. Cloud based images are typically configured with the Operating System already installed and the root disk that is provided by the particular flavor selected at instantiation time. Since an ISO is a read-only source, storage must be provided separately. Instead of referencing the ISO as an image source which will automatically set the boot order at the highest precedence (0), the image can be instead converted to a volume, offering an alternative boot path. A separate volume can then be created and serve as the primary storage for the root disk serving the instance along with being set with a lower boot precedence so that it will be activated once the Operating system is installed. The following table describe the volumes that will be created in further detail using this approach:
| Volume | Mount Point | Boot Order | Extra Parameters |
| Root OS | /dev/vda | 0 | bus=ide |
| RHEL Boot Disk | /dev/hda | 1 | type=cdrom |
The first volume that should be created is based on the content of the previously created image. Let’s call this volume rhel-8.4-x86_64-boot-vol. Execute the following command to create the volume.
The should refer to the output from the previously created image. Also note the bootable flag is being set so that the volume is eligible to be used as a boot device. Be sure to also set an appropriate volume side based on the size of the image.
openstack volume create --size=<volume_size> --image=<image_id> --bootable -f=value -c=id rhel-8.4-x86_64-boot-vol
Next, create a new volume that will serve as the root disk for the newly created server instance. In this example, a volume called rhel-8.4-boot-test-vol will be used. Set an appropriate volume size based on the expected needs of your server instance.
openstack volume create --size=<volume_size> --bootable -f=value -c=id "rhel-8.4-boot-test-vol" -f=value -c=id
With the tasks associated for volume management complete, collect the remaining parameters needed to boot the server instance. While the openstack command has been used thus far, it does not provide the necessary options that we will need for managing the volumes appropriately. Instead, the nova command will be used. Feel free to view the options supported by the nova command to determine which are appropriate for your use case. Common options include --flavor for defining the type of instance that will be created, --nic for managing network interfaces, --security-group for associating security groups, or --key-name for attaching an SSH key to the instance.
Once all of the parameters have been collected, proceed to create a new server instance called rhel-8.4-boot-test using the following command.
nova boot --flavor <flavor_name> --nic net-id=<network_id> --block-device id=<image_volume_id>,source=volume,dest=volume,bus=ide,device=/dev/vda,size=<image_volume_size>,type=cdrom,bootindex=1 --block-device source=volume,id=<root_volume_id>,dest=volume,device=/dev/hda,size=<root_volume_size>,bootindex=0 rhel-8.4-boot-test
The --block-device parameter associates how the volumes created previously are applied to the newly created server instance. Be sure to include the id’s of the volumes created previously and their associated sizes. You may also choose to omit certain parameters or include additional parameters based on your use case, but the command listed here should cover the minimum set of configurations.
The details of the newly provisioned server instance will be provided once the nova boot command returns. Management of the new instance can be facilitated by connecting to the console and performing the necessary installation steps. Locate the URL of the in-browser based console by executing the following command.
openstack console url show rhel-8.4-boot-test
Once connected to the console, you will notice that the instance used the volume containing the operating system boot image since it is the only volume present with bootable media. Complete the necessary steps to boot and install the Operating System from either a remote server or local media. Once the installation is complete and the machine is restarted, the instance will now boot from the volume containing the installed Operating System root disk as it has a lower boot index.
The final step is to detach the volume containing the Boot ISO as it is no longer needed anymore by the server instance. Once the volume is detached, it can then either be deleted or reused by another server instance requiring the use of a Boot ISO.
Volumes cannot be removed while the server is running. Either poweroff the instance from within the Operating System or stopping the instance through the CLI by executing the following command:
openstack server stop <server_instance_id>
The id of the server was displayed within the output printed upon the completion of the nova boot command. It can also be found through the use of the openstack server list command as shown below:
openstack server list --name=rhel-8.4-boot-test -f=value -c=ID
Use this value to stop the rhel-8.4-boot-test server instance
With the server instance stopped, the volume associated with the Boot ISO can be detached.
<server_instance_id>openstack server remove volume <server_instance_id> <image_volume_id>
Confirm the rhel-8.4-x86_64-boot volume is once again available
openstack volume list --name=rhel-8.4-x86_64-boot
Now, the server instance can be started once again and resume normal operation
openstack server start <server_instance_id>
As demonstrated in this post, by configuring how an ISO image is loaded and made available to the server instance, along with controlling the boot order, additional options are made available when operating in an OpenStack environment.
Leave a Reply