Posted: October 23rd, 2018 | Author: sabre1041 | Filed under: Technology | 2 Comments »
 Through the continued evolution of the platform, OpenShift has shifted the focus from the installation and initial deployment of infrastructure and applications to understanding how the platform and their applications are performing, better known as day two operations. As a result of the incorporation of the CoreOS team and their existing ecosystem of tools into the OpenShift portfolio, the release of OpenShift Container Platform 3.11 includes a new administrator focused web console (cluster console) which provides insights into the management of nodes, role base access controls, and the underlying cloud infrastructure objects. While this new console is automatically enabled in the deployment of the OpenShift Container Platform, the console is not enabled in Minishift/Container Development Kit (CDK), the local containerized version of OpenShift. This post will describe the steps necessary for enabling the deployment of the cluster console in Minishift.
Before beginning, ensure that you have the latest release of Minishift. You can download the latest release from Github or from the Red Hat Developers website if making use of the Container Development Kit (CDK).
As of the publishing of this article, Minishift makes use of OpenShift version 3.10. To align with the features that are provided with OpenShift 3.11 to support the cluster console, Minishift should also be configured to make use of this version. When starting up an instance of Minishift, the –openshift-version flag can be provided to specify the version that should be utilized (The CDK uses the flag –ocp-tag).
Start an instance of Minishift to make use of OpenShift version 3.11. In addition, be sure to provide the VM containing OpenShift with enough resources to support the containers required for the deployment using the –memory parameter.
minishift start --openshift-version=v3.11.0 --memory=6114
When using the Container Development Kit, use the following command:
minishift start --ocp-tag =v3.11.16 --memory=6114
Once provisioning completes of the VM completes and the necessary container images have been retrieved and started, information on how to access the cluster will be provided in the command line output similar to the following:
The server is accessible via web console at:
    https://192.168.99.100:8443
When the provisioning process completes, you will be logged in to the OpenShift Command Line Interface (CLI) as a user called “developer“. Since the majority of the steps for deploying the cluster console require higher level permissions, you will need to login as a user with higher level permissions. You can login as the system administrator account using the following command as noted in the prior output:
oc login -u system:admin
The entire list of projects configured in OpenShift are then displayed. Unfortunately, this account cannot be used to access the web console. We need to grant another user cluster-admin permissions. Let’s give a user called “admin” cluster-admin privileges by executing the following command:
oc adm policy add-cluster-role-to-user cluster-admin admin
Now, login as this user to confirm that it has the same set of permissions as the system administrator user
$ oc login -u admin
Enter any password when prompted to finalize the login process.
Note: The Container Development Kit (CDK) ships with a set of of addons that provide additional features and functionality on top of the base set of components. One of these addons is the “admin-user” addon which configures a user named admin with cluster-admin privileges. Similar to the admin-user addon, another addon called anyuid is enabled by default in the CDK to streamline the development process. By default, containers running on OpenShift make use of random user ID which increases the overall security of OpenShift. The functionality within OpenShift that aids in this process is called Security Context Constraints (SCC). By default, all containers use the restricted SCC. The anyuid SCC for which the anyuid addon makes use of allows all containers to use the user ID as defined within the container instead of a random user ID. However, the utilization of the anyuid SCC by all OpenShift components has been known to cause challenges. Since new container development is not being emphasized as part of this effort, disable the configurations that were made by the addon by executing the following command:
$ oc adm policy remove-scc-from-group anyuid system:authenticated
With all of the policies now properly configured, let’s try to access the OpenShift web console. Due to a known issue, navigating to the base address in a web browser will result in an error. Instead, add the /console context to the OpenShift server address to work around this issue.
For example, if OpenShift is available at https://192.168.99.100:8443, the console would be accessible at https://192.168.99.100:8443/console
Accept the self signed certificate warning and you should be presented with the OpenShift web console. Login to the web console with the user “admin”. Any password can be entered as no additional validation is performed. Once authenticated successfully, you will be presented with the OpenShift catalog.
While access to the OpenShift web console is great, it only provides a developer’s centric viewpoint into the platform which has been available since the infancy of OpenShift 3. Additional steps will need to be performed to install the cluster console to provide a more operational viewpoint into the platform.
Coinciding with the release of OpenShift 3.11 was also the introduction of the Operator Framework and Operators into the mainstream use. Operators are a method for packaging, deploying and managing Kubernetes based applications. The cluster console makes use of an operator called the console-operator to manage its lifecycle.
To make use of an operator, a set of resources must be deployed to an OpenShift environment. These manifests are stored within the Github repository associated with the operator.
The content of the repository can either be downloaded as zip from Github or cloned. The command below will use git to clone the repository to a local machine and navigate into the directory created.
$ git clone https://github.com/openshift/console-operator
$ cd console-operator
All of the manifests needed to create the necessary project in OpenShift along with the remaining assets are located in a directory called manifests. The contents of the directory can all be created using a single command using the OpenShift CLI.
$ oc apply -f manifests/
A new namespace containing the operator and the console will be deployed. This can be confirmed by viewing the set of running pods in the newly created openshift-console namespace.
$ oc get pods -n openshift-console

NAME                                 READY     STATUS    RESTARTS   AGE
console-operator-7748b877b5-58h2z    1/1       Running   0          5m
openshift-console-67b8f48b9d-dw7dl   1/1       Running   0          5m
In addition, a route is also created to expose access outside the cluster.
$ oc get routes -n openshift-console

NAME      HOST/PORT                                     PATH      SERVICES   PORT      TERMINATION          WILDCARD
console   console-openshift-console.192.168.99.100.nip.io             console    https     reencrypt/Redirect   None
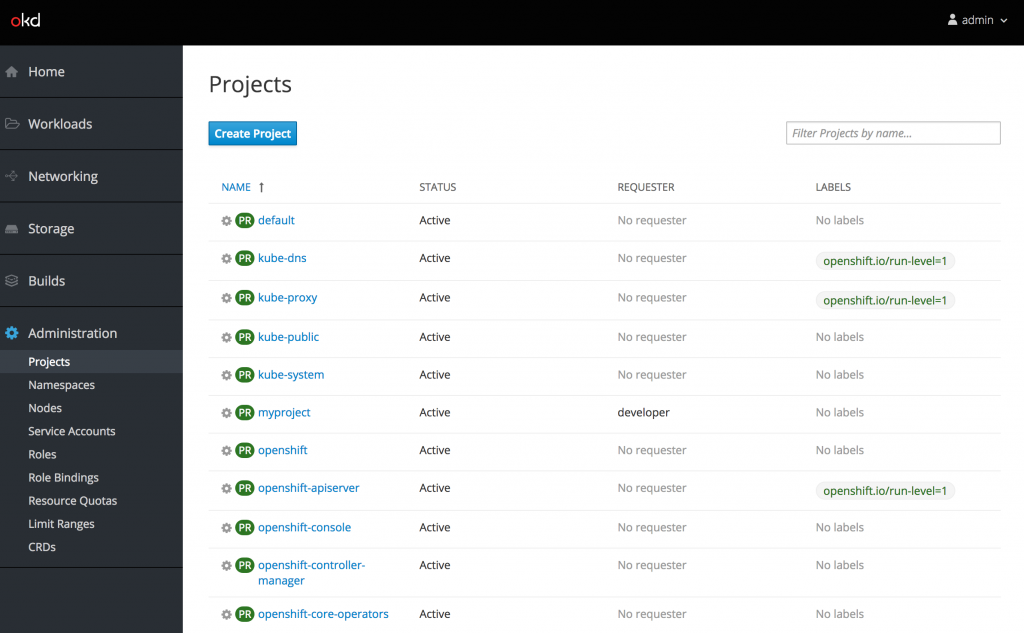
Navigate the the URL provided. Once again, accept the self signed certificate and login using the admin user. Once authenticated, the list of projects is presented.
Note: If you attempt to access the cluster console and are presented with a redirect loop where the login page continues to appear, it indicates a race condition has occurred where the console was not properly configured with the correct permissions to make requests against the OpenShift API. When this situation, occurs, execute the following command to delete the console pod which should mount the secrets properly upon the creation of the newly created pod:
oc delete pod -n openshift-console -l app=openshift-console
Now, under the administration section of the navigation bar, roles and their bindings, quotas along with the set of defined custom resource definitions can be browsed. Take a moment to view each of these sections at your leisure.
Most platform administrators are concerned with a holistic snapshot of the entire OpenShift environment. This is provided on the status page underneath the Home section of the left hand navigation bar.
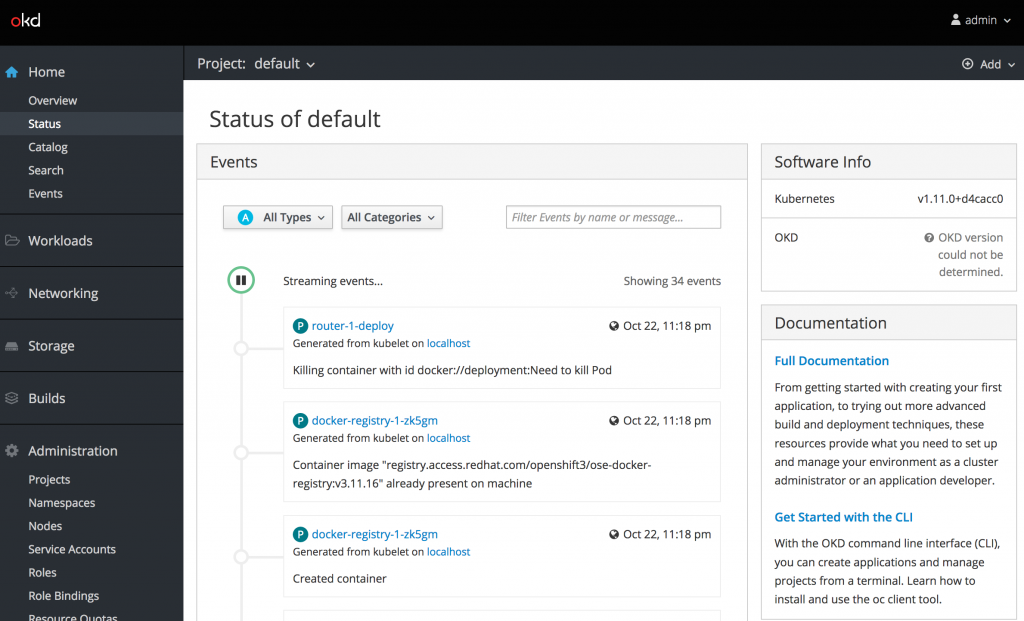
When navigating to the status page for the first time, only the default namespace is displayed. To view all namespaces, select the “all projects” option from the Projects dropdown at the top of the page. This will display an aggregation across all namespaces. Currently, only events are displayed which is only a portion of what platform administrators need to determine the state of the environment. There are key components of this page missing. This is due to the fact that the remaining content is sourced from metrics gathered in Prometheus which is not deployed by default in Minishift.
Fortunately, there is an operator available as of OpenShift 3.11 to manage the deployment of the Prometheus. The ecosystem of Prometheus tools including Alertmanager and Kube State Metrics is made available by the content found in the cluster-monitoring-operator repository. In a similar fashion as completed previously for the console-operator, open up a terminal session and clone the contents of the repository locally and change into the directory.
$ git clone https://github.com/openshift/cluster-monitoring-operator
$ cd cluster-monitoring-operator
Apply the contents of the manifest directory to OpenShift.
$ oc apply -f manifests/
A new namespace called openshift-monitoring will be created along with operators for managing Prometheus and the rest of the monitoring stack. There are a number of components that are deployed by the operators so it may take a few minutes for all of the components to become active. If necessary, refresh the cluster console status page to reveal additional telemetry of the current state of the OpenShift environment.
When reviewing the metrics now presented from Prometheus, a portion of the values may not be displayed. If this is the case, additional permissions may need to be added to allow for the OpenShift controller to perform a TokenReview. The operator configured a ClusterRole called prometheus-k8s which enables access to perform TokenReviews. Execute the following command to associate this ClusterRole to the service account being used by the controller-manager pod.
$ oc adm policy add-cluster-role-to-user prometheus-k8s -n openshift-controller-manager -z openshift-controller-manager
Wait a few moments and the remaining graphs should display values properly.
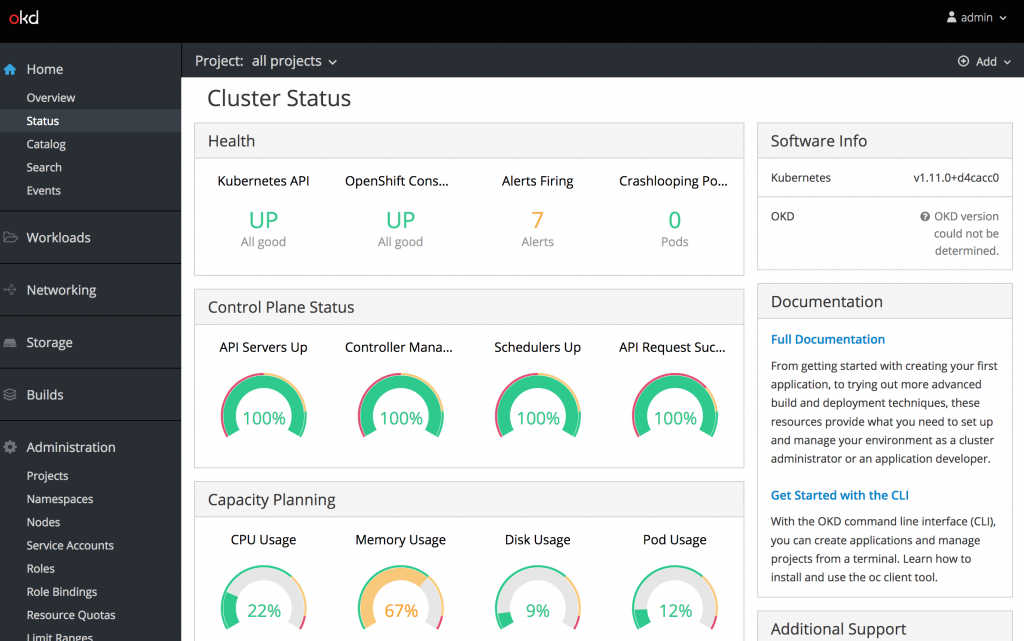
While the cluster console that is deployed on Minishift does not contain all of the metrics that are typically available in a full OpenShift deployment, it provides insights into the capabilities unlocked by this new administrative console and the expanded day two operations features.
Posted: October 9th, 2018 | Author: sabre1041 | Filed under: Technology | Tags: cdk, minishift, OpenShift, registries | No Comments »

Security continues to be a priority in most organizations. Any breach may result in intellectual or financial losses. Reducing access to external systems by internal resources is one was to limit the threat potential. One such method is to place a middleman, or proxy, between internal and external resources to govern the types of traffic. Considerations for how the Container Development Kit (CDK) can traverse proxy servers were covered in a prior blog. However, many organizations are further reducing the need for communicating with remote systems and placing all resources within their infrastructure. Systems operating in a manner where access to external resources is completely restricted is known as running in a disconnected environment. OpenShift supports operating in a disconnected environment and cluster operators can take steps to prepare for normal operation. A full discussion on managing OpenShift in a disconnected environment is beyond the scope of this discussion, but can be found here. While there are several areas the must be accounted for when operating in a disconnected environment, having access to the container images that reside in external image registries is essential. The CDK, like the full platform is driven by container images sourced from external locations. Fortunately, the CDK does contain the functionality to specify an alternate location for which images that control the execution can originate from.
OpenShift’s container images are stored by default in the Red Hat Container Catalog (RHCC) by default. Many organizations operate their own container registry internally for providing content either from remote locations or created internally. Common registry examples in use include a standalone docker registry (docker distribution), Sonatype Nexus, JFrog Artifactory and Red Hat Quay. Since the same container images that are used by OpenShift Container Platform are used by the CDK, organizations can serve them using an internal registry and satisfy both sets of consumers. One requirement that must be adhered to is that the name of the image repository, name and tag must match the source from the Red Hat Container Catalog (it can differ, however several manual changes would then be required).
Once the images are available in the local registry, a few configuration changes can be made to fully support their use in the CDK (See the section on syncing images). First, several of the options that will be leveraged in the CDK are classified as “Experimental features”. To enable support for experimental feature, set the “MINISHIFT_ENABLE_EXPERIMENTAL” environmental variable to “y” as shown below:
export MINISHIFT_ENABLE_EXPERIMENTAL=y
With experimental features enabled, the CDK can now be started. For this example, let’s assume that there is an image registry located at registry.mycorp.com which has been seeded with the images to support OpenShift. Execute the following command to utilize the CDK with images sourced from this internal registry:
minishift start --insecure-registry registry.mycorp.com --docker-opt add-registry= registry.mycorp.com --docker-opt block-registry=registry.access.redhat.com --extra-clusterup-flags --image= registry.mycorp.com/openshift3/ose
Phew, that was a long command. Lets take a moment to break it down.
This is the primary command and subcommand used to start the CDK
- –insecure-registry registry.mycorp.com
While the registry may be served using trusted SSL certificates, many organizations have their own Certificate Authority instead of leveraging a public CA, such as Comodo. Since the VM running the CDK only trusts certificates from public CA’s, this will allow docker to be able to communicate with the registry
- –docker-opt add-registry= registry.mycorp.com
Many OpenShift components do not include the registry portion of the image and instead rely on the configuration of the underlying Docker daemon to provide a default set of registries to use. Both the OpenShift Container Platform and the Container Development Kit have the RHCC configured by default. By specifying the location of the internal registry, the CDK will be able to reference it when images are specified without the value of the registry.
- –docker-opt block-registry=registry.access.redhat.com
To ensure images are only being sourced from the corporate registry not the default location (RHCC), the CDK VM can configured to place a restriction at the docker daemon level.
- –extra-clusterup-flags –image= registry.mycorp.com/openshift3/ose
OpenShift in the context of the CDK as of OpenShift version 3.9 utilizes the same image as containerized installation and contains all of the necessary logic to manage an OpenShift cluster. Under the covers of the CDK, the “oc cluster up” utility is leveraged to deploy OpenShift. By default, “oc cluster up” references the full path of the image, including registry. This experimental feature flag allows this value to be overridden with the location of the image from the enterprise registry.
The CDK will now start by pulling the container image and once this image is started, all dependent images by the platform will be retrieve. After the CDK has started fully, verify all running images are using the enterprise container registry.
First, check the names of the images currently running at a Docker level using the minishift ssh command:
minishift ssh "docker images --format '{{.Repository}}:{{.Tag}}'"
The final component that requires modification to support leveraging an enterprise registry is to update all of the ImageStreams that are populated in OpenShift. By default, they reference images from the RHCC. The Ansible based OpenShift installer does contain logic to update ImageStreams if the location differs from the RHCC. Unfortunately, the CDK does not contain this logic. Fortunately, this issue can be corrected with only a few commands.
oc login -u admin
Similar to all other accounts in the CDK, any password can be specified.
Next replace the RHCC with the location of the enterprise registry for all ImageStreams by executing the following command:
oc get is -n openshift -o json | sed -e 's|registry.access.redhat.com|registry.mycorp.com|g' | oc replace -n openshift -f-
Make sure to replace registry.mycorp.com with the address of the enterprise registry.
With the ImageStreams now utilizing all of the enterprise registry as the source, reimport all of the ImageStreams:
for x in `oc get is -n openshift -o name`; do oc import-image $x -n openshift --all --insecure=true; done
After the command completes, all ImageStreams will be updated.
At this point the CDK is fully functional with images being referenced from the enterprise registry, thus enabling productivity in environments where security is a high priority
Posted: October 9th, 2018 | Author: sabre1041 | Filed under: Technology | Tags: cdk, minishift, OpenShift | No Comments »
 One of the many hallmarks of Open Source Software is the ability for anyone in the community to freely contribute to a software project. This open model provides an opportunity to garner insight into the direction of a project from a larger pool of resources in contrast to a closed sourced model where software may be regulated by a single organization or group. Many enterprises also see the value of Open Source Software to power their most critical systems. However, enterprises must be cognizant that Open Source Software from the community may not have the integrity that they have been accustomed to when using software obtained directly from a vendor. Red Hat, as a leader of Open Source Software solutions, provides a subscription model that can be used to meet the quality and support requirements necessary by any organization. A subscription includes fully tested and hardened software, patches, and customer support. Once a subscription has been purchases, licensed software must be registered to activate the necessary included features.
The Container Development Kit (CDK) is the supported version of the upstream minishift project, and given that the software package is built on top of a Red Hat Enterprise Linux base, a valid subscription associated with a Red Hat account is required to access the entire featureset provided by the CDK. To enable the development on Red Hat’s ecosystem of tools, a no-cost developer subscription is available through the Red Hat Developer program and includes an entitlement to Red Hat Enterprise Linux along with a suite of development tools that are regularly updated with the latest enhancements and features. Information about the Red Hat Developer Subscription along with the steps to create an account can be found at the Red Hat Developer Website.
Once a Red Hat Developer account has been obtained, the configuration of associating the account within the CDK can be completed. These steps were detailed in the prior post, Minishift and the Enterprise: Installation.
While the Red Hat Developer subscription is a great way for developers to take advantage of enterprise Linux software, many organizations frown upon the use of personal licenses operating within the organization, especially on company owned machines. The CDK is configured to automatically register and associate subscriptions against Red Hat’s hosted subscription management infrastructure. Accounts for developers can be created within the Red Hat Customer Portal for use with the CDK. As described in the post Minishift and the Enterprise: Proxies, subscription-manager, the tool within RHEL for tracking and managing subscriptions, is automatically configured to traverse a corporate proxy server to the public internet when this option is enabled. This feature, as previously mentioned, is useful as most enterprises employ some form of barrier between the end user and external network.
Unfortunately, many enterprises do not use Red Hat’s hosted subscription management system to register machines on their network and instead leverage Red Hat Satellite within their internal network. The CDK, as of version 3.3, is only able to register subscriptions against Red Hat automatically as part of normal startup. Fortunately, there are methods in which the user can configure the CDK to register against a satellite server instead of Red Hat. These options include:
- Executing commands to facilitate the registration process
- Leveraging an add-on which streamlines the registration process
Regardless of the method utilized, the CDK should be instructed to not attempt to register the machine during startup. This is accomplished by passing the –skip-registration parameter when executing the minishift start command as shown below:
minishift start --skip-registration
Even though the RHEL machine within the CDK is not registered, the majority of the functionality will remain unaffected. The key exception is managing software packages using the yum utility. Since RHEL based images inherit subscription and repository information from the host they are running on, operations both on the host machine as well as within a container making use of yum will fail due to the lack of valid subscriptions. This is primarily noticeable at image build time as it typically involves the installation of packages using yum.
The RHEL machine within the CDK can be registered manually in a similar fashion to any other RHEL machine using the subscription-manager utility. To gain access to a prompt within the CDK, the minishift ssh command can be used.
minishift ssh
By default, an ssh session is established within the CDK using the “docker” user. Since subscription-manager requires root privileges, access must be elevated using the sudo command. Execute the following command to elevate to the root user:
sudo su -
With access to root privileges, the machine can now be registered to Red Hat using the subscription-manager register command. Either a username/password or activation key/organization combination can be used as follows:
subscription-manager register --username=<username> --password=<password>
Or
subscription-manager register --org=<organization-key> --activationkey=<activation-key>
In either case, adding the –auto-attach parameter to each command will attach a subscription automatically to the new registration.
To subscribe the CDK against an instance of Red Hat Satellite instead of Red Hat’s hosted infrastructure, many of the same commands can be reused. An additional step is required to first download the bundle containing the certificates for the Satellite server so that the CDK can communicate securely to facilitate the registration process. Execute the following command to install the certificates into the CDK:
rpm -Uvh http://<satellite_server>/pub/katello-ca-consumer-latest.noarch.rpm
Now use subscription-manager to complete the registration process using the –org and –activationkey parameters
subscription-manager register --org=<organization-key> --activationkey=<activation-key> --auto-attach
To validate the CDK is properly subscribed, lets start a new container and attempt to install a package using yum. Once again, in a session within the CDK as the root user, execute the following command:
docker run -it --rm rhel:7.5 yum install -y dos2unix
If the above command succeeded, the CDK is properly registered and subscribed.
Automate Satellite Registration using an Add-on
Active users of the CDK routinely delete the RHEL VM that is part of the CDK using the minishift delete command and start with a clean slate as it eliminates the artifacts that have accumulated from prior work. As demonstrated previously, registration of the CDK against a Red Hat Satellite does involve a number of manual steps. Fortunately, there is a way to automate this process through the use of a minishift add-on. An add-on is a method to extend the base minishfit startup process by injecting custom actions. This is ideal as the add-on can streamline the repetitive manual processes that would normally need to be executed to register against satellite.
An addon called satellite-registration is available to facilitate the registration of the CDK against a Satellite instance. To install the add-on, first clone the repository to the local machine:
git clone https://github.com/sabre1041/cdk-minishift-utils.git
With the repository available on the local machine, install the add-on into the CDK
minishift addons install cdk-minishift-utils/addons/satellite-registration
Confirm the add-on was installed successfully by executing the following command:
minishift addons list
When any new add-on is installed, it is disabled by default (as indicated by the disabled designation). Add-ons can be enabled which will automatically execute them at startup or they can be manually invoked using the minishift apply command. If you recall, registration against a satellite instance required several values be provided to complete the process:
- Location of the satellite server to obtain the certificate bundle
- Organization ID
- Activation Key
The add-on similarly requires these also be provided so that it can register the CDK successfully. Add-on’s offer a method of injecting parameters during the execution process through the –addon-env flag. The above items are associated with the add-on environment variables listed below:
- SATELLITE_CA_URL
- SATELLITE_ORG
- SATELLITE_ACTIVATION_KEY
To test the add-on against a satellite server, first start up the CDK with auto registration disabled:
minishift start --skip-registration
Once the CDK has started, apply the satellite-registration add-on along with the required flags:
minishift addons apply satellite-registration --addon-env "SATELLITE_CA_URL=<CA_LOCATION>" --addon-env "SATELLITE_ORG=<ORG_NAME>" --addon-env "SATELLITE_ACTIVATION_KEY=<ACTIVATION_KEY>"
Confirm the registration was successful by checking the status as reported by subscription manager from the local machine
minishift ssh sudo subscription-manager status
If the “Overall Status” as reported by the previous command returns “Current”, the CDK was successfully subscribed to the satellite instance.
Whether using Red Hat hosted infrastructure or Red Hat Satellite, developers in the community or within an enterprise setting have access to build powerful applications using trusted Red Hat software by registering and associating subscriptions to the Container Development Kit.
Posted: March 8th, 2018 | Author: sabre1041 | Filed under: Technology | Tags: developer, minishift, networking, proxy | 3 Comments »

In part 1 of this series, an overview was provided on how to install and configure Minishift/Container Development Kit (CDK) for use in an enterprise environment. During this discussion, the primary concern focused on the preparation of the host with the proper prerequisite software and to confirm the user executing the tool has the appropriate access to execute the required commands for operation. For those who have spent any amount of time in an enterprise environment, one of the primary challenges is how to manage resources that have a dependency on communicating with external resources.
Most organizations have some form of security or filtering layer that all ingress and egress traffic must traverse through before reaching the intended destination. These types of systems are commonplace and take the form of a software or hardware proxy and are implemented for security and compliance reasons. Computers on a corporate network are preconfigured to redirect all traffic (typically at an Operating System level) through the proxy before being allowed on the public Internet.
Unfortunately for developers (and in reality all users), proxy servers tend to cause the most distress and can negatively affect their productivity. Users must be cognizant of the transport mechanisms involved in any tool they are working with and any reliance on external systems. In addition, they must have the knowledge and understanding of whether the tool supports proxying connections, and if so, how to complete the configuration. With an understanding of the vital role proxies play in an enterprise setting, the remainder of this discussion will provide an overview on the support Minishift has for proxy servers and the various ways the various included components can be configured.
Determine required external resources
Minishift is one of those tools that makes requests to external resources. Over the course of normal operation, several different external resources are accessed by the various components within not only Minishift’s architecture, but also the underlying OpenShift ecosystem. When working a proxy in any corporate environment, one of the first questions before determining how to configure the tool for proxy support is to pinpoint the list of resources that the tool will need access to and if access is currently allowed. This step is akin to the process that was completed in the prior blog post for determining any prerequisite software Minishift needed. In addition, having a list prepared upfront aids in any discussion with security teams or as part of a site exemption process.
The following is a high level list of sites that Minishift requires access to for minimal operation.
- Docker Images (From DockerHub)
- docker.io – Authentication and registry
- cloudfront.net – Image content is served through the CloudFront CDN
- Red Hat Container Catalog
- registry.access.redhat.com
- access.redhat.com
- Red Hat Subscription Manager (CDK)
- subscription.rhsm.redhat.com
- Build assets
- If external resources are being leveraged such as source code from github.com or build artifacts from the Maven public repository.
OpenShift and Proxies
With an understanding of the different types of external resources that are accessed during the normal operation of Minishift, how are they used by the various included components? I would be flat out lying if I were to say that the proxy configuration in OpenShift and its components are straightforward. In fact, there is an entire document dedicated to detailing the components that have proxy support and the mechanisms in which they can be configured. These include:
- Master and node services
- Docker
- Image builds
- Usage in running containers
As you can see, the number of components is not trivial and each has their own set of configuration files and rules that can be applied. At times, it can be dizzying.
Configuring Minishift for Proxies
Fortunately, Minishift takes away the majority of the pain involved with managing proxies by supporting the auto configuration of many of the items presented in the prior section through a set of startup flags and options. Since proxies are typically targeted at managing HTTP traffic, there are three primary considerations:
- How to manage insecure traffic (HTTP)
- How to manage secure traffic (HTTPS)
- Which type of traffic should not be routed through the proxy
Most operating systems provide support for these items through a set of configurable variables:
- http_proxy
- https_proxy
- no_proxy
- (Along with their all uppercase counterparts).
Likewise, proxy support in Minishift is facilitated by making use of these types of variables. Let’s see how to configure Minishift to make use of a proxy.
The most declarative method for managing proxy connections is to specify the options as parameters when starting Minishift with the minishift start command. As indicated previously, three command line options are available: The –http-proxy option is used for insecure communication while –https-proxy for secure communication. Finally, –no-proxy allows for a list of addresses to be provided which will not make use of a proxy.
For example, to start Minishift and to configure the instance to make use of a proxy server listening at http://corporate-proxy:8080 and to avoid using the proxy for a resource located at internal-resource.mycorp.com, the following command can be executed:
minishift start --http-proxy=http://corporate-proxy:8080 --https-proxy=http://corporate-proxy:8080 --no-proxy=internal-resource.mycorp.com
Note: If authentication is required to communicate with the proxy, it can be provided using the format “http://<user>:<password>@<ip_addr>:<port>”
You can verify Minishift is being configured with proxy support when the following appears during startup:
-- Setting proxy information ... .OK
Instead of specifying the proxy parameters each time Minishift is started, the values can be persistently set using the minishift config command as shown below using the aforementioned example values:
minishift config set http-proxy http://corporate-proxy:8080
minishift config set https-proxy http://corporate-proxy:8080
minishift config set no-proxy internal-resource.mycorp.com
So What Did Minishift Configure?
While an overview was provided that described the various ways proxies can be configured in OpenShift, which areas in particular did Minishift implement with regards to proxies?
- Preflight checks to verify connectivity prior to launch
- Host level operating system environment variables
- Subscription manager to support registering the CDK
- Docker daemon of the underlying host running the containerized version of OpenShift
- Global build defaults to support accessing source code and build dependencies
If Only It Were That Easy….
Recall previously where I had mentioned that proxies cause the most heartache of all other obstacles in an enterprise environment? Well, even after Minishift is configured to make use of a proxy server, there are a number of gotcha’s that trip up even the most seasoned developer. Let’s discuss some of the areas that have been known to cause issues when working with Minishift and proxies.
Running Containers
Even though the docker daemon of the underlying host is configured with proxy support, these values are not inherited by the underlying containers. Instead, the container (or more accurately Pod), must be defined with values which the included components can make use of. These typically take the form of the aforementioned proxy values. The following is an example of how to define proxy values within a pod specification.
containers:
- env:
  - name: "HTTP_PROXY"
    value: "http://corporate-proxy:8080”
  - name: "HTTPS_PROXY"
    value: "http://corporate-proxy:8080”
  - name: "NO_PROXY"
    value: "internal-resource.mycorp.com”
As previously mentioned, it is up to the underlying application on how and whether it supports proxies.
Command Line
The most common method when interacting with Minishift is through the executable using the command line. Once Minishift is up and running, focus shifts to the running OpenShift cluster and management through the Command Line Interface (even though the web console is also available). While the majority of CLI commands specifically target the OpenShift cluster, there are several commands that have the potential to fail within an environment containing proxies. As part of the “oc new-app” and “oc new-build” commands, the target images and source code repositories are inspected in order to satisfy the actions of the command. If the target location requires the traversal through the proxy server and the proxy details are not within the command line environment, the query and subsequent commands will fail.
Fortunately, since most organizations configure proxies at an Operating System level, these values are inherited within the command line session. If they are not defined, set the HTTP_PROXY and HTTPS_PROXY environment variables accordingly. However, this does cause a problem with communicating with OpenShift along with Minishift itself. If the IP address of Minishift is not specified in the list of NO_PROXY values, traffic intended for Minishift will instead be bound for the proxy and in most cases terminate at that point as the proxy has no knowledge of the networking on an individual developers machine.
To add Minishift to the list of addresses that should bypass proxies, utilize the following steps:
Find the IP address of Minishift:
minishift ip
Take the address provided by the previous command and add it to the list of addresses:
export NO_PROXY=$NO_PROXY,<minishift ip>
OpenShift CLI commands should once again return valid results
Final thoughts
As has been described, Minishift provides a number of solutions for utilizing the tool within an environment that contains a proxy server. While the majority of the most common scenarios were addressed within this article, it is almost certain that there will be other situations depending on the environment for which the tool is deployed within. Fortunately, as a result of its core architecture for supporting proxies, Minishift has the capabilities to be leveraged successfully in an enterprise environment.
Posted: February 14th, 2018 | Author: sabre1041 | Filed under: Technology | 3 Comments »
 As technology has continued to advance, the steps for developing and deploying applications has followed suit. What was once a fairly standard process that involved only a finite number of components has evolved dramatically in recent years with the introduction of new toolsets and frameworks. While adding a new software package on an individual’s local machine may seem like a trivial task, the concerns are multiplied within an enterprise setting. What is the origin of the component? Why is it needed? What is the update cycle? Who supports the tool? These are all valid questions and a common occurrence in any organization practicing diligent IT security and compliance methodologies.
While a full-blown installation of OpenShift is not practical on a typical developer machine, Minishift offers developers the opportunity to take advantage of managing advanced container workloads while accelerating developer productivity without all of the complexities of the operational support. As organizations embrace OpenShift, they see the benefits of giving their developers the freedom of running an entire containerized version platform within an individual machine. These advantages include eliminating the reliance on a shared OpenShift environment as well as reducing the overall resource utilization of said cluster. As a result, costs are reduced and the opportunity for adding additional services to the environment can be attained.
So you want to run OpenShift locally
Based on prior experience, these concerns are typically encountered before organizations can adopt Minishift:
- Describe the system requirements
- Provide a list of dependencies
This type of information gives IT administrators, desktop support personnel, and compliance teams the necessary knowledge to fully understand the items they may be ultimately responsible for managing.
The system requirements and dependencies directly correlate to the type of distributions that will be provided.
Given the context of this series is focused on an enterprise setting, the remainder of these discussions will focus on the Container Development Kit (CDK), the downstream, productized version of Minishift. While many of the same concerns are found in the upstream project, there are specific items that are only found in the CDK.
The Container Development Kit is available using two installation paths:
- A standalone executable
- As part of the Red Hat Development Suite: A packaged set of tools to support container development, which includes OpenJDK, Red Hat JBoss Developer Studio, VirtualBox, and the Container Development Kit.
In most organizations that I have worked with, they choose to adopt the standalone executable instead of the Red Hat Development Suite. This decision is a result of organizations wanting to manage a succinct number of tools instead of a full suite. The suite is great for developers working outside of an enterprise context, as it provides a guided installation of the CDK. Also, there may already be a comparable tool that is packaged with the suite already within the enterprise.
Regardless of the installation approach, the primary requirement to support the CDK is the presence of a supported hypervisor as it runs within a virtual machine.
Several popular options are available:
The choices are directly dependent on the target Operating System, which in most organizations is either Windows or OSX. Even though I do work for a Linux company, I fully acknowledge the fact that most developers will rarely use Linux as their primary host in an enterprise setting.
Some organizations do wince at the prospect of having to support virtualization tools as they typically do require an increased system resource profile, such as RAM and CPU. Security teams also are concerned about any implementations that may attempt to compromise existing security features implemented both within the network as well as on the machine itself. In addition, administrative rights are required for the installation and in some cases the operation of hypervisor tooling.
Fortunately, thanks to the advent of development approaches leveraging virtual machines along with tools to support automated environment configuration, such as Vagrant, some organizations already have hypervisors present on developer machines and can forgo working through this process. This greatly simplifies the potential hurdles for adoption within the enterprise.
Setup and configuration
Once all of the hurdles of installing the prerequisite software have been completed, the CDK itself can be installed and configured. Organizations typically block the individual downloading of executable files for security purposes, so other mechanisms must be utilized. In many cases, approved software is made available through a software catalog. Otherwise, the executable for the CDK can be hosted in an artifact repository, such as Sonatype Nexus or JFrog Artifactory, for users to download.
When using a manual installation process and not initiated by a corporate installation tool that may automate many of the installation and configuration processes, users can either reference the executable file directly or place the file on the PATH and make it available within any terminal session. In the case of a Windows system, users will typically not be able to modify the system PATH variable as it is shared among multiple users of the machine. Instead, they can modify the user PATH variable that only affects their own individual account.
The next step is to setup the CDK itself by using the setup-cdk minishift command as shown below:
minishift setup-cdk
Setting up the CDK extracts the ISO file used to boot the virtual machine and prepares the system for use. All of these files are copied to the .minishift folder inside the users’ HOME directory ($HOME/.minishift). The location of this folder can be changed either by passing the –minishift-home flag or setting the MINISHIFT_HOME environment variable to a suitable location. In many environments, a home directory is located on a network share so that files can easily be retrieved across multiple systems as a user traverses different machines in the organization. However, a performance loss will be incurred during the operation of the CDK as resources are retrieved from a remote location. In addition, if for some reason a user is not connected to the corporate network, they will not have access to the required files to operate the CDK. When selecting an alternate folder location, users must be cognizant of the folder they are intending to target and whether they have write permissions.
The final step prior to starting the CDK is to specify credentials for registering the included copy of Red Hat Enterprise Linux (RHEL) to the Red Hat Network (RHN). Registration is required in order for containers running within OpenShift to take advantage of yum packages, as yum utilizes the subscriptions of the underlying host. A developer subscription can be obtained for free at https://developers.redhat.com or may be available through an existing enterprise license. While a properly subscribed machine is not required for normal operation, it will result in reduced functionality.
Credentials can be stored persistently using the MINISHIFT_USERNAME and MINISHIFT_PASSWORD environment variables, specified using the –username and –password flags during startup, or specified as a configuration item managed by the minishift config command. In addition to managing usernames and passwords, a wide range of options can be specified using the minishift config command, such as the hypervisor driver along with the amount of CPU or RAM allocated for the virtual machine. An example of how to set the virtual machine driver is shown below:
minishift config set vm-driver virtualbox
All that is left to do is to start the CDK along with any optional parameters:
minishift start
The Container Development Kit will provision a new virtual machine, register the machine, and complete a number of provisioning steps including the following:
- Downloading the containerized version of OpenShift
- Allocating a set of PersistentVolumes for making use of persistent storage
- Applying several add-ons which extend the functionality of the base OpenShift configuration
- Creating an admin and developer account for interacting with the platform
Once the CDK has started, it will present a URL to access the web console along with credentials for the developer account.
A baseline installation of the Container Development Kit in an enterprise environment is fairly straightforward once all of the prerequisites have been fulfilled. However, there are situations where access to external resources may not be readily available. In the next post in this series, we will illustrate how to use the Container Development Kit in an environment that requires the use of a proxy server to access external assets.
Posted: January 22nd, 2018 | Author: sabre1041 | Filed under: Technology | Tags: Ansible, management, OpenShift | No Comments »
 Separation of concerns is one of the fundamental principles in a multitenant environment. It ensures that multiple users can coexist without knowledge or access to each others resources. While OpenShift supports multitenancy through a number of different mechanisms, the use of projects provide users with their own separate workspace with the cluster. Built on top of Kubernetes namespaces, projects in OpenShift not only allows for a single user, but an entire community of users the ability to effectively collaborate within the cloud. One of the unique features of projects is that when they are initially created, they are preconfigured with a set of service accounts and permissions (roles/role bindings) that allow for users to be immediately productive. While the initial set of customized resources within a project provides a suitable baseline for end users, cluster administrators may want to enforce additional policies and configurations whenever a new project is created. Fortunately, OpenShift provides the capability of defining a default project template that will be instantiated whenever a new project is created. The following steps describe how to create a new default project template:
- Export the default project template to a file
- Make the appropriate modifications
- Add the template to the cluster
- Edit the master-config.yaml configuration on each master to designate the template that should be used as the default project template
In most of the clusters that I regularly deploy, I have automated these actions as a post installation step (obviously driven through Ansible). Even with the additional automation, it still presents another dependency that must be maintained when installing a new OpenShift environment. Fortunately starting with OpenShift 3.7.14, native support for configuring the default project template is available within the installation. Similar to the other options that are available during an installation of OpenShift, all that is required is defining a few Ansible variables. The rest of this post describes how to automate the configuration of a default project template through the OpenShift installer.
Before specifying the mechanisms necessary to configure the installer, let’s define a common use case of how the default project template could be modified. To protect the stability of the cluster, ResourceQuotas and LimitRanges can be applied to any new project to define the and restrict the amount of resources that can be consumed by running applications. While these metrics can vary from cluster to cluster, a middle of the road set of resources can be defined as follows:
ResourceQuotas
| Name |
CPU |
Memory |
Scope |
|---|
| quota |
2 |
12Gi |
NonTerminating |
| burst-quota |
4 |
16 |
|
LimitRanges
| Name |
Pod Max |
Pod Min |
Container Max |
Container Min |
Container Default |
|---|
| limits |
CPU: 200m Memory: 2Gi |
CPU: 10m Memory: 128Mi |
CPU: 200m Memory: 2Gi |
CPU: 20m Memory: 256Mi |
CPU: 50 Memory: 256Mi |
The openshift_project_request_template Ansible role is ultimately responsible for implementing many of the steps that would normally need to be manually configured. This role makes use of an Ansible library called yedit that allows for the modification of YAML files. As the role executes, it exports the default project template and modifies the file with customized values. Any modification to the default project template must be defined by the variable openshift_project_request_template_edits which takes in an array of modifications that should be executed by yedit. This variable, similar to other variables that allow for the customization of the OpenShift installation are defined within the [OSEv3:vars] section of the Ansible inventory. Formatting the variable in a manner in which the module can properly process the changes is the most complex aspect of the customization process.
Each array value must define a set of values to perform the desired results of customizing the default project template. First is a key within the yaml file that should be modified. For those familiar with OpenShift templates, there are two primary key properties: objects which define the resources that are applied to OpenShift and parameters which allow for values to be dynamically injected at runtime. Since default project templates do not support additional parameter values, the only the object key can be modified. Since the desired outcome of the execution process is to append the existing list of objects, yedit has a module option called `append` that when set to True, will append the newly defined values with the existing values. Finally, the newly created object itself must be defined. Each additional resource to be added to the default project template must be separated into its own array object. In our use case, three objects will be created as shown below:
openshift_project_request_template_edits:
  - key: objects
    action: append
    value:
      apiVersion: v1
      kind: ResourceQuota
      metadata:
        annotations:
          openshift.io/quota-tier: Medium
        labels:
          quota-tier: Medium
        name: quota
      spec:
        hard:
          cpu: "2"
          memory: 12Gi
        scopes:
        - NotTerminating
  - key: objects
    action: append
    value:
      apiVersion: v1
      kind: ResourceQuota
      metadata:
        annotations:
          openshift.io/quota-tier: Medium
        labels:
          quota-tier: Medium
        name: burst-quota
      spec:
        hard:
          cpu: "4"
          memory: 16Gi
  - key: objects
    action: append
    value:
      apiVersion: v1
      kind: LimitRange
      metadata:
        annotations:
          openshift.io/quota-tier: Medium
        labels:
          quota-tier: Medium
        name: limits
      spec:
        limits:
        - max:
            cpu: 200m
            memory: 2Gi
          min:
            cpu: 10m
            memory: 128Mi
          type: Pod
        - default:
            cpu: 50m
            memory: 256Mi
          max:
            cpu: 200m
            memory: 2Gi
          min:
            cpu: 20m
            memory: 256Mi
          type: Container
Once the openshift_project_request_template_edits variable has been defined, a few more variables must also be defined. First, openshift_project_request_template_name should be defined in order to specify the name of the template that should be created and then openshift_project_request_template_namespace specifies the namespace (or project) in which the template will be created. To create a template called project-request in the default namespace, the following variables can be specified:
openshift_project_request_template_namespace: default
openshift_project_request_template_name: project-request
Next, the OpenShift installation must be instructed to execute the logic in the openshift_project_request_template through the use of the openshift_project_request_template_manage boolean variable which should be set to True as shown below:
openshift_project_request_template_manage: True
The final step is to define the name along with the namespace in the format namespace/name that will be added to the projectRequestTemplate field of the master-config.yaml file. This is defined by the osm_project_request_template as shown below:
osm_project_request_template: default/project-request
After the four (4) variables have been added, execute the installer against a new or existing OpenShift cluster.
Once the installer has completed, verify the expected results by logging in to the OpenShift environment and creating a new project. Create a new project called test-project-template.
oc new-project test-project-template
Verify the ResourceQuotas are present:
$ oc get resourcequotas

NAME          AGE
burst-quota   1m
quota         1m
Now verify the LimitRange was created:
$ oc get limitrange

NAME      AGE
limits    1m
With just a few Ansible variables, the OpenShift installer streamlined the steps necessary to configure the default project template for an OpenShift cluster.
Posted: October 22nd, 2017 | Author: sabre1041 | Filed under: Technology | No Comments »
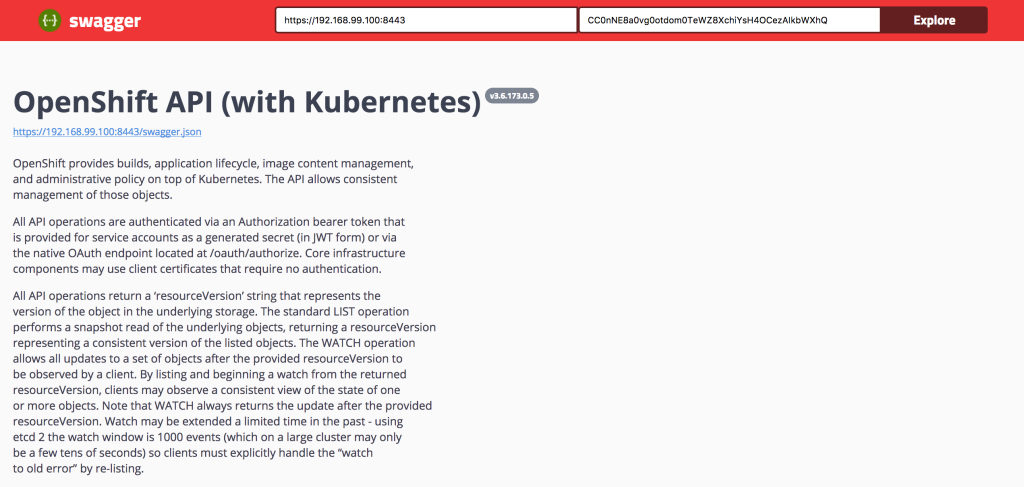
As microservices architectures continue to proliferate, there becomes an ever-increasing need for insight into the options that may be provided by each service. This is important as the primary mechanism between each service is through lightweight request protocols that are typically exposed through an Application Programming Interface (API). Several tools have been developed to address concerns within this space and Swagger, an ecosystem of API development and testing tools, is one of the most popular options available.
Prior to the release of OpenShift version 3 in the summer of 2015, I designed a version of the Swagger User Interface (UI) frontend based on a concept from OpenShift lead engineer Clayton Coleman which enabled users to easily visualize and interact the OpenShift REST API (A blog entry can be found here). At that time, only two endpoints were exposed:
Fast forward two years and Kubernetes, OpenShift and Swagger have come a long way. In the fall of 2015, it was announced that an open governance model would be created around the Swagger specification, which would solidify Swagger as the standard for describing REST API’s. Version 2.0 of Swagger represented the first release under the new model. The initial implementation of Swagger within Kubernetes and OpenShift made use of the older 1.2 version of the Swagger specification. Fortunately, a few months later, a 2.0 compatible specification was released to support the standardized model for describing the API.
Today, the OpenShift Swagger UI site has been updated that takes advantage of both the OpenShift provided Swagger 2.0 compatible specification along with the recently released Swagger 3.0 UI. No longer is the UI restricted to just the /api and /oapi endpoints, but all of the API’s exposed, including the new API groups, are available.
The repository can be found below:
https://github.com/sabre1041/openshift-api-swagger
The repository contains a simple HTML along with a few assets. It can be run as is from a local machine or deployed to a web server. Similar to the prior version, OpenShift must be configured to allow cross site JavaScript requests (CORS). Once OpenShift has been properly configured, all that is needed by the end user is the address of the OpenShift master and an OAuth token of a user already authenticated to OpenShift for methods requiring authentication.
Enjoy!
Posted: May 7th, 2017 | Author: sabre1041 | Filed under: Technology | No Comments »
Red Hat Summit for the year 2017 has come and gone and once again, I am reminded why it is easily one of my most anticipated weeks of the calendar year. My job at Red Hat allows me to collaborate with many different groups within the organization, but considering the distributed nature of Red Hat, Red Hat Summit offers the opportunity to reconnect with colleagues face to face.
More importantly, Red Hat Summit provides a medium to share my knowledge and experience working with open source technologies to the masses. This year, I was fortunate to facilitate two hands on labs, one of Red Hat Summit’s unique offerings. Hands on labs afford attendees the option of using several different types of technologies first hand from the experts who work on them on a daily basis. In addition to the labs, I also facilitated a session at the Red Hat Consulting discovery zone smack dab in the center of the action in the partner pavilion. The rest of this post provides an overview of my sessions at Red Hat Summit 2017 along with the associated assets.
Building Containerized IoT Solutions on OpenShift
Technology continues to surround as each day goes by. Many of the devices around our home, work and school are connected to the Internet and thus know as the Internet of Things (IoT), On the first day of Red Hat Summit, I was fortunate to work with the brilliant Ishu Verma, Red Hat’s IoT technical evangelist, to produce a hands on lab that allowed attendees to containerize an IoT solution and deploy the solution on the OpenShift Container Platform.
The contents of the lab along with the standalone version of the project are both found on GitHub. Full instructions on how to replicate the solution are available.
Container Driven Continuous Delivery
On day two of Red Hat Summit, I took a break from the lab room and jumped in feet first and presented a session on Container Driven Continuous Delivery with Red Hat Architect Raffaele Spazzoli at the Red Hat Consulting discovery zone booth. One of the questions that we continue to hear from our customers is the methodology that should be used to implement Continuous Integration and Continuous Delivery when working with OpenShift. The session highlighted several different strategies and toolsets that we have found to be effective to enable developers and organizations to be productive.
Managing OpenShift From Installation and Beyond
On the final day of Red Hat Summit, the action once again returned to lab room for one of the most advantageous projects that I have been apart of. My focus these days primarily centers around the OpenShift Container Platform and how customers both across the United States and around the world are deploying and using it. A common theme that I hear at many of these customers is how to properly manage the platform. The key is to use the right tools and to have the proper automation that can help streamline the process. Those themes were an integral part of this lab as attendees were immersed in many of the tools that can help solve their automation and management challenges. Ansible Tower acted as the management layer for the installation and ongoing maintenance of the OpenShift Container Platform. Attendees used Ansible Tower to install OpenShift on top of Red Hat OpenStack. Once the platform was installed, a containerized version of Red Hat CloudForms was deployed on top of OpenShift and integrated with both Red Hat OpenStack and Red Hat OpenShift Container Platform to provide a single pane of glass over the entire infrastructure. Since OpenShift is also a developer platform, it only made sense that attendees were able to take their operator hats off and act as a developer and deploy a sample application. As they deployed the application, metrics on the underlying health of the platform and the newly deployed applications could be viewed in CloudForms. Finally, coming full circle, attendees once again returned to Ansible Tower to kick off a job that dynamically scaled the number of OpenShift nodes. Putting this all together was no easy task. I was fortunate enough to work with several Red Hat rockstars: Scott Collier, Jason DeTiberus and Vinny Valdez. It was two action packed hours that introduced many technology and products that attendees had yet to get their hands on previously.
Both the automation tooling and the guide that was utilized by attendees can be found in the GitHub repository.
All and all, it was an immensely successful Red Hat Summit. This year was my first attempt at a lab session (2 in fact) and it ushered in new experiences of Summit that I will never forget. I am already looking forward to Red Hat Summit 2018 which once again returns to San Francisco May 8-10. I hope to see you there too!
Posted: April 1st, 2017 | Author: sabre1041 | Filed under: Technology | No Comments »
Note: This article describes the functionality found in the Red Hat Container Development Kit 3.0 Beta. Features and functionality may change in future versions.

The Red Hat Container Development Kit (CDK) provides an all-in-one environment to not only build and test Docker containers, but to make use of them on Red Hat OpenShift Container Platform; all from a single developer’s machine. Since its inception, the CDK used Vagrant as the provisioning platform. Starting with version 3.0, the CDK now makes use of Minishift for the underlying provisioner. The transition to Minishift based CDK 3.0 reduces the number of dependencies that need to be installed and configured. Only a hypervisor such as VirtualBox or KVM is now required.
One of the best parts of the CDK is that is provides a fully functional environment that a developer can immediately make use of. However, the transition to CDK 3.0 did omit one of the key features found in prior versions: preconfigured persistent storage. In CDK 2.0, three (3) Persistent Volumes for use by OpenShift were preconfigured to provide applications with long term storage. A Network File System (NFS) server was configured on the host machine to provide such functionality. The Minishift host does not have an NFS server configured. However, one of the alternative storage types provided by OpenShift can be used instead: HostPath. The HostPath volume plugin makes use of storage on the underlying container host without needing to install any additional software.
To configure the CDK for HostPath storage, multiple directories representing the PersistentVolumes should be created to support applications requiring persistent storage. Since Minishift boots into a tempfs, the majority of the directories will not persist across machine restarts. Only files placed in the following directories will be retained:
- /var/lib/docker
- /var/lib/minishift
Three new Persistent Volumes should be created in the /var/lib/minishift/pv directory represented by folders pv01 pv02 and pv03.
With the CDK already started, execute the following command to access a shell in the Minishift machine:
minishift ssh
By default, when accessing the Minishift machine using the SSH command, you are logged in as a user called docker. Since this directory is privileged and protected and owned by the root user, sudo up.
sudo su -
Create the three directories for the PersistentVolumes
mkdir -p /var/lib/minishift/pv/pv0{1..3}
To simplify the management of permissions in a development environment such as the CDK, relax the directory and permission ownership:
chmod -R 777 /var/lib/minishift/pv/pv*
chmod -R a+w /var/lib/minishift/pv/pv*
One of the key benefits of the CDK is that it is built on top of a Red Hat Enterprise Linux (RHEL) base. One of the security features inherent with RHEL is SELinux which provides added protections for not only the host, but any container that uses it as a base. By default, containers are restricted from writing directly to the underlying host file system. To allow a container to write to the directories created for the Persistent Volumes, the SELinux label svirt_sandbox_file_t must be set.
Execute the following command to relabel the directories:
chcon -R -t svirt_sandbox_file_t /var/lib/minishift/pv/*
restorecon -R /var/lib/minishift/pv/
With the directories properly configured, Persistent Volumes making use of the HostPath storage plugin can be created. Make sure you are logged into the OpenShift environment using the OpenShift Command Line tool as the cluster administrator:
oc login -u system:admin
Now create the new Persistent Volumes:
for i in $(seq 1 3); do

oc create -f - <<PV
apiVersion: v1
kind: PersistentVolume
metadata:
  name: pv0$i
spec:
  accessModes:
  - ReadWriteOnce
  - ReadWriteMany
  - ReadOnlyMany
  capacity:
    storage: 2Gi
  hostPath:
    path: /var/lib/minishift/pv/pv0$i
  persistentVolumeReclaimPolicy: Recycle
PV

done
The newly created Persistent Volumes can now be verified:
oc get pv

NAME      CAPACITY   ACCESSMODES   RECLAIMPOLICY   STATUS      CLAIM                                REASON    AGE
pv01      2Gi        RWO,ROX,RWX   Recycle         Available                                                  1m
pv02      2Gi        RWO,ROX,RWX   Recycle         Available                                                  1m
pv03      2Gi        RWO,ROX,RWX   Recycle         Available                                                  1m
The use of persistent storage, especially during the development phase, provides additional capabilities when creating containerized applications.
Posted: December 28th, 2016 | Author: sabre1041 | Filed under: Technology | No Comments »
The release of Jenkins 2.0 officially adopted first class support for the concept of pipelines as code as a way to describe the steps an application will take as part of a continuous integration and continuous deployment process. While the entire pipelines as code concept slowly evolved out of the existing Jenkins ecosystem, it ushered in a new method for how developers interact with both the Jenkins server as well as the organization of their source code. Instead of multiple Jenkins jobs chained together to form a “pipeline”, the Jenkinsfile was introduced where each step in the process could be defined in a single unit that could be included inline as part of the Pipeline job in the Jenkins server, or within the source code of a project. It is recommended to store a Jenkinsfile with source code in a source code management system (SCM), such as git, in order to achieve full traceability and history of the pipeline
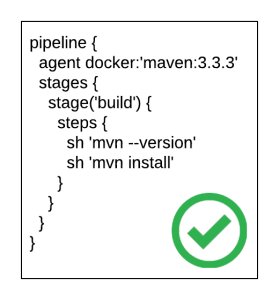
Even though pipelines provides a powerful and extensive framework, one of the challenges faced by those developing Jenkinsfiles are the specific syntaxes that can be applied. This can be partially attributed to a prior familiarity with a GUI based configuration approach, or lack of extensive formal documentation and tooling. To address these shortcomings, a new plugin called the Pipeline-Model-Definition plugin was developed which focused on a declarative methodology for describing Jenkinsfiles. The result is a syntax that is both easier to develop and understand as it models the pattern of the traditional freestyle job type.
pipeline {
  agent docker:'maven:3.3.3'
  stages {
    stage('build') {
      steps {
        sh 'mvn --version'
        sh 'mvn install'
      }
    }
  }
}
A more in depth look at the pipeline-model-definition plugin and declarative syntax can be found in the article, Announcing the beta of Declarative Pipeline Syntax.
One of the features also included in the Pipeline-Model-Definition plugin is the ability to validate the contents and syntax of a Jenkinsfile. Validation is performed by an exposing functionality to remotely verify the provided Jenkinsfile’s conforms with the configuration of the target Jenkins server. This was a much-needed enhancement that had been missing in the entire pipelines ecosystem. Since the content of a Jenkinsfile is groovy based, a developer could perform some form of initial validation on their local machine. The true test to whether a Jenkinsfile was syntactically correct could only occur once it was executed on the Jenkins server resulting in additional testing and development cycles if any issues arose.
Before a Jenkinsfile can be validated, the Pipeline-Model-Definition plugin must be installed on the Jenkins server. Login to the Jenkins server and select Manage Jenkins. Select Manage Plugins and on the Available tab to view the available plugins. Locate the Pipeline: Model Definition plugin and select Download now and install after restart.
With the plugin installed, a developer could make use of one of two methods to verify their Jenkinsfile from their machine:
SSH:
curl -X POST ` -F "jenkinsfile=<Jenkinsfile" JENKINS_URL/pipeline-model-converter/validate
HTTP:
curl -X POST ` -F "jenkinsfile=<Jenkinsfile" JENKINS_URL/pipeline-model-converter/validate
An additional step to the invocation would need to occur if Cross Site Request Forgery (CSRF) protection was enabled resulting in the following command:
curl -X POST -H `curl 'JENKINS_URL/crumbIssuer/api/xml?xpath=concat(//crumbRequestField,":",//crumb)'` -F "jenkinsfile=<Jenkinsfile" JENKINS_URL/pipeline-model-converter/validate
Each of the prior commands assumes a file called Jenkinsfile is present in the current directory.
While these options for validating a Jenkinsfile are certainly useful, they do fall outside of the actions a typical developer would take to build and test their application code. Instead, another approach would be to directly integrate the validation into an existing build process. For Java based applications, a Maven plugin called the jenkinsfile-maven-plugin has been developed to streamline the validation process.
The jenkinsfile-maven-plugin can be added to a project’s pom.xml file by including the following content:
<plugin>
	<groupId>com.andyserver.maven.plugins</groupId>
	<artifactId>jenkinsfile-maven-plugin</artifactId>
	<version>${jenkinsfile.maven.plugin.version}</version>
</plugin>
Since the validation process occurs on the Jenkins server, the plugin must be configured with the location of the server and any applicable authentication details as shown below:
<plugin>
	<groupId>com.andyserver.maven.plugins</groupId>
	<artifactId>jenkinsfile-maven-plugin</artifactId>
	<version>${jenkinsfile.maven.plugin.version} </version>
	<configuration>
		<server>https://jenkins.example.com:8080/jenkins</server>
		<username>admin</username>
		<password>password</password>
	</configuration>
</plugin>
Once the plugin has been properly configured, the validation of the Jenkinsfile within a project can be executed by running the following command:
mvn jenkinsfile:validate
Any errors in the validation process will cause the build to fail and the specific exception to be printed out.
A full list of available options can be found within the project repository.
Being able to validate the content of a Jenkinsfile during the development process helps ensure compliance with both the structure of the Jenkinsfile and the available tools on the Jenkins server. Each of these benefits helps shorten the overall software development lifecycle and release software faster.
Recent Comments