Integrated Windows Authentication (SPNEGO) for Web Applications on JBoss EAP 6.1
Posted: July 7th, 2013 | Author: sabre1041 | Filed under: Technology | Tags: JBoss, PicketLink, SPNEGO | 16 Comments »One of the benefits of web applications living in a windows domain is their ability to utilize single sign on and integrated authentication as an authentication mechanism. This functionality is natively supported on Microsoft’s own Internet Information Services (IIS) web server, but can be also employed on non Windows based web servers and applications. In both cases, each leverages an implementation of a negotiation of credentials between the web browser and a server implementing the Kerberos protocol (Active Directory in a Windows environment) called SPNEGO (Simple and Protected GSS-API Negotiation Mechanism). The SPNEGO protocol is used when a client wishes to authenticate to a server, but each are unaware of the security mechanisms that each supports. The client will propose both a preferred authentication mechanism and a set of supported mechanisms. The server will either accept the proposed mechanism, choose from one of the supported mechanisms or reject the authentication request altogether. If both the client (web browser) and the server support the Kerberos authentication mechanism, it will be chosen. Otherwise NTLM can be used as a fallback, though it is less secure and often not a supported mechanism. SPNEGO is supported on a range of Java frameworks and containers such as Spring, Tomcat and JBoss. Its functionality is enabled in JBoss through a component of the PicketLink framework called JBoss Negotiation. Initially as a standalone product, the JBoss Negotiation toolkit provides a Tomcat authenticator and a JAAS login module which enable applications to leverage single sign on. While EJB’s can participate in single sign on, web applications account for the majority of its use case. For a web application to leverage SPNEGO on JBoss, configurations must be made within the web application, the JBoss server, and in Active Directory. Sections of these steps are documented in various locations including the JBoss Negotiation User Guide (Written for EAP 5) and the JBoss EAP 6.1 Security Guide to name a few; however a complete end to end reference is hard to find. This article will discuss the steps involved in configuring a web application to utilize integrated Windows authentication (SPNEGO) on JBoss EAP 6.1.
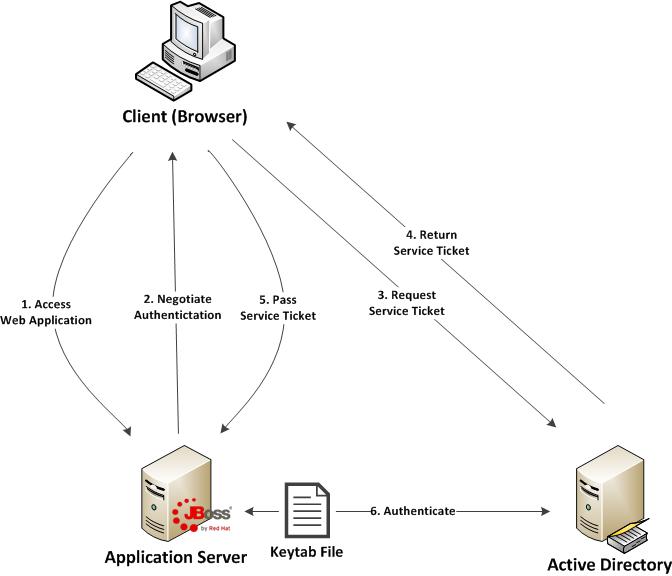
Before diving in to the specific configurations, let’s discuss the process of how a web application in general is able to obtain the user name of the currently logged in user through integrated authentication. First, a user utilizes a browser to navigate to the web application. The server will respond stating that it must negotiate authentication. If both the browser and server support SPNEGO, it will be used. This is determined by verifying the existence of a trust between the browser and server. Since the browser will be seamlessly passing authentication information about the user to the server, a trust must be configured within the web browser otherwise SPNEGO authentication will not be attempted. If this trust exists, the browser must then contact Active Directory, which is acting as a Kerberos Ticket Granting Service (TGS), and retrieve a Service Ticket (ST) which is used to prove the identity of the caller. This ticket is then sent to the web server. The web server, which is configured within Active Directory to be a Service Principal (SP), uses a keytab file to communicate with Active Directory to decode the ticket and return the desired user name. A diagram of this process is shown below.
Don’t worry if some of these concepts seem unclear. These will be revealed over the course of the discussion. At a high level, the following are the steps required to configure a web application with integrated authentication on EAP 6.1:
- Generate and create a keytab file which will store a Service Principal used by the JBoss Server to authenticate against Active Directory
- Configure the JBoss server
- Configure the web application
- Configure the client web browser
Recent Comments